---
title: Save custom views for filtered work items
description: Create, save, and share Views in Plane to quickly access filtered work items.
---
# Views
A View in Plane is a saved configuration of filters, layouts, display options, and sorting preferences applied to your work items. Views do not change the underlying data — they are lenses that let you see the same work items through different perspectives without creating duplicates or moving anything.
Think of a view as a smart bookmark: you define what you care about (priority = urgent, assigned to me, due this week), how you want to see it (Kanban board, grouped by state), and which columns to show — and Plane remembers all of that for every session.
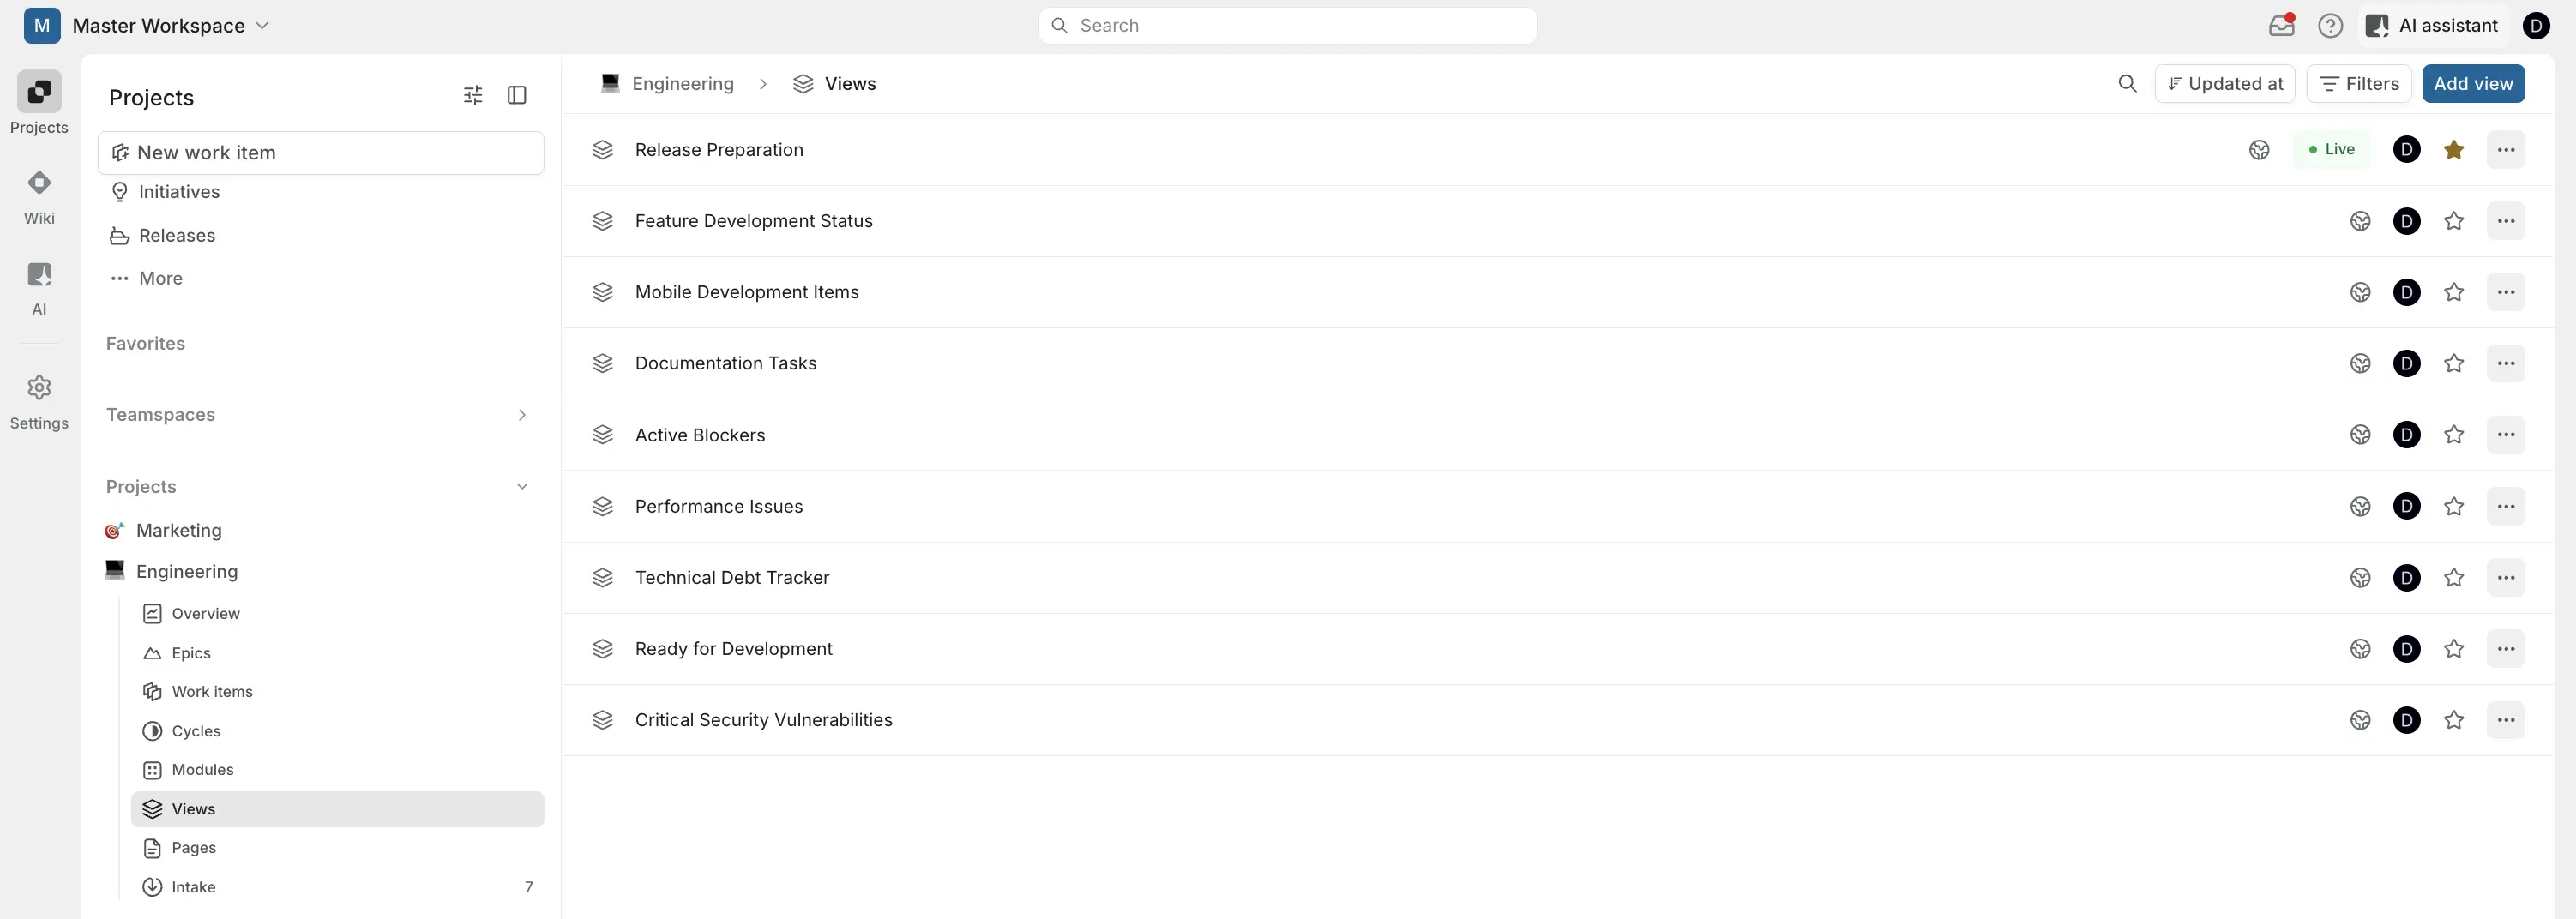
Views are especially useful when you need to:
- Focus a recurring standup on a specific slice of work (e.g., all blockers this sprint).
- Give stakeholders a curated window into progress without exposing the full backlog.
- Share a stable URL that always shows the latest issues matching defined criteria.
- Standardize how a team monitors a specific workflow (e.g., QA queue, release checklist).
## Types of Views
Plane offers two scopes of views, with fundamentally different coverage.
- **Project Views**
Project views are created within a specific project and accessible to all members of that project. This feature is enabled by default and can be toggled from [Project Settings](/core-concepts/projects/overview#configure-project-settings). Project views support all layouts.
- **Workspace Views**
Workspace views are created at the workspace level and available to all workspace members. These include some default system-defined views that cannot be removed. Workspace views are visualized using the spreadsheet layout.
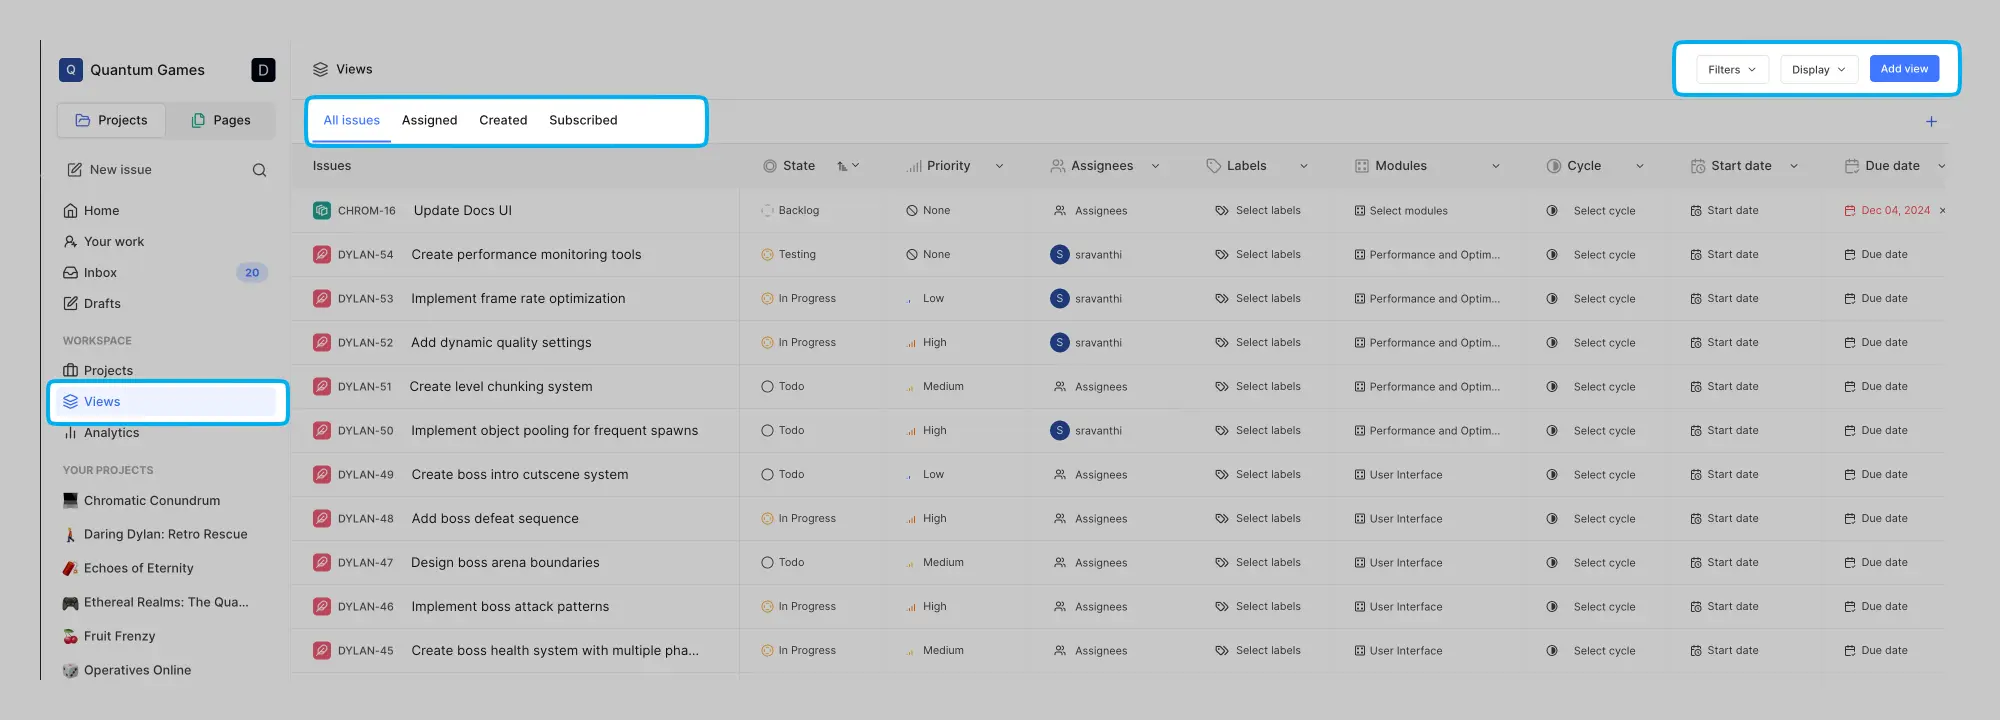
Workspace views include four built-in, non-deletable default views: **All Issues**, **Assigned to Me**, **Created by Me**, and **Subscribed**. These are always available and always reflect live data.
- **Teamspace Views**
Teamspace views provide a third scope: views tied to a teamspace rather than a single project or the full workspace. See more about [Teamspace Views](/core-concepts/workspaces/teamspaces#teamspace-views).
## Create view
### Create a project view
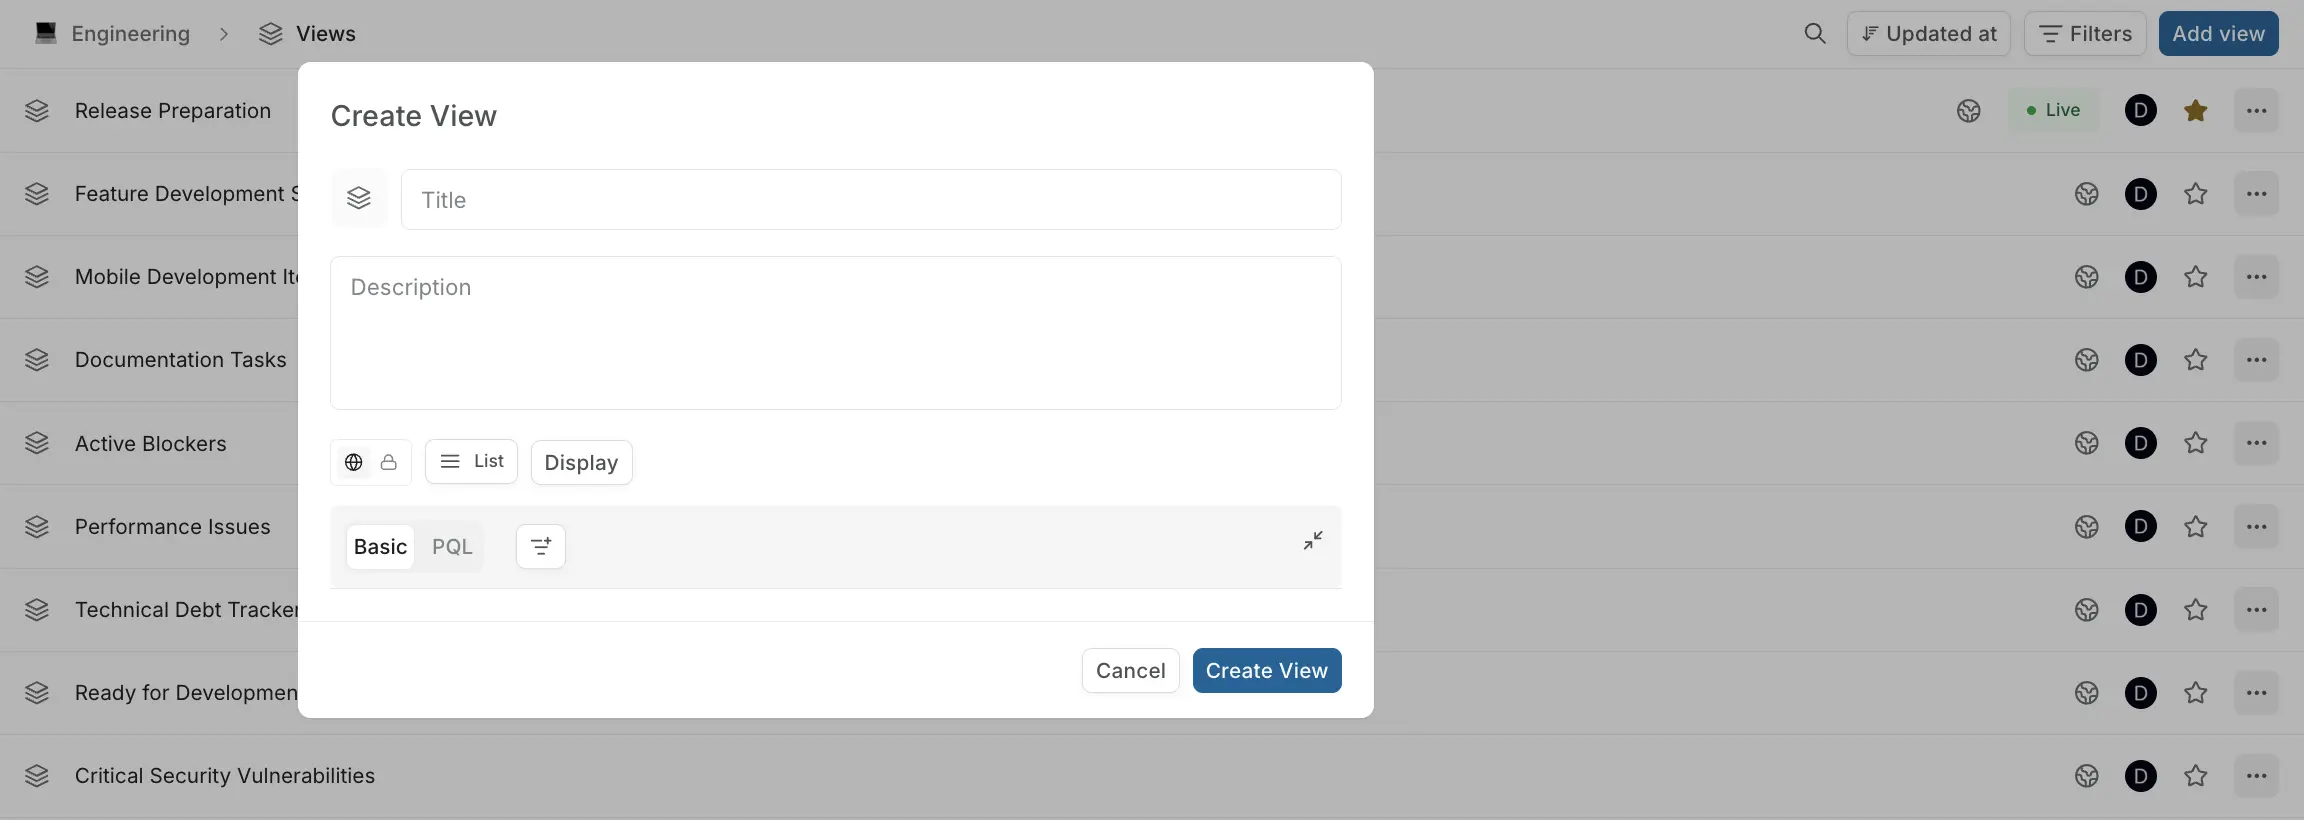
1. Open a project and go to **Views** in the left sidebar.
2. Click **Add view**.
3. Enter a **name** for the view.
4. Optionally add a **description** to explain the view's purpose.
5. Select the access level, layout and display options as per your requirements.
6. Set **Filters** to define which issues appear. Use the filter builder to select properties like Assignee, Priority, State, Label, or date ranges.
7. Click **Create View**.
Alternatively, spin off a View from within the project's Work items section after applying the layout, filters, display options and then clicking **Save View**.
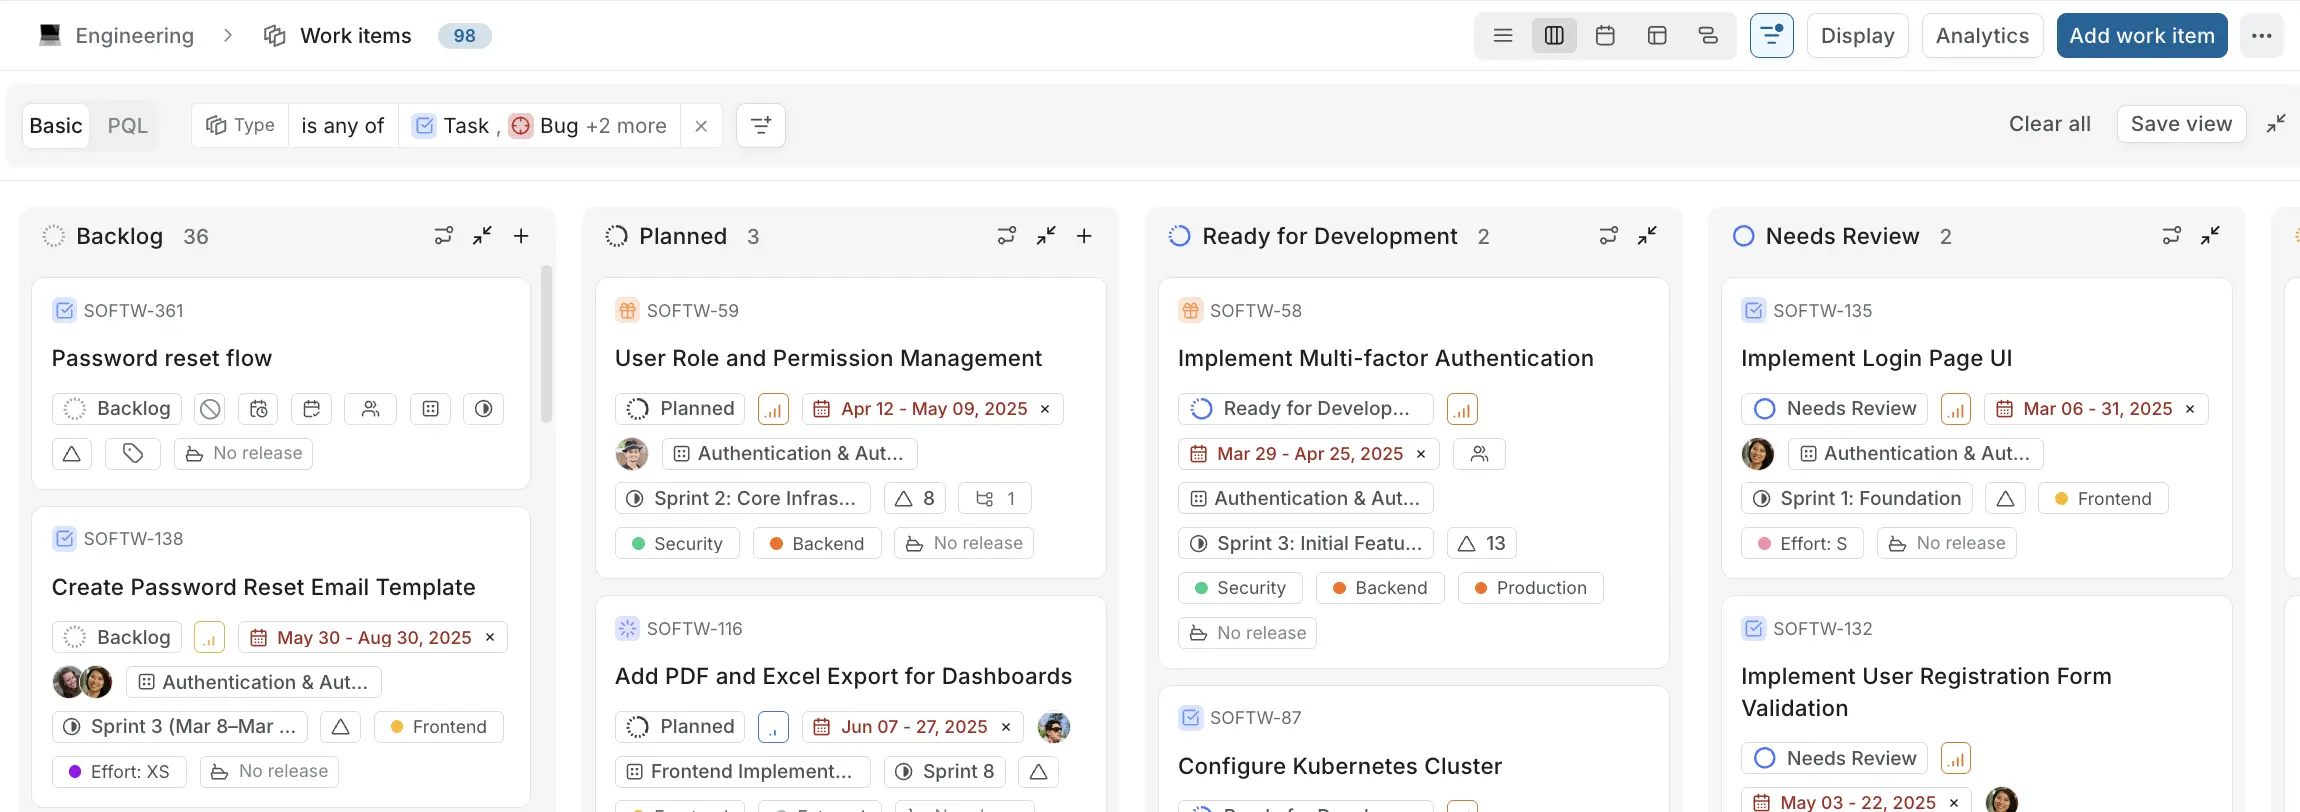
The view is created with your current filter selections and saved to the project's views list. Display filters and properties default to your workspace defaults and can be adjusted after creation from within the view.
### Create a workspace view
1. Click **Views** in the main sidebar (not inside a project — at the workspace level).
2. Click **Add View**.
3. Enter a **name** and optional **description**.
4. Set **filters** — these apply across all projects in the workspace.
5. Click **Create View**.
Workspace views appear alongside the four built-in views (All Issues, Assigned to Me, Created by Me, Subscribed).
Learn more about how to apply filters [here](/core-concepts/issues/visualise_filter). After creating a view, you can share the link to collaborate and investigate with other members.
## View access levels
Every view has an access level.
### Public view
By default, views are public. They are visible and usable by all members with access to the project.
### Private view
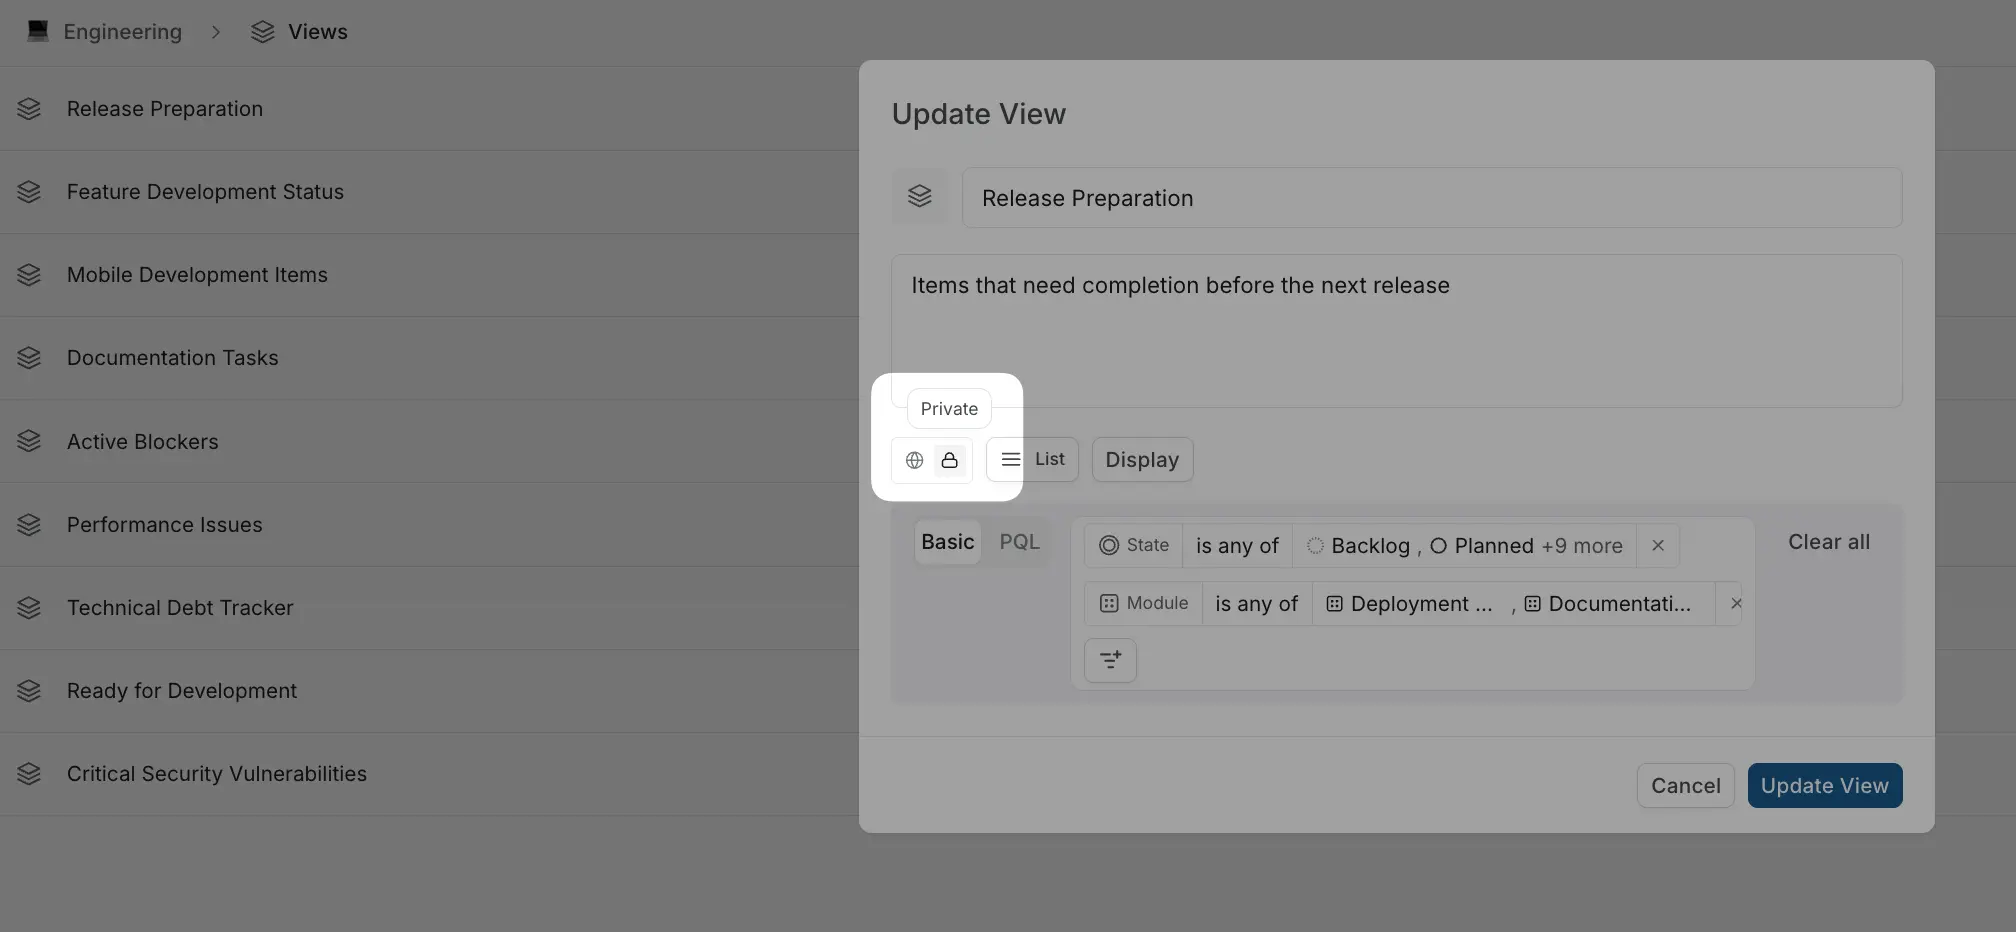
They are visible only to the creator; other members cannot see or open it. Only the owner of a private view can change its access level. Project admins cannot override private view access. Toggle between public and private using the globe and lock icons in the create or edit view modal.
## Edit a view
1. Open the view.
2. Select your preferred layout: **List**, **Board**, **Calendar**, **Table**, or **Gantt**.
3. Add, remove, or modify filter conditions and display options.
4. Click **Update View** that appears in the filter bar.
If you close the view without saving, your unsaved filter changes are discarded and the view reverts to its saved state on next open.
### Group work items in a view
1. Open the view.
2. Click **Display** in the top toolbar.
3. Under **Group by**, select a property: State, Priority, Label, Assignee, Cycle, Module, or others.
4. Optionally set **Sub-group by** for a second-level grouping (in the Board layout).
5. Toggle **Show empty groups** if you want to see group headers even when there are no matching issues.
6. Save the view.
## Lock view
A view can be **locked** by its creator to prevent any edits — including filter changes, display changes, and renames. Locked views can still be read by all permitted members; only the creator can unlock them.
1. Open the view and click the **Lock** button on the top.
2. Alternatively, go to the Views list. Open the **...** menu → **Lock View**.
A lock icon appears next to the view name. Members who try to edit the view will see a read-only message. To unlock, open the same menu and select **Unlock View** — only the creator can do this.
Locking is useful when a view represents an agreed-upon team standard and you want to prevent accidental changes.
## Publish View
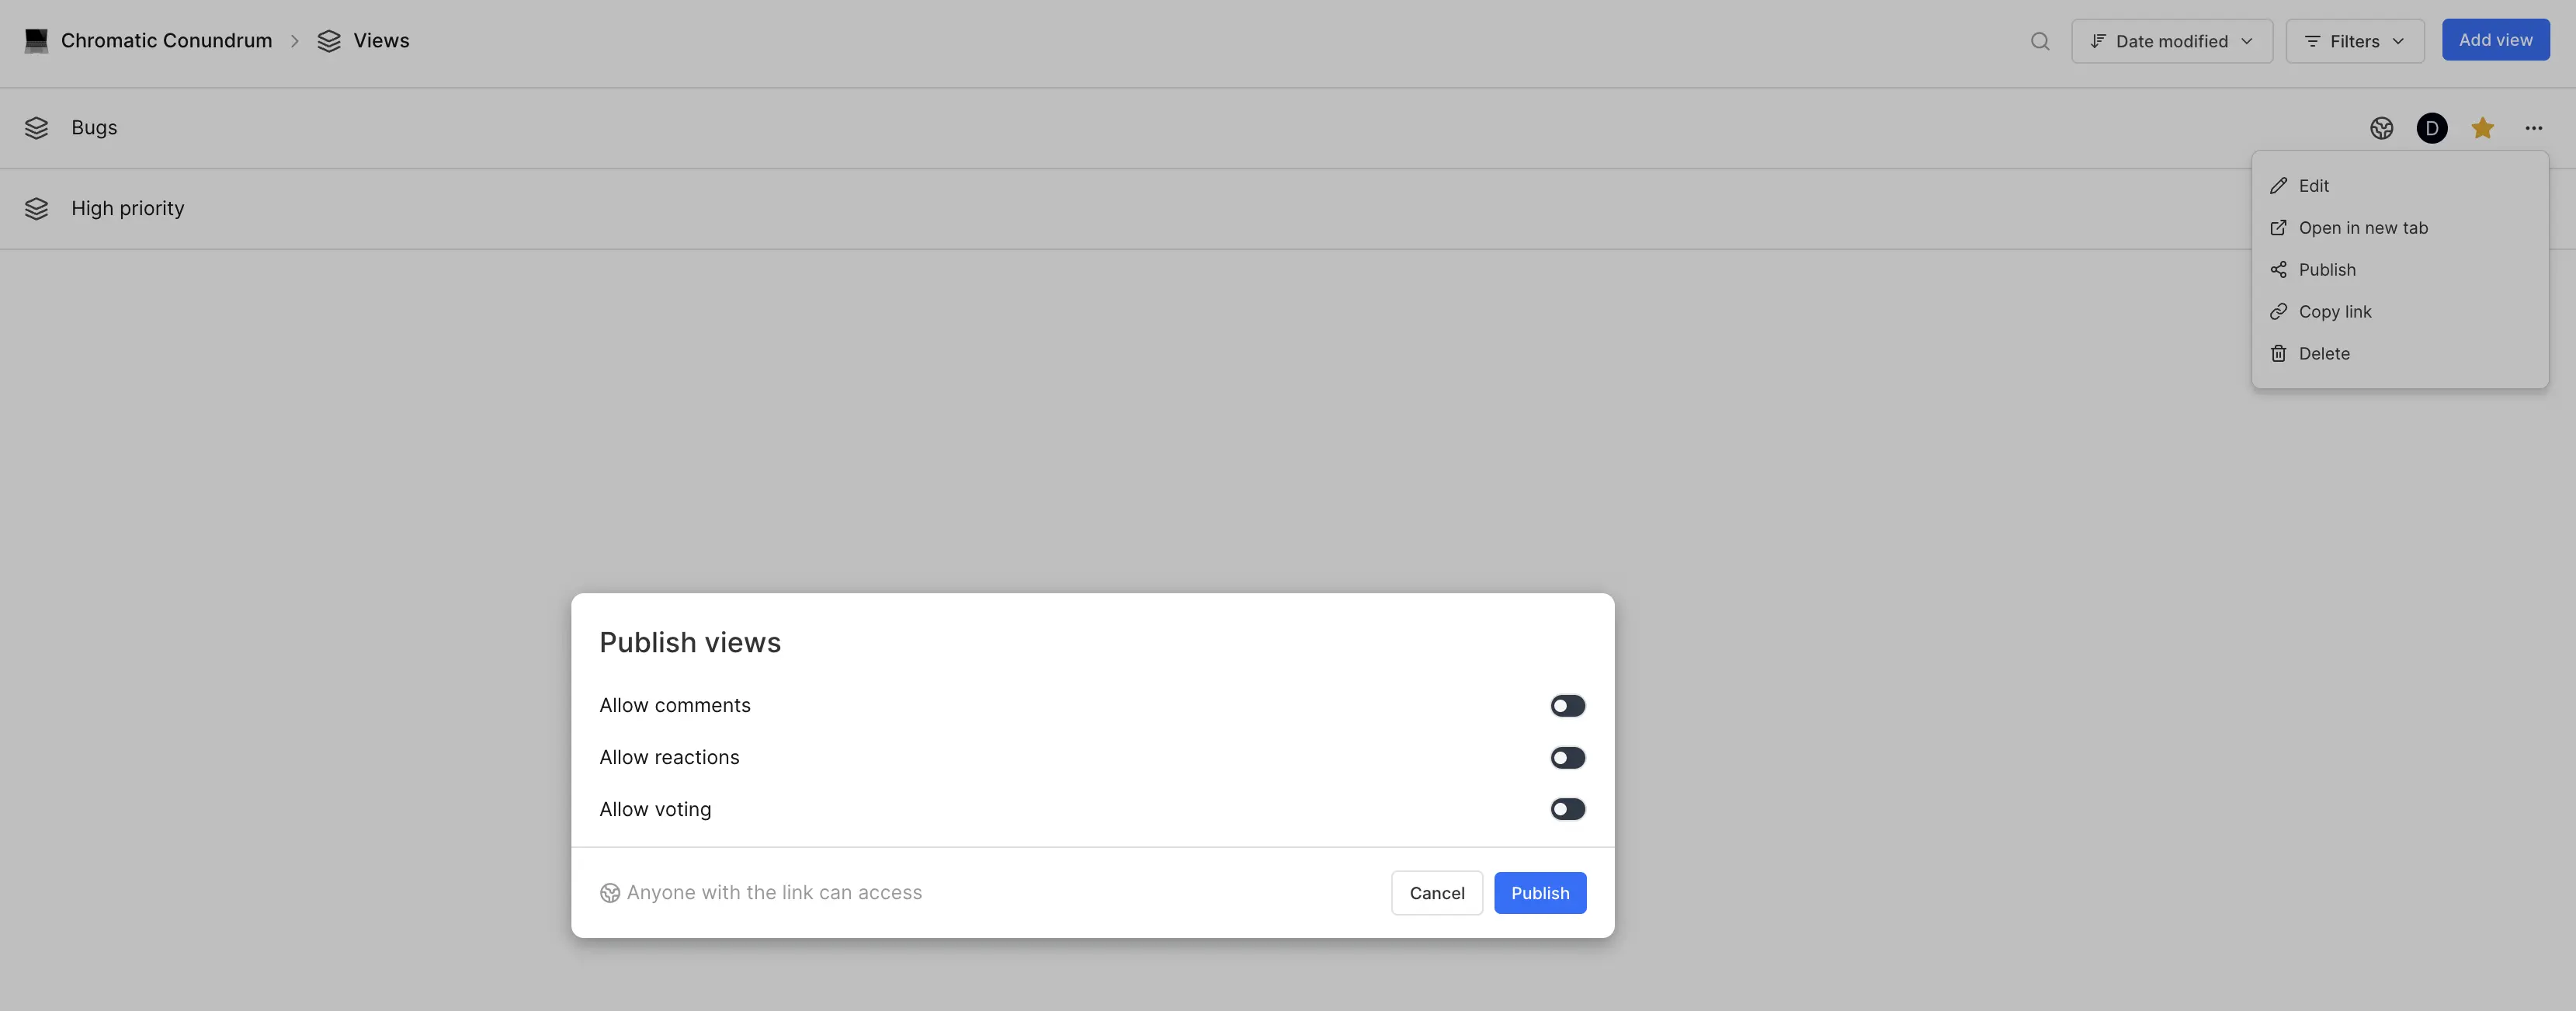
Project views can be **published** to generate a public shareable link. Publishing is managed from within the Share panel.
1. Open the project view.
2. Click the **Share** button in the header.
3. In the share panel, find the **Publish** section.
4. Toggle on **Publish** to generate the public link.
5. Configure public access options:
- Enable or disable **Comments**, **Reactions**, and **Votes** for public visitors.
- Choose which **layouts** (List, Board, etc.) are available to public viewers.
6. Copy the generated link and share it.
A published view:
- Is accessible to anyone with the link - no Plane account required.
- Shows issues filtered by the view's saved configuration.
- Can optionally allow reactions, comments, or votes from public visitors.
- Can restrict which layouts (List, Board, etc.) are exposed to public viewers.
You can update publish settings or unpublish at any time without changing the original view. To unpublish, return to the share panel and toggle **Publish** off. The link immediately stops working.
## Share a view
Share views with specific team members to give them access to your filtered work without exposing the full project backlog. Sharing is granular - each person gets a specific access level.
### Access levels for shared views
When sharing a view, choose one access level per person:
- **View** - Read-only access. They can see the filtered work items but cannot edit, change filters, or modify the layout.
- **Edit** - Full collaboration. They can view, modify filters, change layouts, and manage the view configuration.
### Share a view
1. Open the view you want to share.
2. Click the **Share** button in the header.
3. Click **Add member** and search for team members by name.
4. For each member, select their access level (View or Edit).
5. Click **Share** or **Done**.
Members are notified when first shared with. They can now access the view from their views list.
### Manage shared access
To change someone's access level:
1. Open the share panel.
2. Click the access level dropdown next to their name and select a new level.
To remove someone:
1. Find them in the share list.
2. Click the **X** or delete icon next to their name.
They immediately lose access.
### Who can share
- **View owner** - Can share their views with anyone in the workspace.
- **Members with edit access** - Can share the view they were given edit access to.
- **View-only members** - Cannot share the view further.
### Sharing vs publishing
There are two ways to make a view accessible beyond your immediate team:
- **Sharing** - Grant specific people access with granular control. Recipients must be workspace members.
- **Publishing** - Generate a public link anyone can access without signing in.
Use sharing for team collaboration. Use publishing for broader distribution.
### Limitations
- Share updates replace the entire roster (you cannot add or remove one person without re-specifying everyone).
- Sharing a view does not share the work items - shared viewers see only data they have access to based on their workspace role.
- If a project member is removed from the project, all shares are automatically revoked.
## Export view
When you export a view, Plane captures the view's filters, processes it and notifies you when it is ready to download.
1. Go to the views list or open a view.
2. Open the **...** menu → **Export**.
3. Select a format: **CSV**, **XLSX**, or **JSON**.
4. Click **Continue**.
5. A toast notification confirms the export has started. Click **View Exports** in the toast, or go to **Workspace Settings → Exports**, to monitor the job and download the file when it is ready.
6. Once the status shows as complete, click **Download** to save the file.
The exported data reflects the work items that match the view's filters at the moment you trigger the export. Specifically, Plane uses the **currently active filters in your session** — so if you have modified the filters since last saving the view, the export will include those unsaved changes. This means the file you download matches exactly what you see on screen when you click Export.
For **project views**, the export is scoped to the single project the view belongs to. For **workspace views**, the export spans all projects in the workspace, consistent with how workspace views work in general.
Export is available on projects views and workspace views.
### Export formats
| Format | Description |
| ------ | ------------------------------------------------------------------------------------------------ |
| CSV | Comma-separated values. Opens in any spreadsheet tool. Best for importing into other systems. |
| XLSX | Excel workbook format. Opens directly in Excel or Google Sheets with formatting preserved. |
| JSON | Structured data format. Intended for programmatic use or importing into other tools via scripts. |
Learn more about [custom exports](/core-concepts/export#custom-exports).
## Add view to favorites
From the views list:
- Hover over the view and click the **star** icon.
From inside the view:
- Click the **star** icon in the view header.
Favorited views appear in the **Favorites** section of the sidebar for quick access.
## Duplicate view
1. Go to the views list (project or workspace level).
2. Right-click or open the **...** menu on the view you want to duplicate.
3. Click **Duplicate** (or **Make a copy**).
The duplicate is created with the same filters, display filters, and display properties, with "Copy of" prepended to the name. You can rename and modify it independently.
## Delete a view
You can remove views by deleting them from the list of views in your workspace or project. Deleting a view has no impact on the associated work items.
1. Go to the views list.
2. Open the **...** menu on the view → **Delete**.
3. Confirm deletion.
Deletion is permanent. Issues are not affected — only the saved view configuration is removed. The built-in workspace views (All Issues, Assigned to Me, Created by Me, Subscribed) cannot be deleted.