

Initiatives Pro
An initiative groups projects and work items around a shared goal. Use it to track progress across projects while teams continue to manage their work in each project.
Initiatives are a workspace feature. They live in the workspace sidebar, not inside a project, and one initiative can span any number of projects.
Turn on initiatives
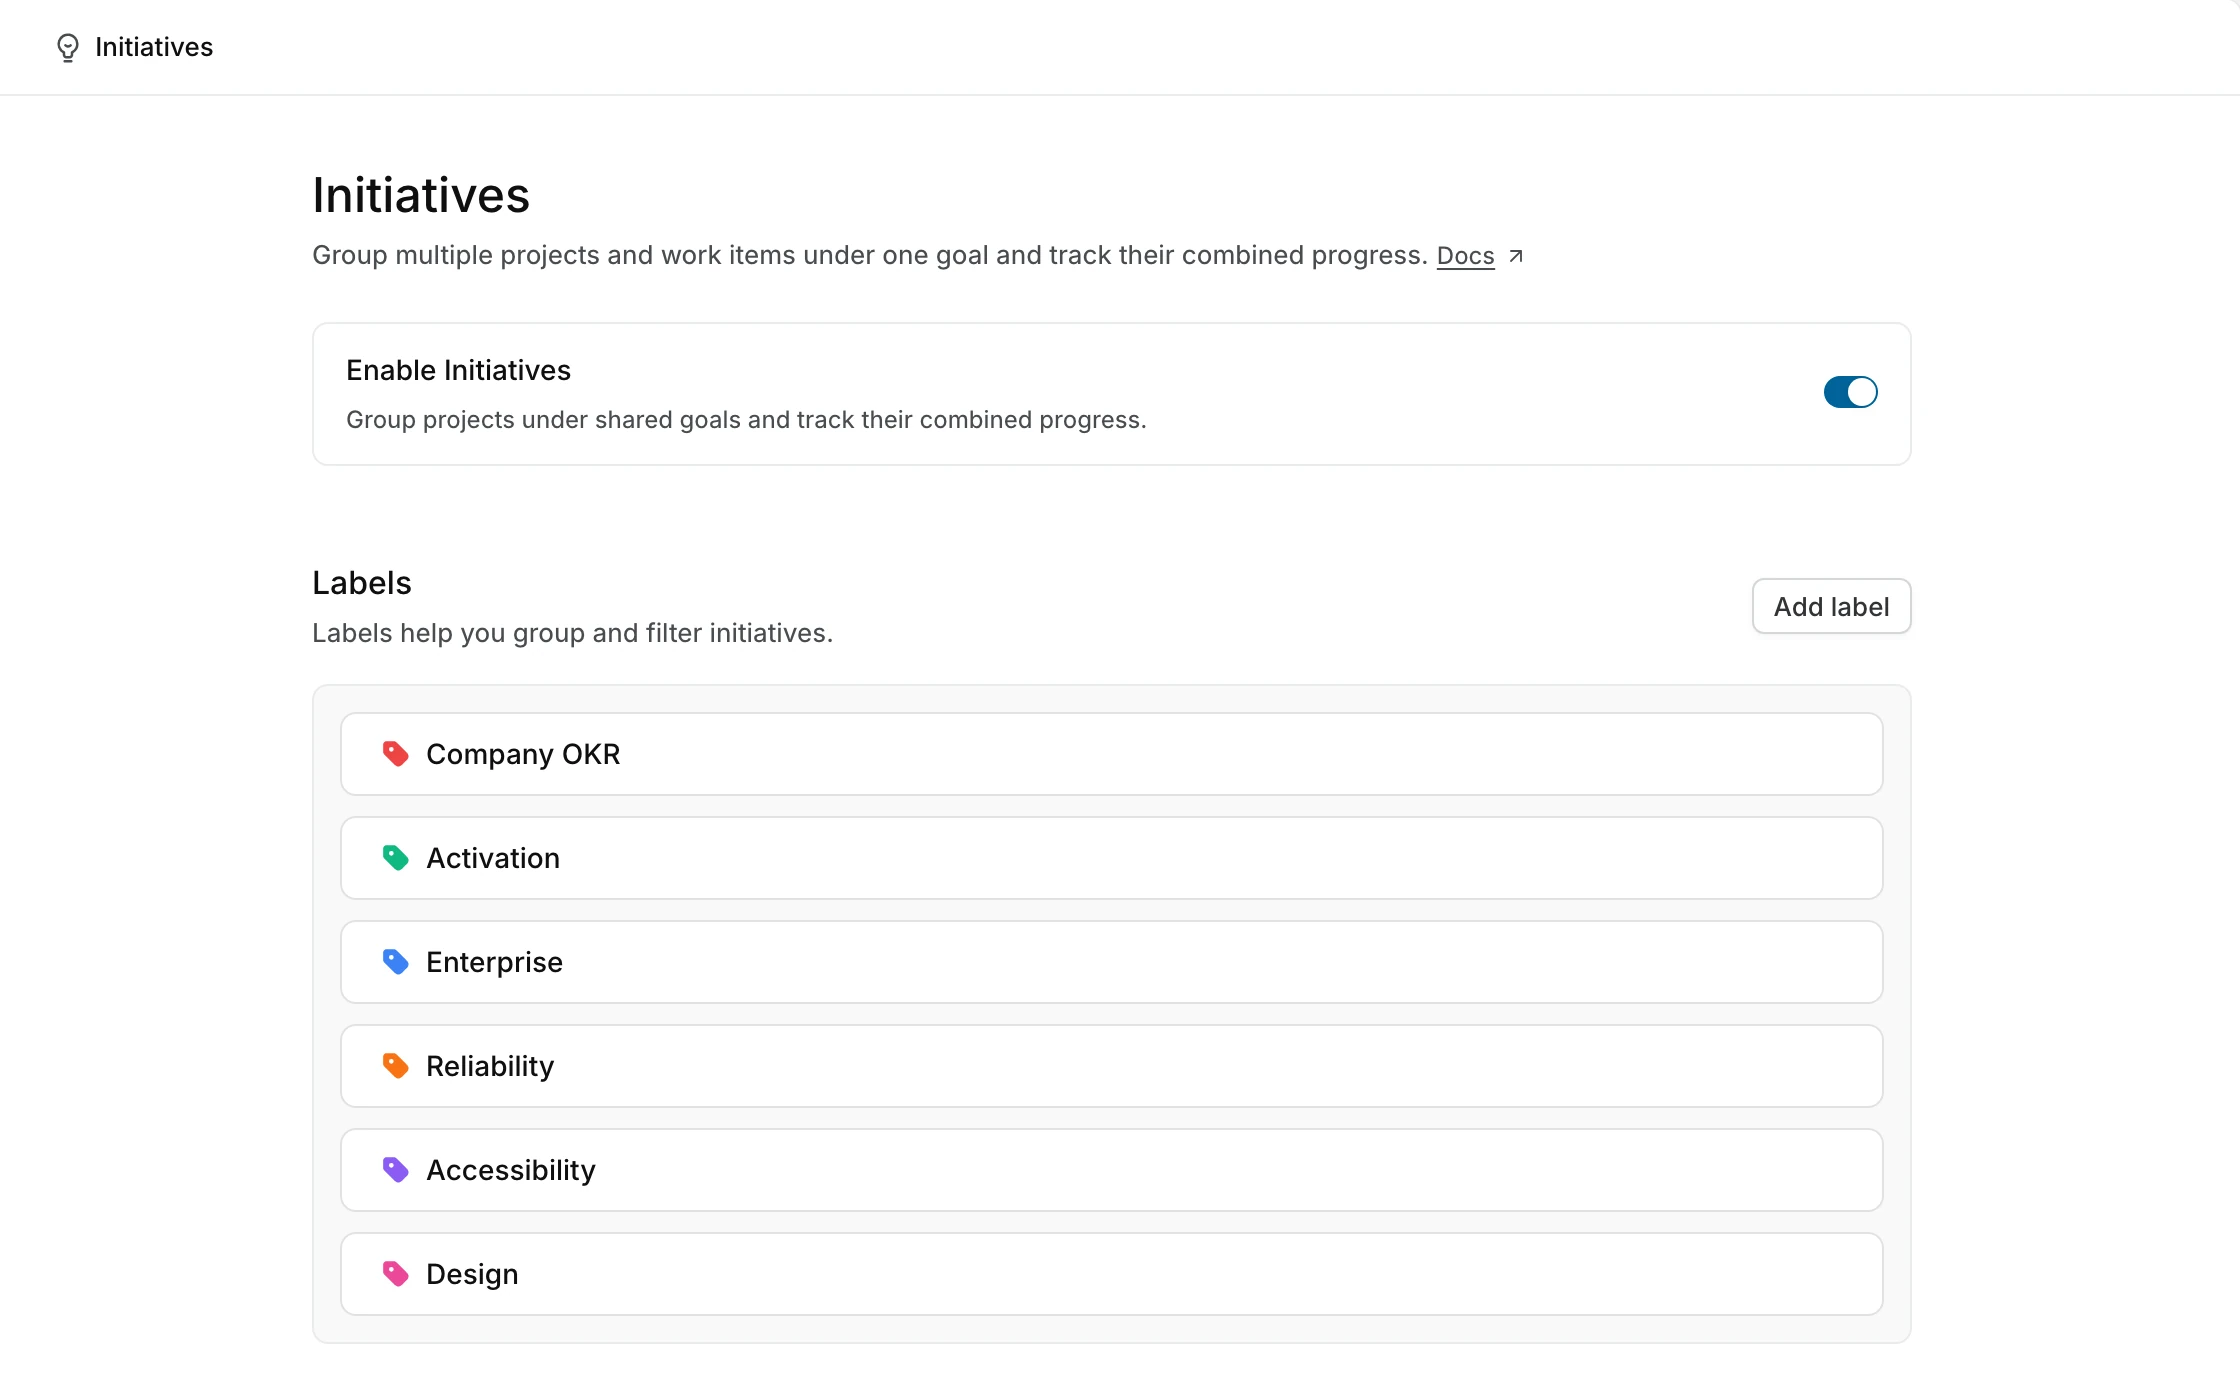
Initiatives are off in a new workspace. A workspace owner or admin turns them on:
- Open workspace settings.
- Under Features, select Initiatives.
- Turn on Enable Initiatives. The switch reads "Group projects under shared goals and track their combined progress."
Initiatives then appears under More in the Workspace section of the sidebar. To keep it visible, open More and click the pin icon next to Initiatives. If you cannot change workspace settings, ask a workspace admin to turn it on.
If your plan doesn't include initiatives, the settings page and the Initiatives page show an upgrade screen instead.
Add labels
Labels help you group and filter initiatives. Create them in Workspace settings > Features > Initiatives:
- Under Labels, click Add label.
- Choose a color and enter a Label title.
- Click Add.
To change a label, open its menu and select Edit label or Delete label. Deleting a label removes it from every initiative and from any views that filter by it. Drag labels to reorder them. Two labels can't share a name.
The Labels section works only while initiatives are on. Otherwise it reads "Enable initiatives to manage labels". Workspace owners and admins manage labels.
Who can do what
| Role | What they can do with initiatives |
|---|---|
| Workspace owner, admin | Everything: create, edit, archive, restore, and delete initiatives, change scope, add links and attachments, and manage labels. |
| Member | View initiatives, their links, attachments, and updates. React, comment, and edit or delete their own comments. |
| Guest | No access to initiatives. |
To let a member do more, make them a workspace owner or admin. On Enterprise Grid, you can instead assign a custom role with the initiative permissions they need. The custom role editor groups them under Initiatives: viewing, creating, editing, managing, reacting to, and deleting initiatives, plus permissions for comments, attachments, and links.
Create an initiative
- Open Initiatives in the workspace sidebar.
- Click Add Initiative. You can also press
N, thenN. In a workspace with no initiatives yet, click Create an Initiative. - In the Create Initiative dialog, enter an Initiative name. The name is required.
- Optionally:
- Pick an emoji or icon next to the name.
- Add a description. The description editor supports formatting, mentions, and images.
- Change the State. New initiatives start in Drafts.
- Pick a Date range.
- Choose a Lead.
- Add labels.
- Click Create Initiative.
Plane shows "Initiative {name} created successfully." If the name is missing, it says "Name is required".
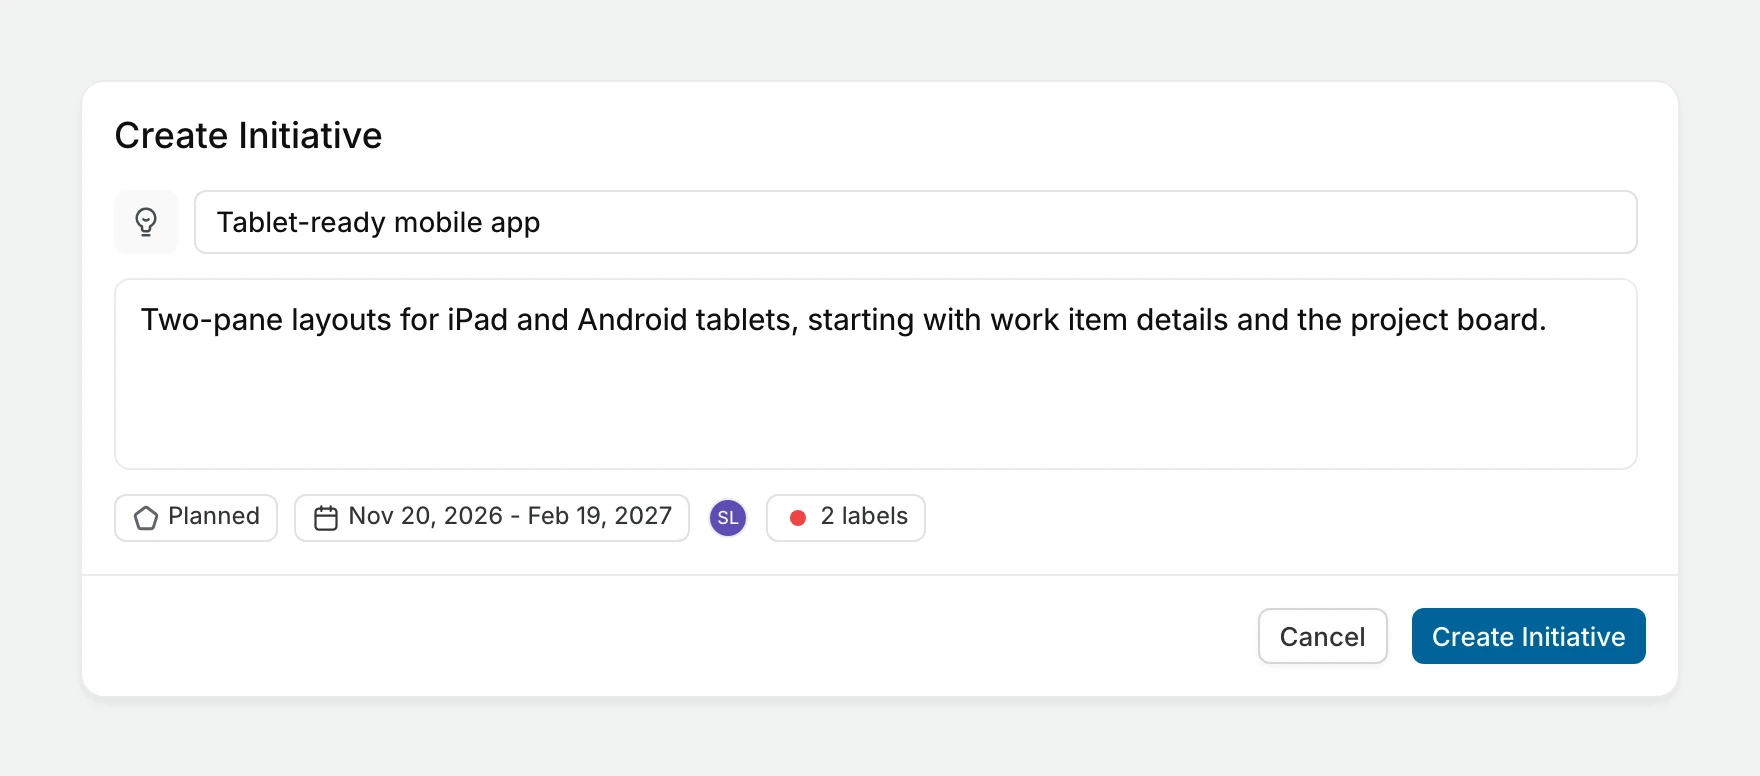
To edit these details later, open the initiative's menu in the Initiatives list. Select Edit and save with Update Initiative. You can also change individual fields in the Properties side panel, or in the initiative's row in the list.
Add projects and work items
The projects and work items connected to an initiative are its scope. You need permission to edit the initiative to change its scope.
- Open an initiative.
- Click Add scope (+) next to View scope in Scope breakdown, and select Work items or Projects. An initiative with nothing in scope shows an Add scope button instead. You can also use Add project or Add work item in the toolbar under the description.
- Select the projects or work items to add.
- Click Confirm for projects or Add selected work items for work items.
The picker shows what's already connected as selected. Clearing a selection and confirming removes that project or work item from the initiative.
You can connect projects and individual work items you can access across the workspace. Archived projects and work items don't appear in the picker, and neither do draft work items or work items still in intake. The work item search shows up to 100 results, so search by name to narrow it. Any work item type can be part of an initiative, including epics, and the same project or work item can belong to multiple initiatives.
You can also connect from the other side. A project's overview has an Initiatives property, where Add Initiative picks initiatives for the project. A work item's Initiative property, Add to initiative, does the same for a work item.
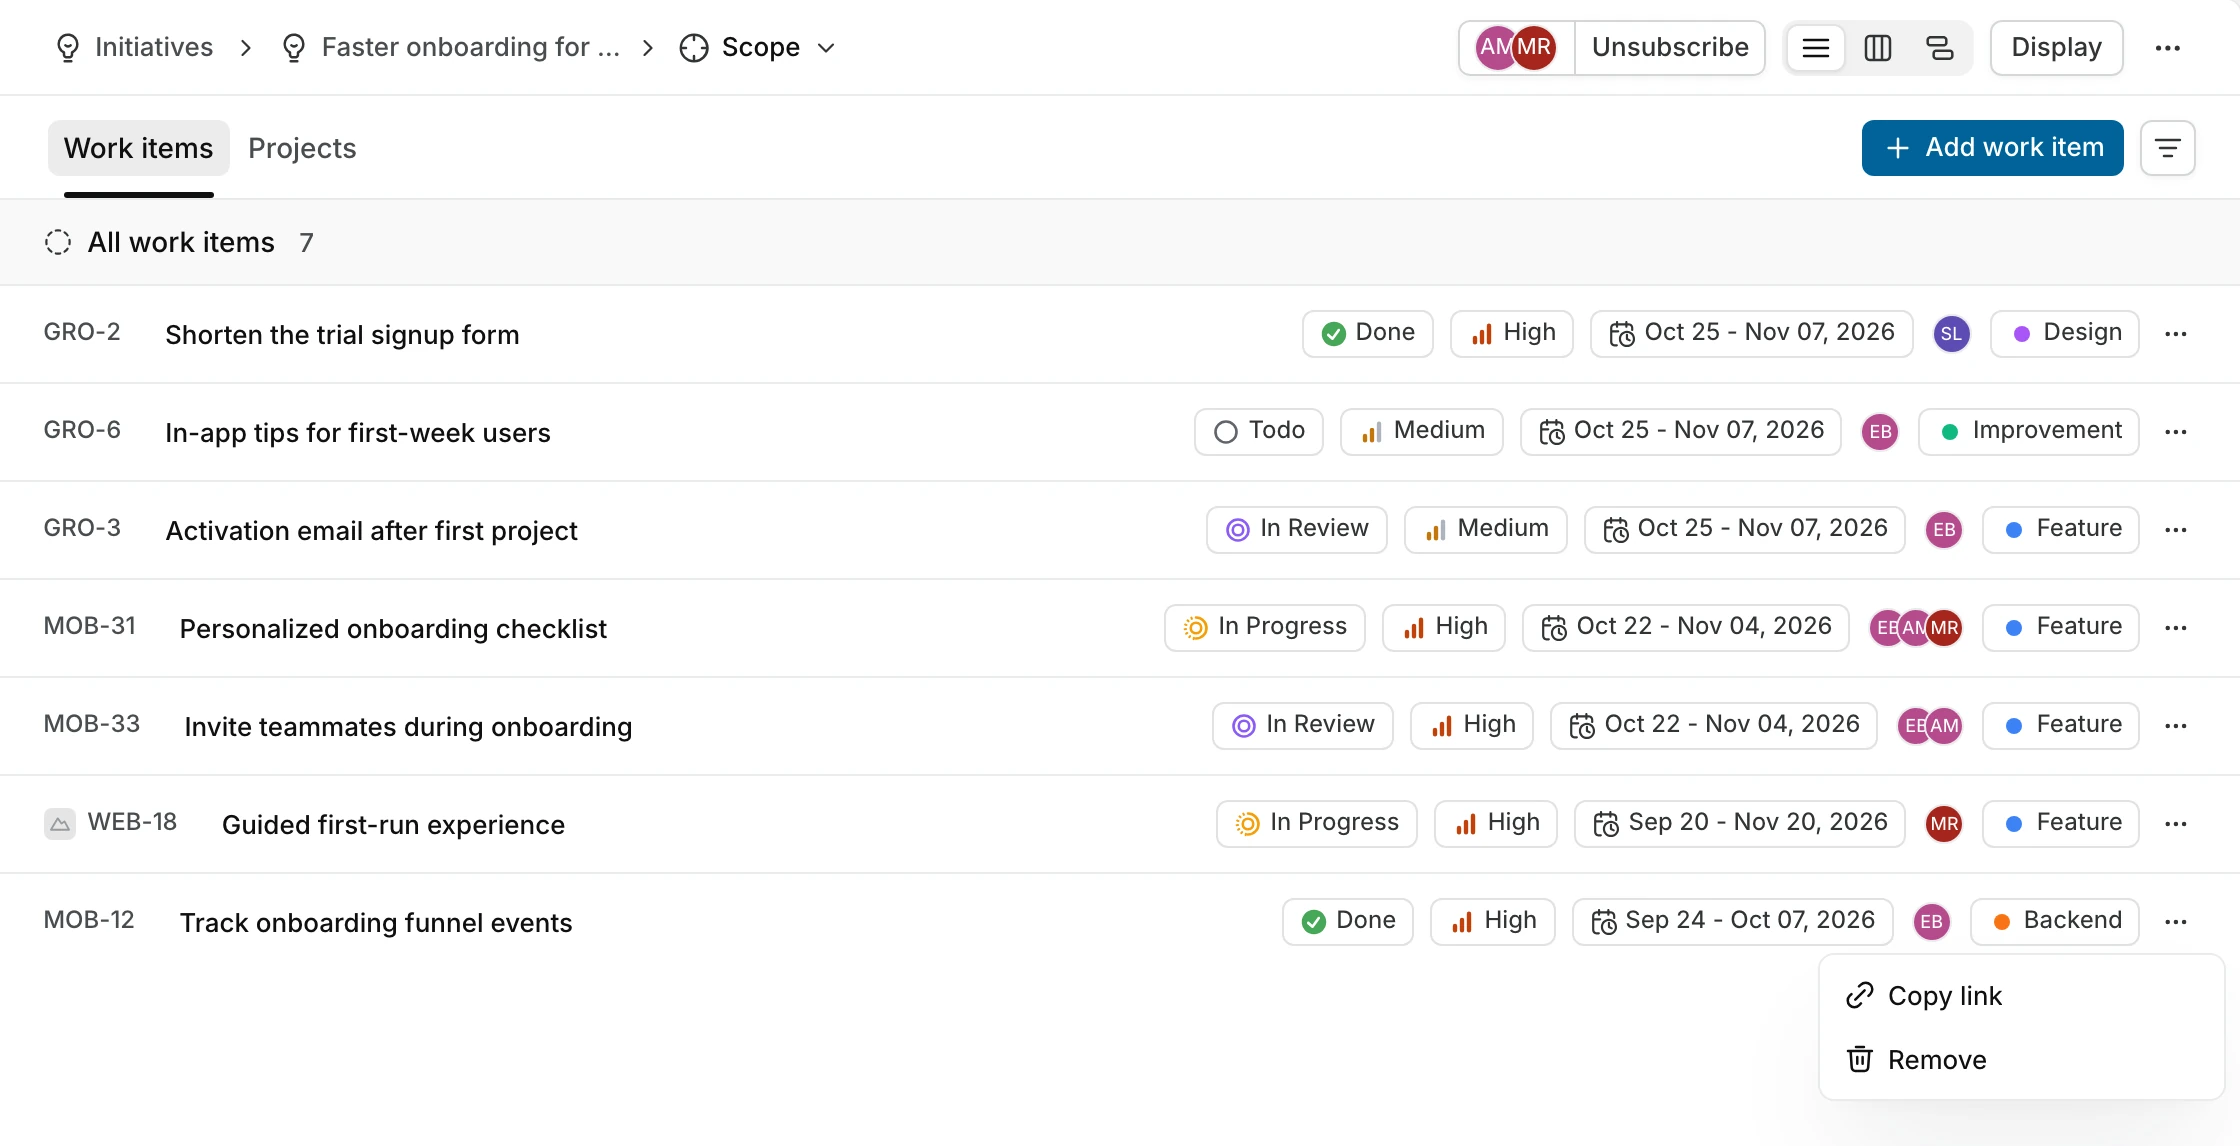
To review the connected work, click View scope in Scope breakdown. On the full initiative page, you can also switch the header menu from Overview to Scope. Use the Work items and Projects tabs to choose what to show. Each tab supports List Layout, Board Layout, and Timeline Layout, with an Add work item or Add project button for adding more scope.
- On the Work items tab, Display groups work items by state group, priority, assignees, or a custom property in list and board layouts. Choose None in list layout to remove grouping. In the timeline, you can move work items' dates and create timeline dependencies.
- On the Projects tab, the board groups projects by States, Priority, or Lead. Grouping by state and the timeline need project states turned on. Otherwise they read "Project states not enabled".
To remove a project or work item from the initiative, open its menu in Scope and select Remove. The project or work item remains in the workspace. The same menu has Copy link.
Until you add anything, the scope reads "No scope added to this initiative yet" and "Link projects and work items and track that work in this space."
Initiative states
New initiatives start in Drafts. Set the State property to reflect the initiative's phase:
| State | When to use it |
|---|---|
| Drafts | The goal or scope is still being defined. |
| Planned | The initiative is ready but work has not started. |
| Active | Work is underway. |
| Completed | The initiative has met its goal. |
| Closed | Work has ended without completing the initiative. |
States change manually. Dates and progress do not move an initiative between states. Closed is a state, and it does not archive the initiative.
Track progress
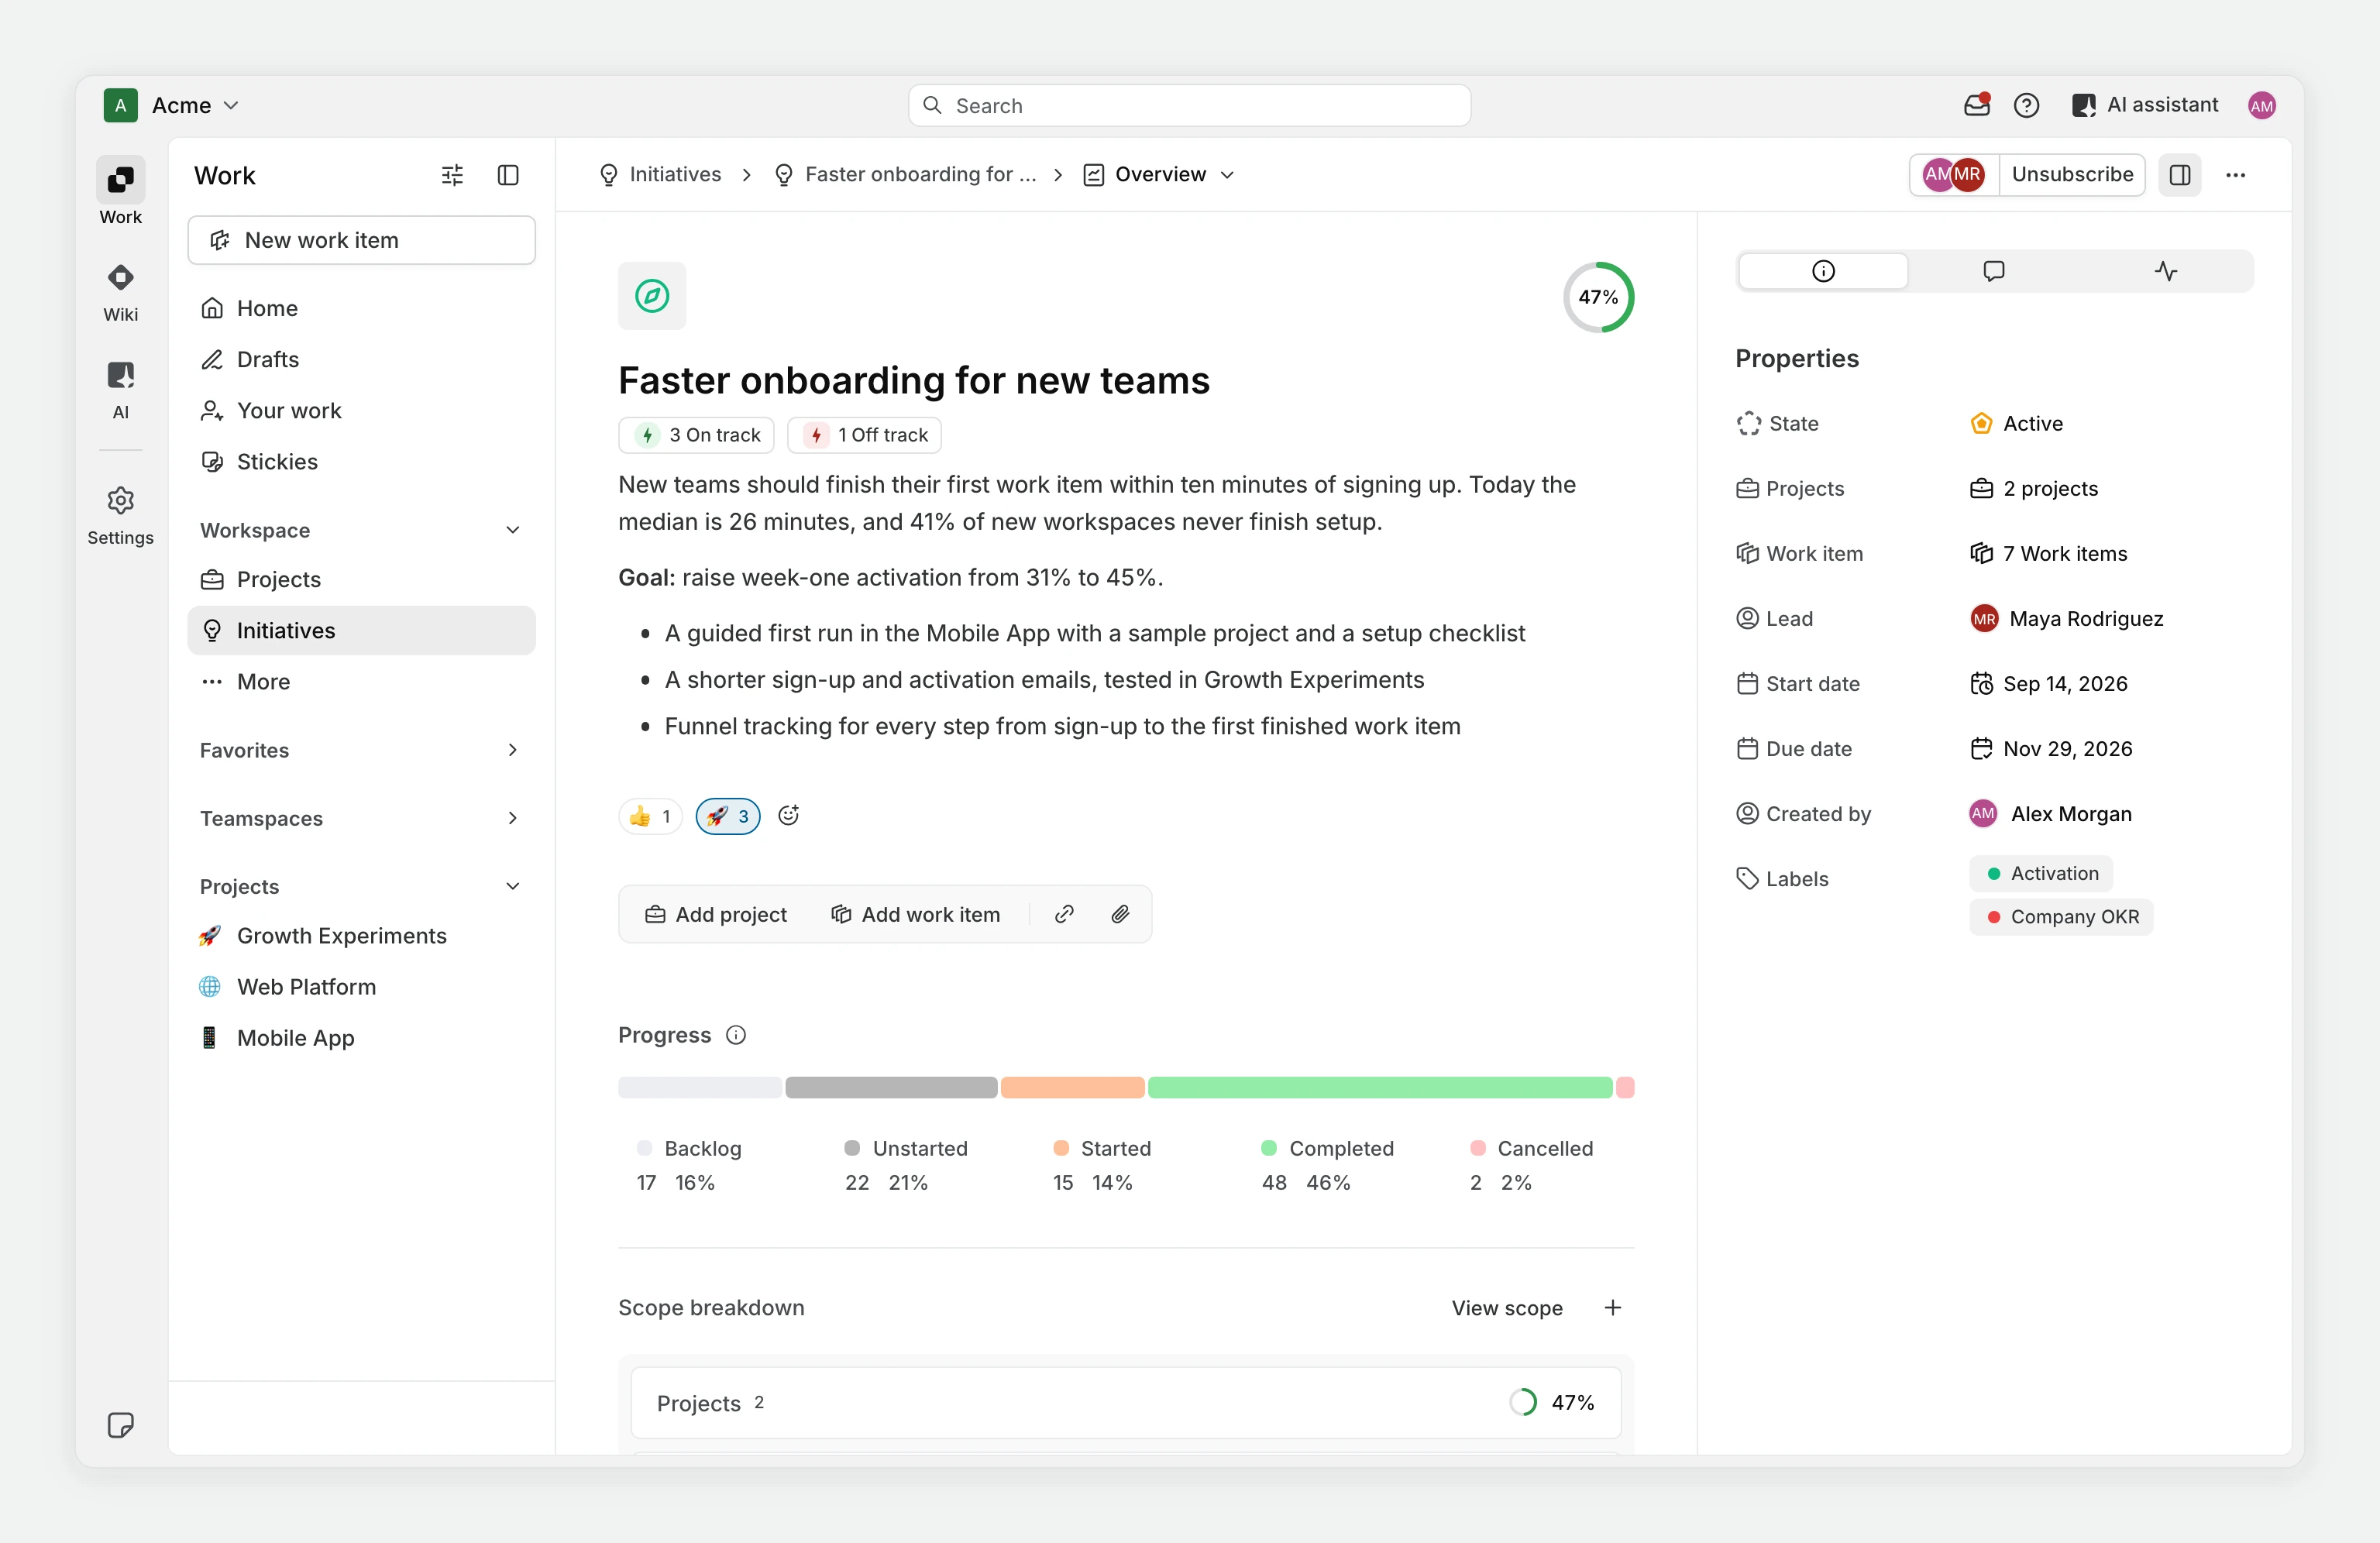
Open Overview to review the progress of the initiative's scope. Clicking an initiative in the list opens it in a peek view. Use the expand icon, or Cmd/Ctrl-click the initiative, to open the full page. The peek has the same Overview, and its View scope button opens the full Scope page.
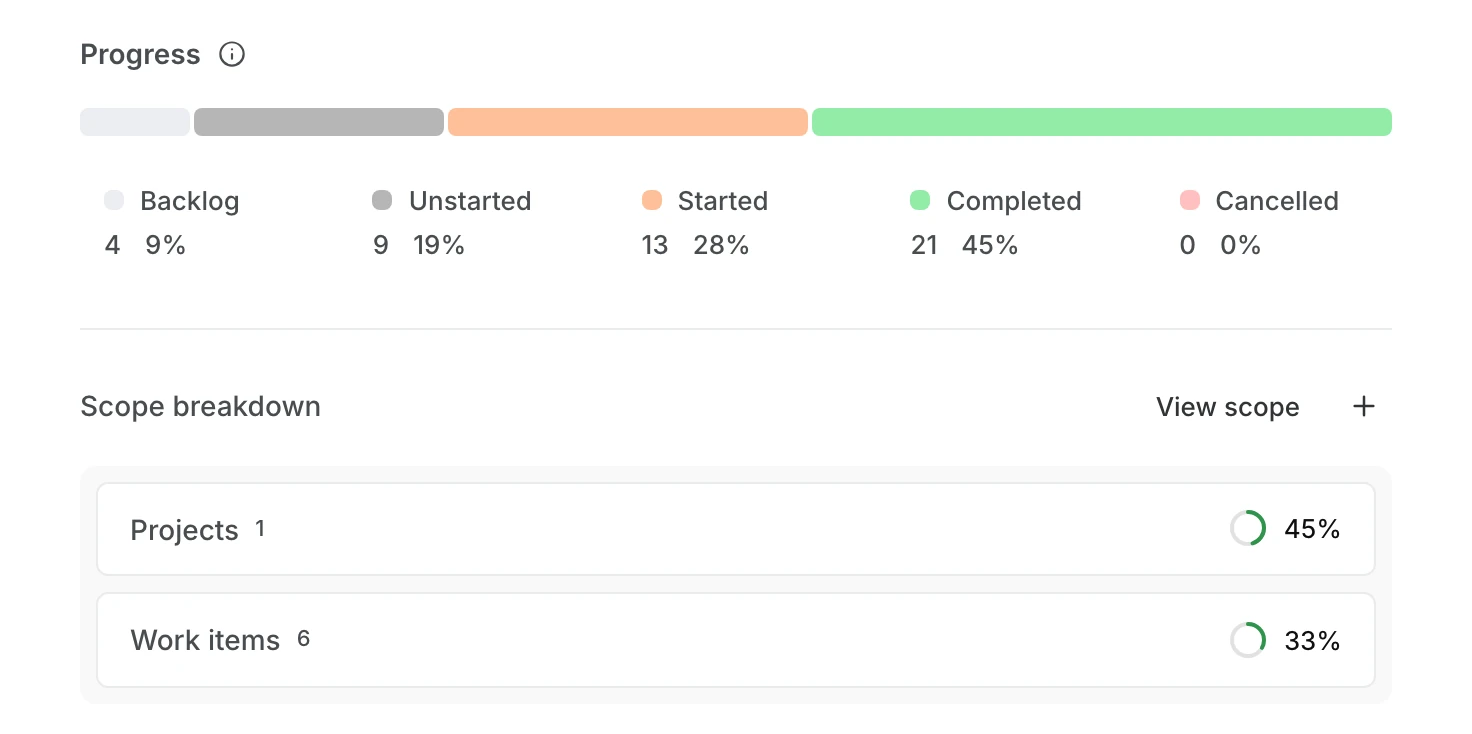
Progress shows a bar with the count and share of work items in each state group: Backlog, Unstarted, Started, Completed, and Cancelled. It counts:
- Every work item in each linked project.
- Each linked work item, plus all the work items nested under it. Linking an epic brings in everything inside the epic.
Each work item is counted once, even when it belongs to more than one part of the initiative's scope. The counts leave out archived projects, archived and draft work items, and the work items under an archived parent. They include only work items you can see, so two people can see different totals. The progress tooltip puts it this way: "The progress metrics aggregate all child work items from both epics and projects."
A ring beside the initiative's name shows the share of work that's done: completed work items out of all work items except cancelled ones.
Scope breakdown has a Projects card and a Work items card, each with a count and its own done percentage. The Projects card covers the work items in linked projects, and the Work items card covers linked work items and everything nested under them. Click a card to open that tab in Scope. Because the overall progress counts each work item once, the two cards can add up to more than the total. In Scope, each project row shows that project's own progress.
Read status updates
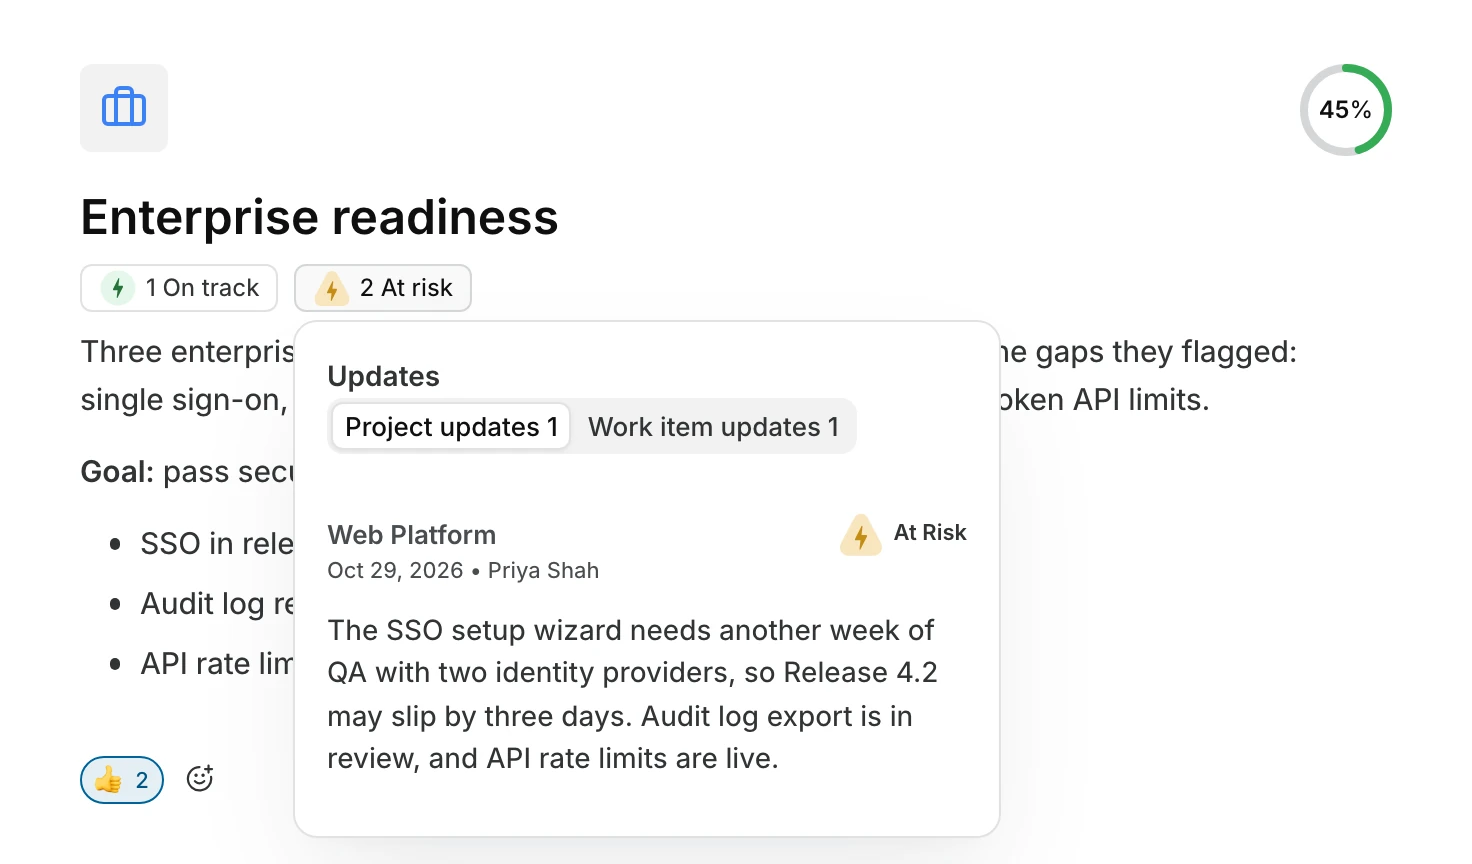
The On track, At risk, and Off track indicators near the initiative name count the latest update from each connected project and work item, by status. Only statuses with at least one update show. The same indicators appear on the initiative's row in the list.
Updates come from project updates on linked projects and from updates on linked epics and work items. You can't post an update on the initiative itself. Click an indicator to read the updates with that status. When both kinds exist, use Project updates and Work item updates to switch between them. Each update shows its project or work item, status, date, author, and text. Click the name to open the source in a new tab. You can comment on and react to the updates.
Edit properties and discuss the work
Use Toggle sidebar in the header to open the side panel. It has three tabs:
- Properties lets you change the State, Projects, Work item, Lead, Start date, Due date, and Labels, and shows Created by.
- Comments is for discussing the initiative. You can react to comments, and edit or delete your own.
- Activity lists changes to the initiative, such as "{author} changed the state from {old} to {new}." It records name, description, lead, date, and scope changes, and added, updated, or deleted links and attachments.
You can add emoji reactions to the initiative under its description. To share reference material, use Add link or Attach in the toolbar under the description:
- Add link asks for a URL and an optional Display title. You can copy, edit, or delete a link later.
- Attach uploads one file at a time, up to your workspace's file size limit. Attachments can be deleted but not edited.
Added items appear in the Links and Attachments sections of Overview. Each section shows a count and appears once it has at least one item.
View and find initiatives
Open Initiatives in the workspace sidebar to browse the workspace's initiatives. Each row shows the initiative's status indicators, state, projects, work items count, lead, dates, and labels. If you can edit initiatives, you can change these properties in the row. Click an initiative to open it.
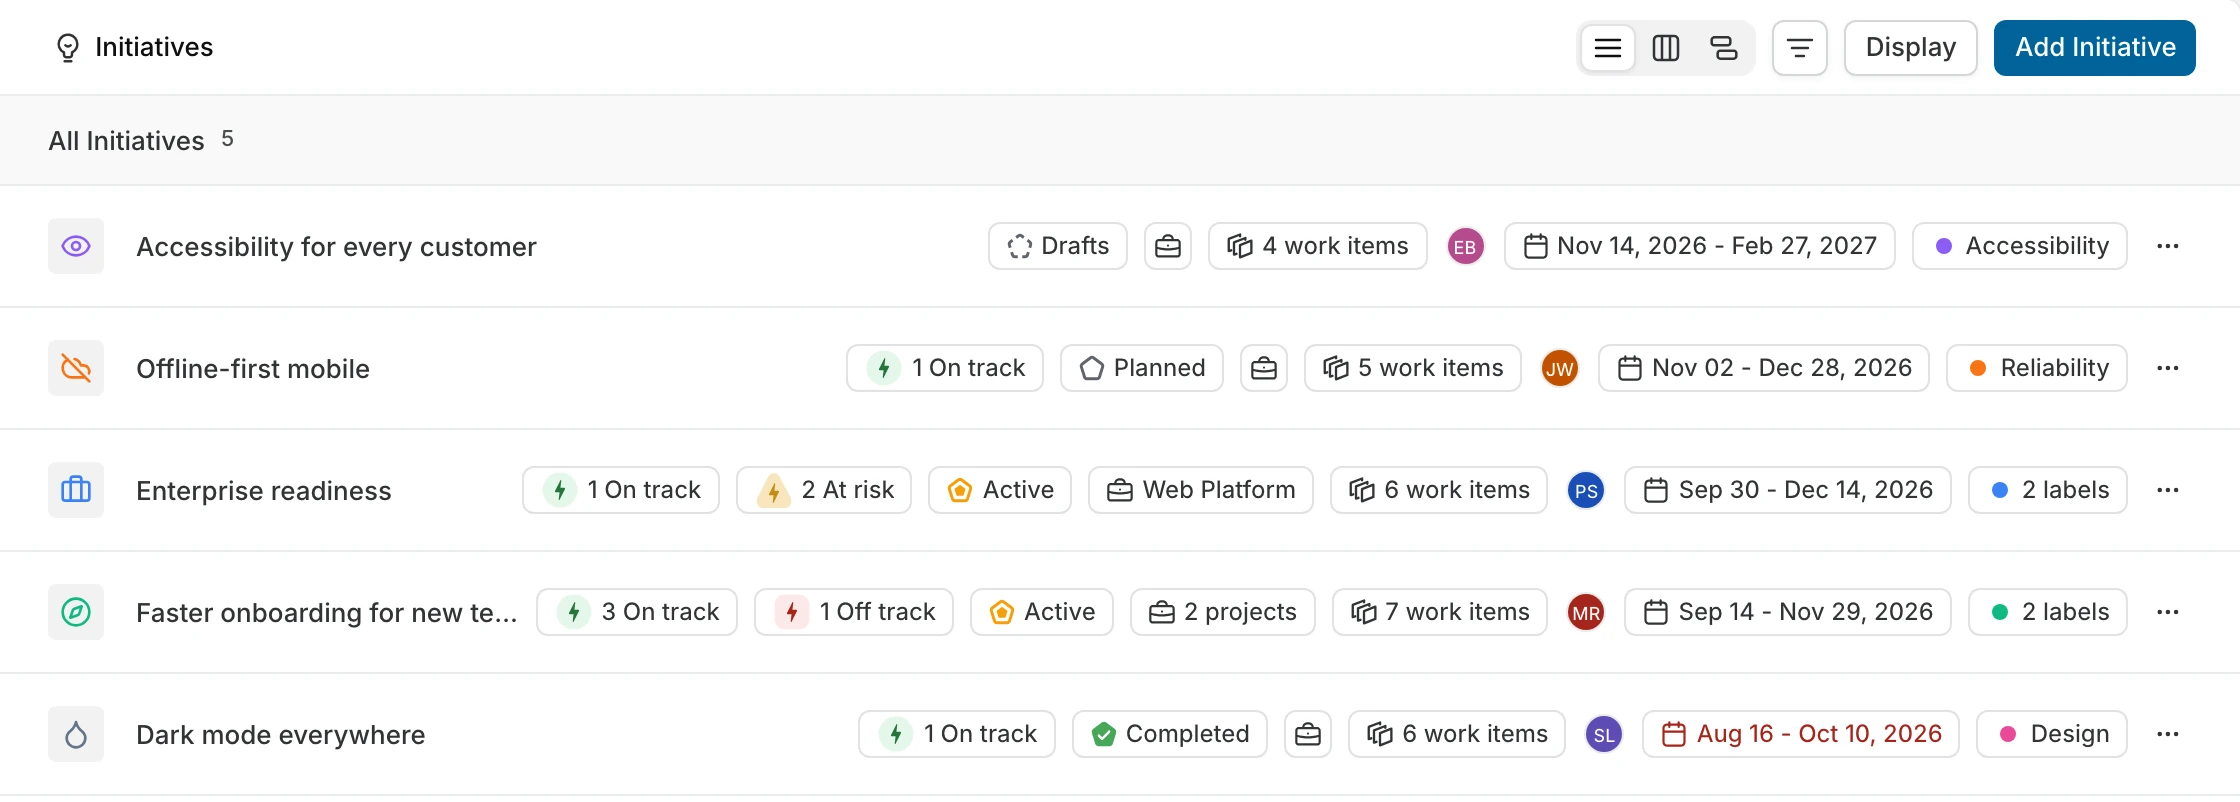
Use the layout selector to choose List Layout, Board Layout, or Timeline Layout. The list is the default.
- List layout shows initiatives in groups. Choose None in Group by to show one list.
- Board layout shows a column for each group. Drag an initiative between columns to change its lead, state, or labels.
- Timeline layout places initiatives against their dates. Choose the Week, Month, or Quarter scale. Today returns to the current date. If you can edit initiatives, drag or resize a bar to change its dates.
Filter by Lead, Start date, End date, State, or Labels. Under Display:
- Group by offers Lead, Created By, States, Labels, and None. Lead is the default. Board layout doesn't offer None, and the timeline doesn't group. Initiatives without a value appear in a None group.
- Order by sorts by Last Created or Last Updated, newest first.
Plane saves your layout, filters, and display options for you in this workspace. There's no search box on the list. If no initiatives match your filters, the list says so.
Archive an initiative
Only initiatives in Completed or Closed can be archived. For other initiatives, Archive appears in the menu but is turned off.
- Open the initiative's menu and select Archive.
- Confirm with Archive. The dialog reads "Are you sure you want to archive the initiative? All your archived initiatives can be restored later."
Archived initiatives leave the list and you can't link anything new to them. They can't be opened, and they don't appear when you pick initiatives for a project or work item.
To find them, open More > Archives in the sidebar's Workspace section, then select Initiatives. If Archives is pinned, open it directly. The page reads "No archived initiatives yet" until you archive one.
To change an archived initiative's properties, scope, links, or attachments, open its menu and select Restore. Plane restores it right away, without a confirmation, and says "You can find {name} in your initiatives."
Delete an initiative
You can delete any initiative, including an archived one.
WARNING
Deleting an initiative cannot be undone. Its comments, links, and attachments are deleted with it. Its connected projects and work items remain in the workspace.
- Open the initiative's menu and select Delete.
- Click Delete to confirm.