Slack integration Pro
Plane's Slack integration brings your project management directly into your team's communication flow. Create work items from conversations, get notified about updates, interact with Plane AI, and keep everyone aligned — all without leaving Slack. This guide will walk you through how to set up and connect your Slack account to Plane.
Set up Slack integration
Self-hosted instances (Commercial Edition)
If you're running a self-hosted instance of Plane, you'll need to set up a few extra configurations to get Slack integration working. Check out the setup guide first before diving into the steps on this page.
Follow the steps below to complete the setup:
Connect Slack Workspace
To get started, you need to connect your Slack workspace to Plane.

- Navigate to Workspace Settings → Integrations in Plane.
- Find the Slack integration and click Configure.
- Click the Install button. This will redirect you to Slack’s authentication page. Slack will ask you to review the permissions it needs to integrate with Plane. Make sure to allow them.
- After allowing permissions, you’ll be redirected back to Plane. You should now see that your Slack workspace is successfully connected.
Your workspace is now integrated. Team members can start using Plane shortcuts in Slack channels.
Connect personal Slack account
For a more personalized experience, you can connect your personal Slack account. This is particularly useful for features like Thread Sync. When Thread Sync is enabled, any messages posted to a work item will be sent back to Slack. If you're connected, it will show your name as the sender. If you're not connected, the message will appear as coming from the Plane Bot or the name of your Slack bot.

From Workspace settings
Workspace admins can connect their personal Slack accounts from Workspace settings.
- In the Connect your personal account section under Integrations, click Connect.
- Slack will ask for permission to integrate with Plane. Review and allow the necessary permissions.
- After granting permissions, you’ll see the status updated to show that your personal account is connected.
INFO
Only one Workspace Admin can connect their personal Slack account via Workspace Settings. Other Admins and Members can connect theirs from Profile settings.
From Profile settings
If you don’t have admin access, you can still connect your personal Slack account through your profile settings.
Head to the Profile settings page in Plane.
Select the Connections tab on the sidebar.
In the dropdown menu, select the Plane workspace you want to connect your personal account to.

Click Connect in the Slack section, which will redirect you to Slack to complete the connection.
INFO
If your workspace doesn’t have Slack integration enabled, you won’t be able to connect your personal account. In this case, contact your Workspace Admin.
Once your account is connected, you’ll see the status update to reflect that your personal Slack account is successfully integrated.
Use the Slack integration
Now that you’ve connected Slack to Plane, let’s explore what you can do with this integration. We built this to reduce the constant back-and-forth between Plane and Slack—so instead of switching between tools to create work items, update statuses, or share links, you can do it all from Slack.
Create work items from Slack
Turn conversations into trackable work without switching apps.
There are two easy ways to create issues from Slack, depending on your workflow: using the message shortcut or the /plane command. Any updates in Plane to fields like State, Assignee, or others will automatically reflect in the linked Slack thread.
Message shortcut

Convert any Slack message into a Plane work item:
Hover over any message in Slack.
Click the three-dot menu.
Select Create a Work Item.
A modal opens with options:

- Project - Select which Plane project receives the work item.
- Add as - Choose between:
- Work Item - Standard task in your project.
- Intake - Sends to your project's intake queue for triage.
- Work Item Type - Select from your project's work item types. This will also show mandatory custom properties associated with the work item type.
Add a title and description. The original Slack message text auto-fills as the description.
Assign Labels, State, Priority, and Assignees.
Turn on Thread Sync (optional). When enabled, Thread Sync keeps your conversation and Plane work item comments in sync. Anything you say in the Slack thread appears in the Plane work item comments, and vice versa. It’s the easiest way to keep everyone aligned without repeating updates in two places.
Click Create and the work item appears in Plane, with a confirmation posted in the Slack thread.
/plane command
The /plane command lets you create a work item on the fly, without referencing a specific message.

- Type
/planein any Slack channel or DM. - Press Enter to open the creation modal.
- Fill in the same fields as the message shortcut.
- Click Create.
This is great for when an idea or task comes up mid-conversation—you can create the work item in just a couple of clicks without breaking your flow.
Link existing work items to Slack threads
If a Plane work item already exists, and you want to connect it to a Slack thread (for updates, visibility, or comments), just use the Link Work Item shortcut. Here’s how:
Hover over the relevant Slack message or thread.
Click the three-dot menu and select Link Work Item.

In the modal, search for the work item by title or ID.
Select the right work item and hit Link.
That’s it. Now the thread and the work item are connected. Comments in the thread can sync to Plane (and vice versa, if Thread Sync is enabled on that work item), and the thread will display a rich preview of the linked work item.
This is perfect for situations where someone logs a work item in Plane but the conversation about it happens in Slack. Just link them up and avoid duplication.
Add Plane to private Slack channels
When you use Plane in public Slack channels, it automatically adds the Plane bot to those channels. However, for private channels, you must manually add the bot before you can create or link work items.
Here's how to add Plane to your private channels:
- Navigate to your private channel.
- Open the channel settings.
- Go to the Integrations tab.
- Click Add apps in the Apps section.
- Search for
Planein the app directory. You'll see the Plane app with the/planeslash command - Click Add next to the Plane app.
This will add the Plane bot to your private channel, and Slack will show you a confirmation message.
INFO
Only channel members with the right permissions can add apps to private channels. If you don't see the option to add apps, ask a channel admin or the channel creator to add Plane for you.
Once you add Plane to your private channel, you can use all the same features you'd use in public channels - creating work items, linking existing ones, and getting rich link previews. The bot just needs that initial invitation to join your private conversation.
Connect project to Slack channel
Stay on top of project updates by linking Plane projects to Slack channels. You can configure which events trigger notifications, so your team only sees updates that matter.

To configure this:
Go to your Workspace Settings in Plane.
Navigate to Integrations > Slack in Plane.
Click Configure on the Slack integration.
Under Project Notifications, click the ➕ button.
Select a Plane Project and the corresponding Slack Channel you’d like to connect.
Under Notify when, choose which events trigger Slack notifications:
- When a work item is created - Posts a notification whenever someone creates a new work item in this project.
- When a work item state changes - Notifies the channel when work items move between states (e.g., Todo → In Progress).
- When a comment is created on a work item - Posts updates when someone comments on a work item. You can reply to these comments directly from Slack using the Reply button on the notification.
- When a work item is marked cancelled or done - Notifies when work items reach completion states or the cancelled state.
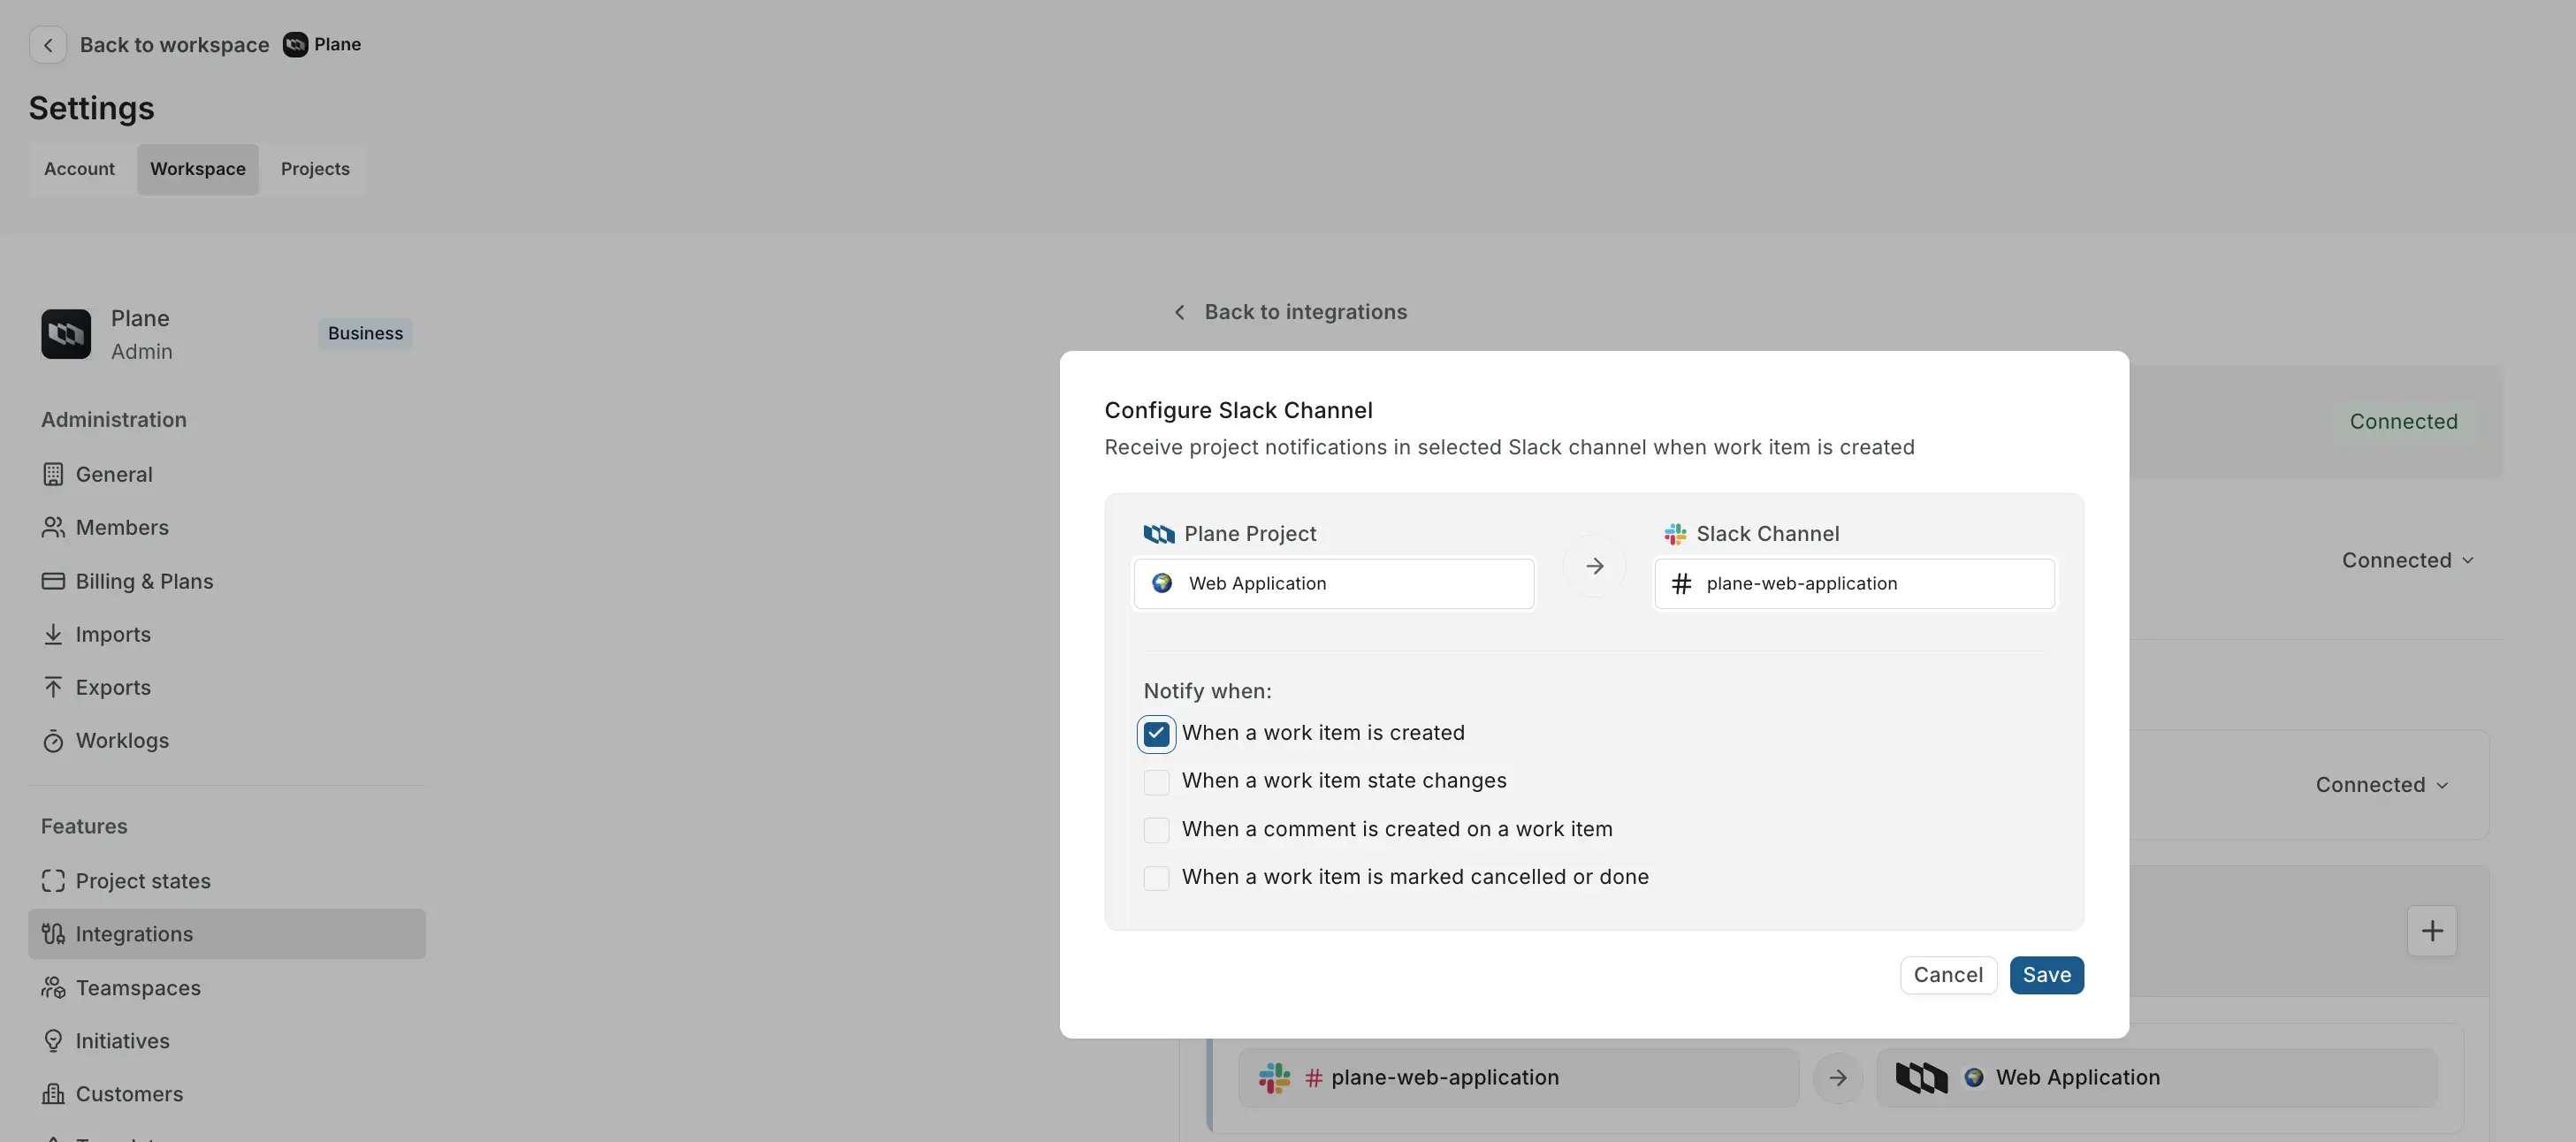
Click Save.
To edit or remove a project notification. Find the project-channel mapping in the Project Notifications list. Click the edit icon to change notification settings or the delete icon to remove the connection entirely.
Get DM notifications
Stay informed about work items that need your attention through Slack DMs.
Enable DM notifications
- Go to Profile Settings → Connections.
- Find the Slack section for your connected workspace.
- Enable Get notified in Slack DMs for important updates, reminders, and alerts just for you.

What triggers DM notifications
Once enabled, you receive Slack DMs when:
- Someone mentions you in a work item comment or description.
- You're assigned to a work item.
Each notification includes:
- Direct link to the work item
- Context about what triggered the notification
- Quick actions (View Work Item, Reply)
This keeps you updated on work that requires your attention without checking Plane constantly.
Use Plane AI agent in Slack
Interact with Plane AI directly from Slack to create work items, check project status, and get updates—all through natural conversation.
Disclaimer
Plane uses AI models powered by Anthropic. AI-generated responses may not always be accurate.
Mention @Plane in threads
Tag @Plane in any Slack thread to ask questions or request actions:
Create work items conversationally:
@Plane create a work item 'live tail' and assign it to Mike.Plane AI responds with clarifying questions if it needs more details (like which project), then creates the work item and confirms with a link.
Get project information:
@Plane can you provide the identifiers of these projects?Check cycle progress:
@Plane how are we doing in the current cycle for the AI project?The AI understands context from your conversation, so follow-up questions work naturally without repeating details.
Link previews
When you share a work item link in Slack, the preview displays as an interactive card. Click anywhere on the preview to open a sidebar that shows the full work item details without leaving Slack.
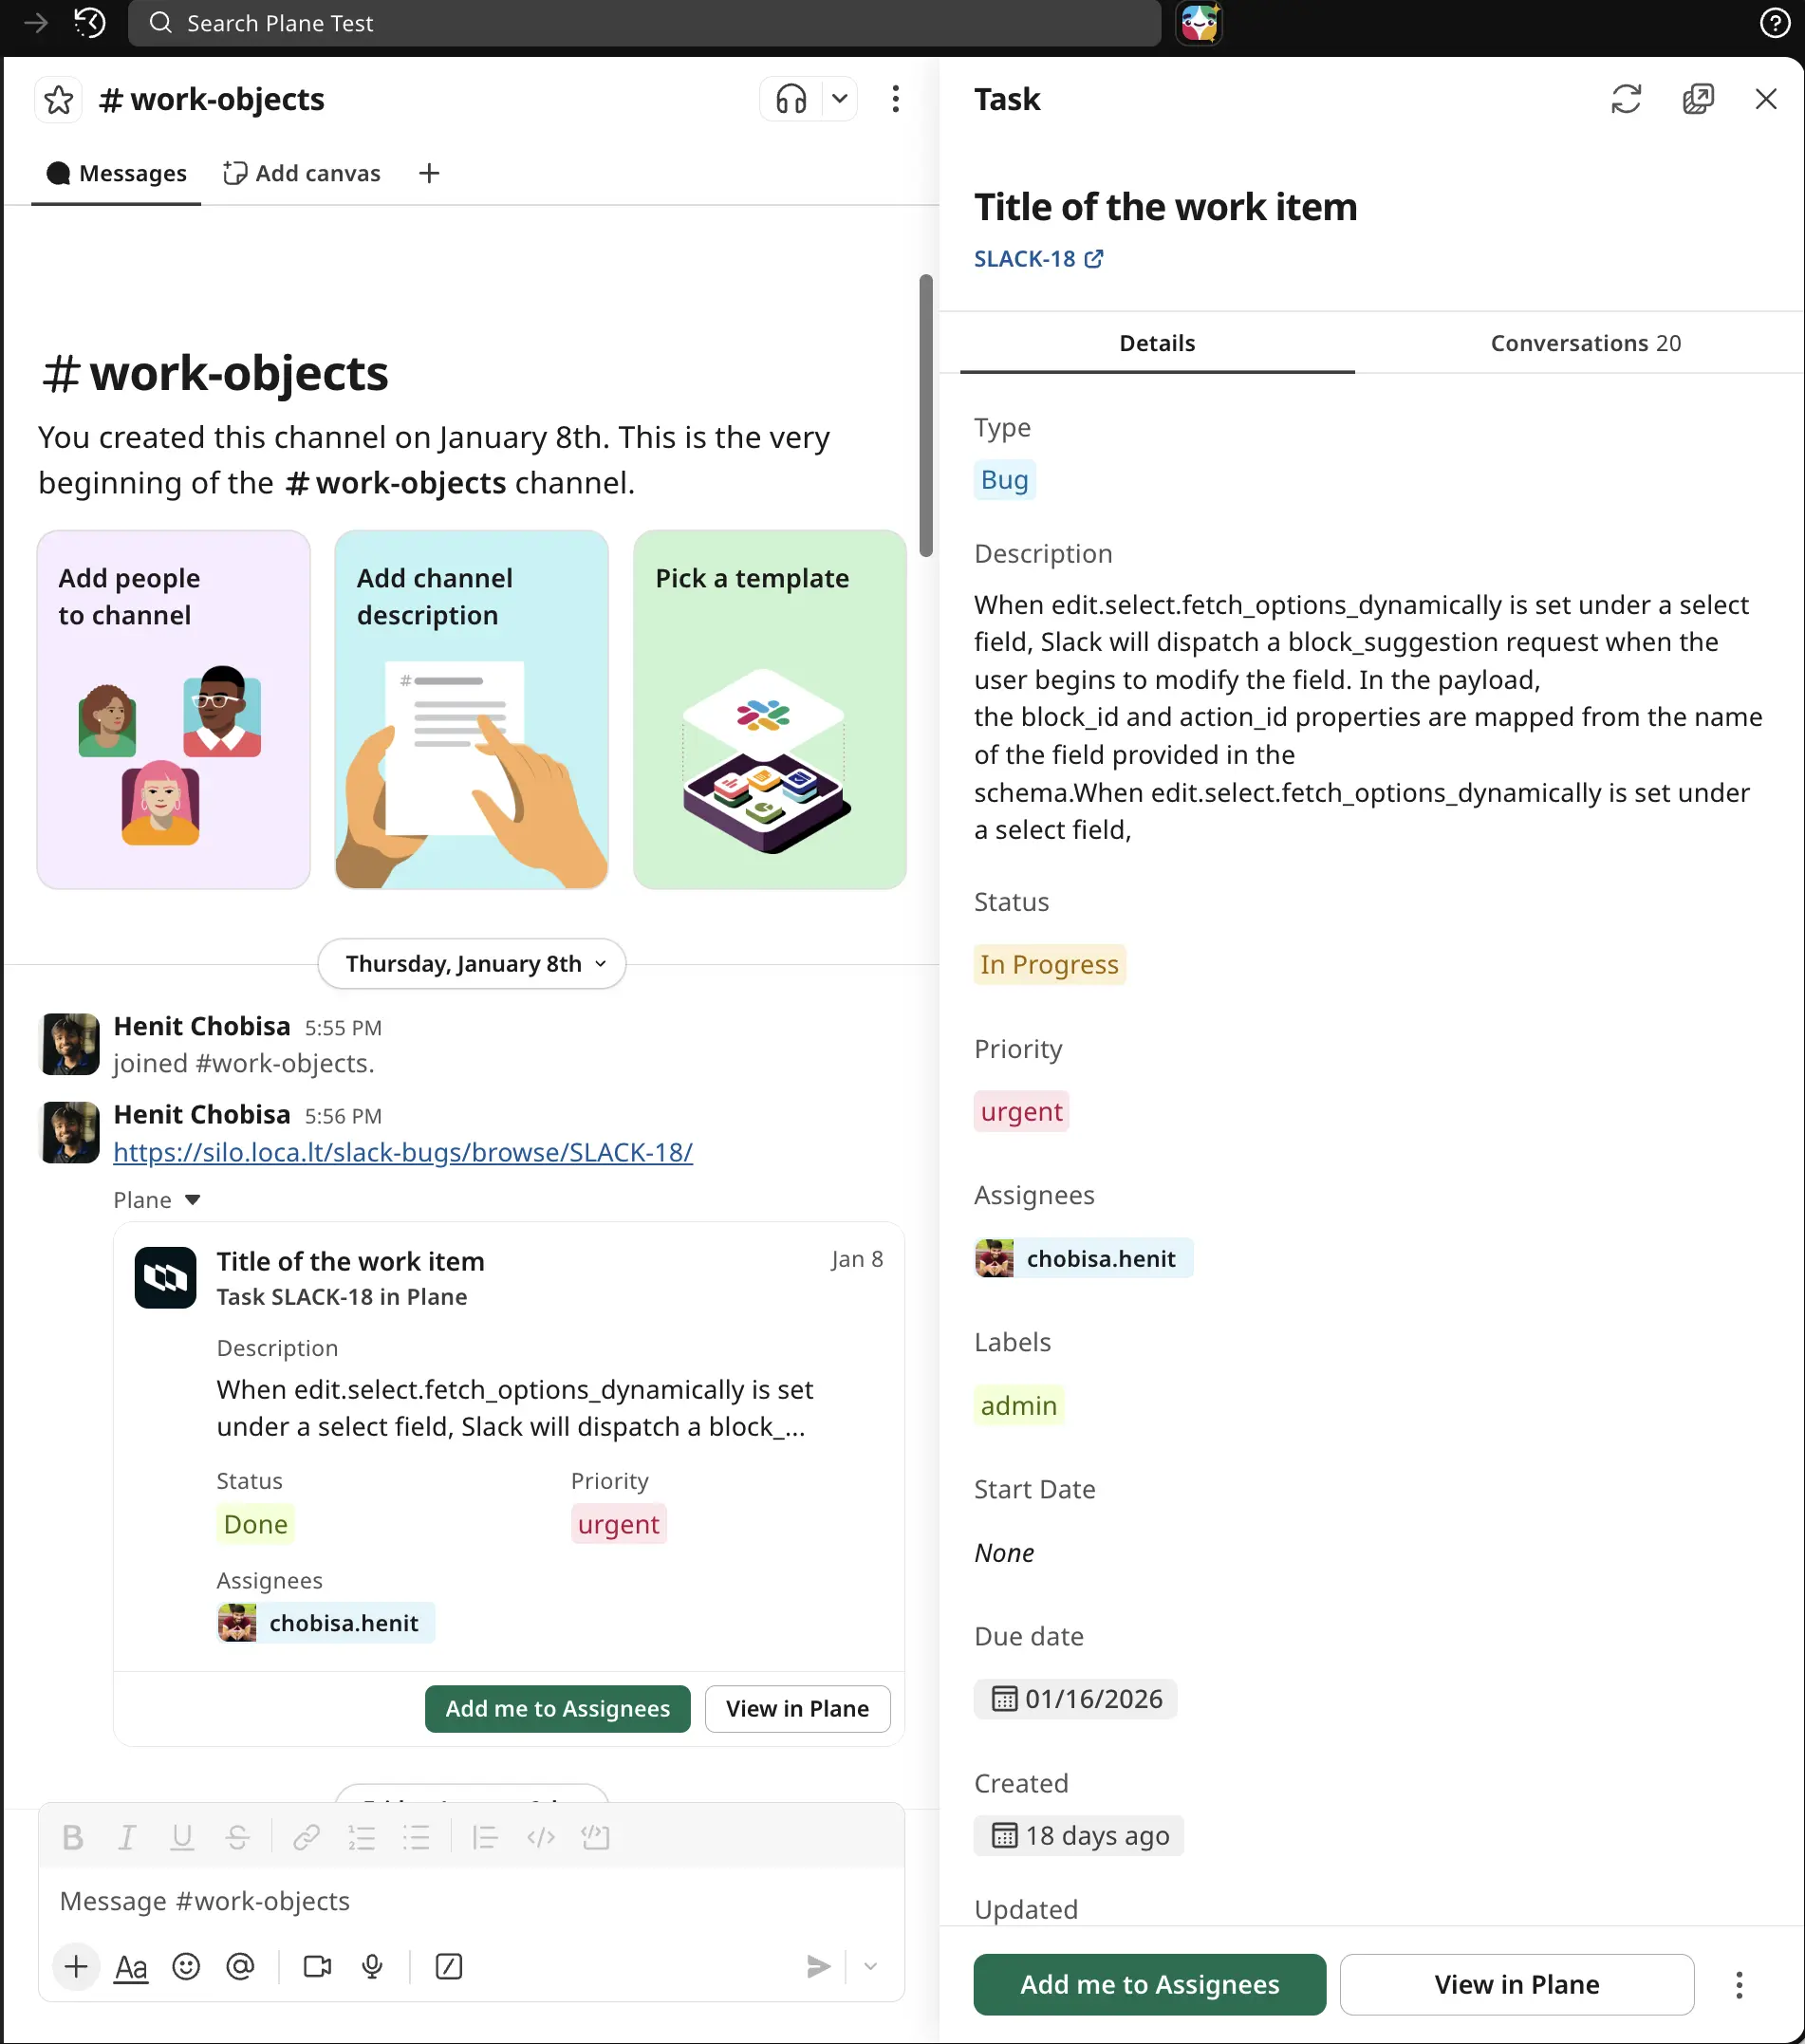
You can view and navigate through all work item details right from Slack. If you need to make changes, use the quick action buttons at the bottom of the preview.
Quick action buttons
With link previews, you can interact with the work item directly from Slack.
- View in Plane - Opens the work item in Plane
- Add me to Assignees - Instantly adds you as an assignee to the work item
- Edit - Opens a modal on the right pane to update work item details
Make your changes and click Save Changes. The work item updates in Plane immediately, and the preview in Slack refreshes to show the new details.
This means you can triage work items, update priorities, reassign tasks, and manage details during Slack conversations without opening Plane.
Privacy and permissions
When you use the Slack integration with Plane, we take your privacy seriously. The integration only accesses the minimum permissions necessary to function properly, and we handle your data in accordance with our Privacy Policy.
The integration may collect and process:
- Messages and threads you choose to sync with Plane work items
- Channel information for project notifications
- Basic user information for authentication and personalization
All data is encrypted in transit and at rest, and you can disconnect the integration at any time from your Workspace Settings or Profile settings.