

Cycles
A cycle groups work items for a set period, such as a two-week sprint. Use cycles to plan what your team will work on next and review what remains when that period ends. Cycles organize work by time, while modules group work by a feature or area of the project.
Turn on cycles
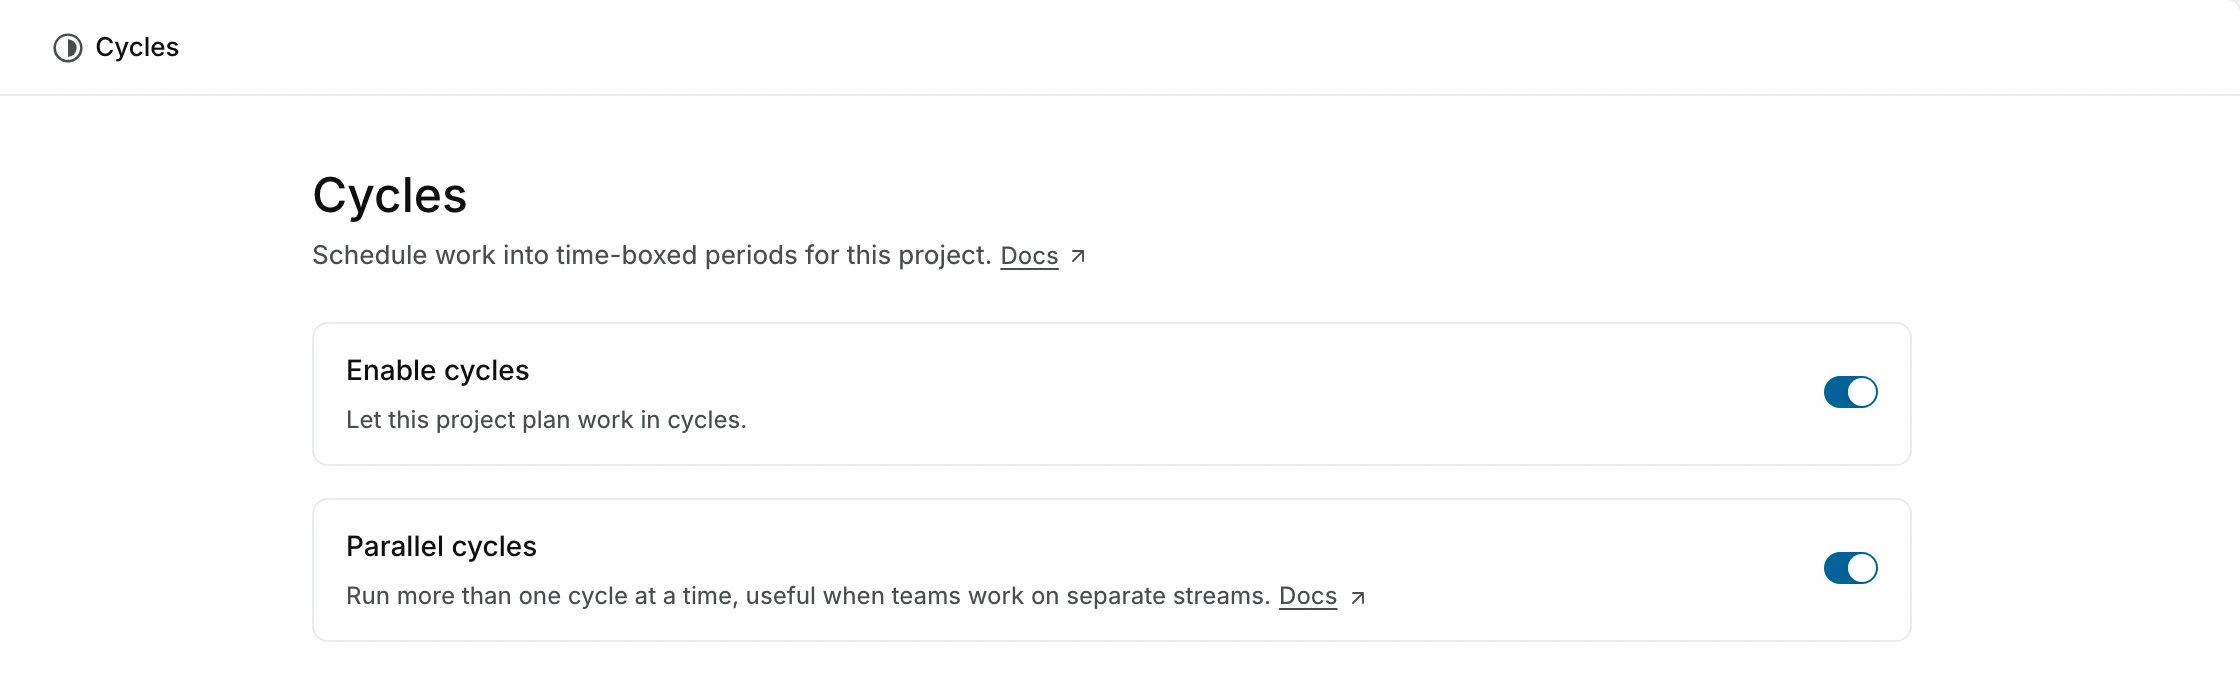
Cycles are off in a new project. You can turn them on in the features step that follows Create project, or later in project settings:
- Open your project's menu and select Settings.
- Under Features, select Cycles.
- Turn on Enable cycles.
A project created from a template takes the template's setting instead.
The same page holds Parallel cycles, Auto-schedule cycles, and Manual cycle advancement. They stay unavailable until cycles are on. Only project admins and workspace admins can change these settings, so if you can't, ask a project admin.
Create a cycle
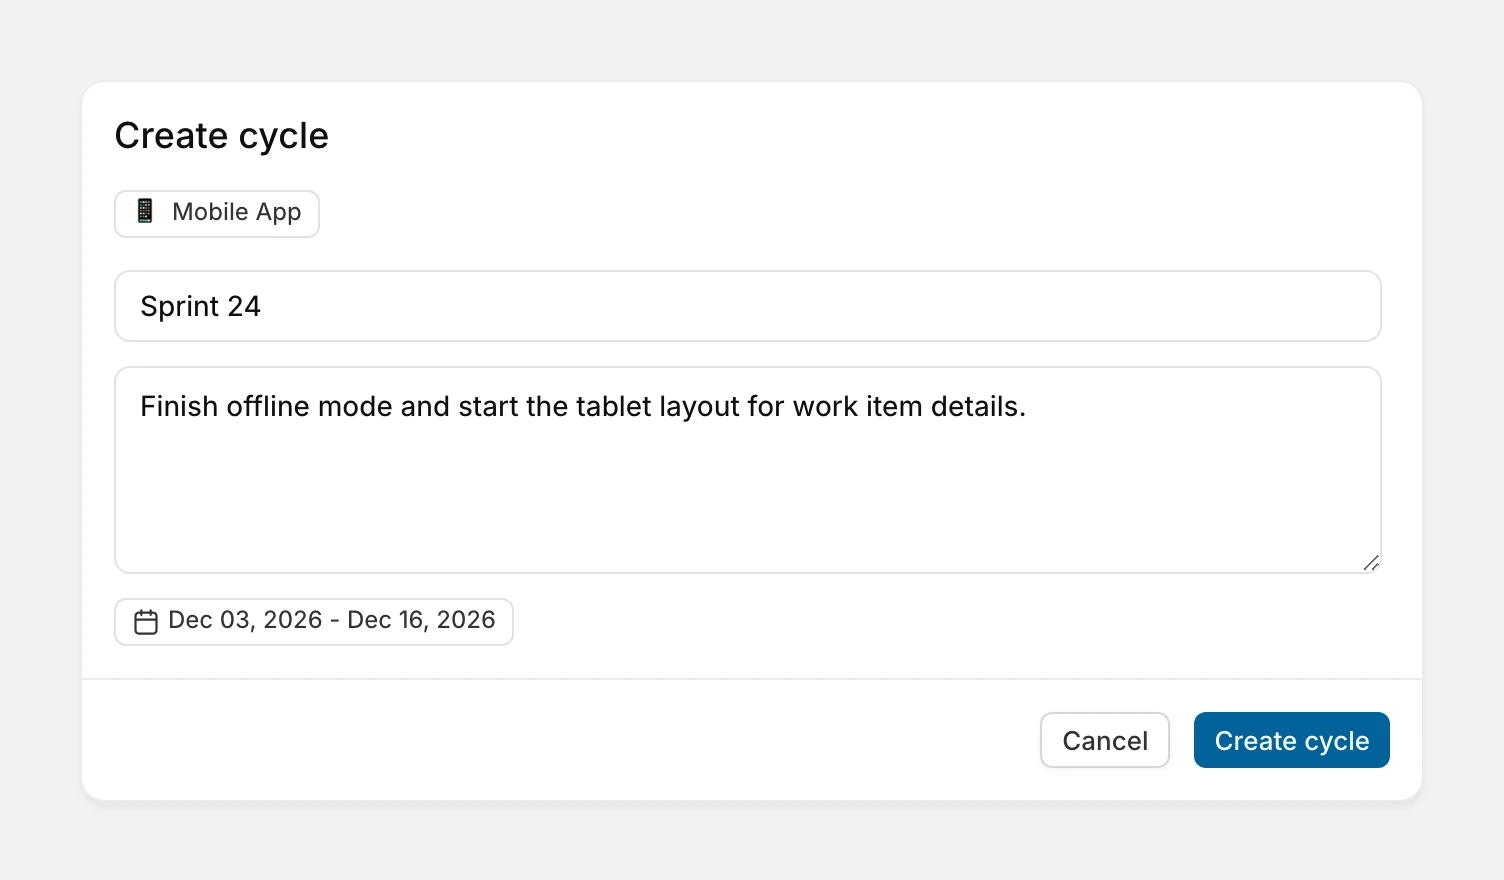
- Open Cycles in your project sidebar.
- Click Add cycle.
- Enter a Title.
- Add a description and pick a Date range if you have them.
- Click Create cycle.
You can also press N, then C to open the creation dialog. The dialog has a project selector in its header, so you can create the cycle in another project from there. A cycle needs both a start date and a due date, or neither. If you don't pick a date range, the cycle stays in draft until you schedule it.
By default, cycles in the same project cannot have overlapping dates. If the dates you pick overlap an active or upcoming cycle, Plane says you already have a cycle on those dates and suggests removing the dates to create a draft instead. To schedule overlapping work periods, enable parallel cycles.
Cycle dates follow the project's timezone. In a cycle's details panel, the date range shows the project's offset, such as UTC +05:30, when it isn't zero. Hover over the date range to see the dates In your timezone, based on your profile settings.
Parallel cycles Enterprise Grid
To run more than one cycle at a time, open Features > Cycles in project settings and turn on Parallel cycles, on the same page as Enable cycles. You can then create overlapping date ranges and have multiple active cycles in the project. This helps when teams work on separate streams, for example a two-week sprint running alongside a longer release cycle.
Each active cycle has its own work items and progress. A work item still belongs to only one cycle at a time. Adding it to another cycle moves it there.
With parallel cycles on, you can start any upcoming cycle, not only the next one. Each active cycle also gets its own card on the workspace Active cycles page and appears in teamspace cycle views.
If you turn parallel cycles off after overlapping cycles exist, those cycles stay as they are. New dates, and date changes to existing cycles, are checked for overlaps again, so you can't create a new overlap or move an overlapping cycle's dates.
Auto-schedule cycles Business
To create cycles on a recurring schedule:
- Open Features > Cycles in project settings.
- Turn on Auto-schedule cycles. The fields open for editing.
- Enter a title and configure the schedule using the fields below.
- Click Save, or Discard to drop your changes.
| Field | What to set |
|---|---|
| Cycle Title | A base name. Plane adds a number to each cycle it creates. If you set the title to "Sprint", cycles are named "Sprint 1", "Sprint 2", and so on. |
| Cycle Duration | The length of each cycle in weeks, from 1 to 30. |
| Cooldown Period | The number of days between cycles. Use zero for no gap. |
| Cycle starts day | The date the first cycle starts. It can't be in the past. |
| Number of future cycles | How many upcoming cycles to keep scheduled, from one to three. |
| Auto-rollover work items | Whether to move unfinished work items into the next cycle automatically on the day a cycle completes. |
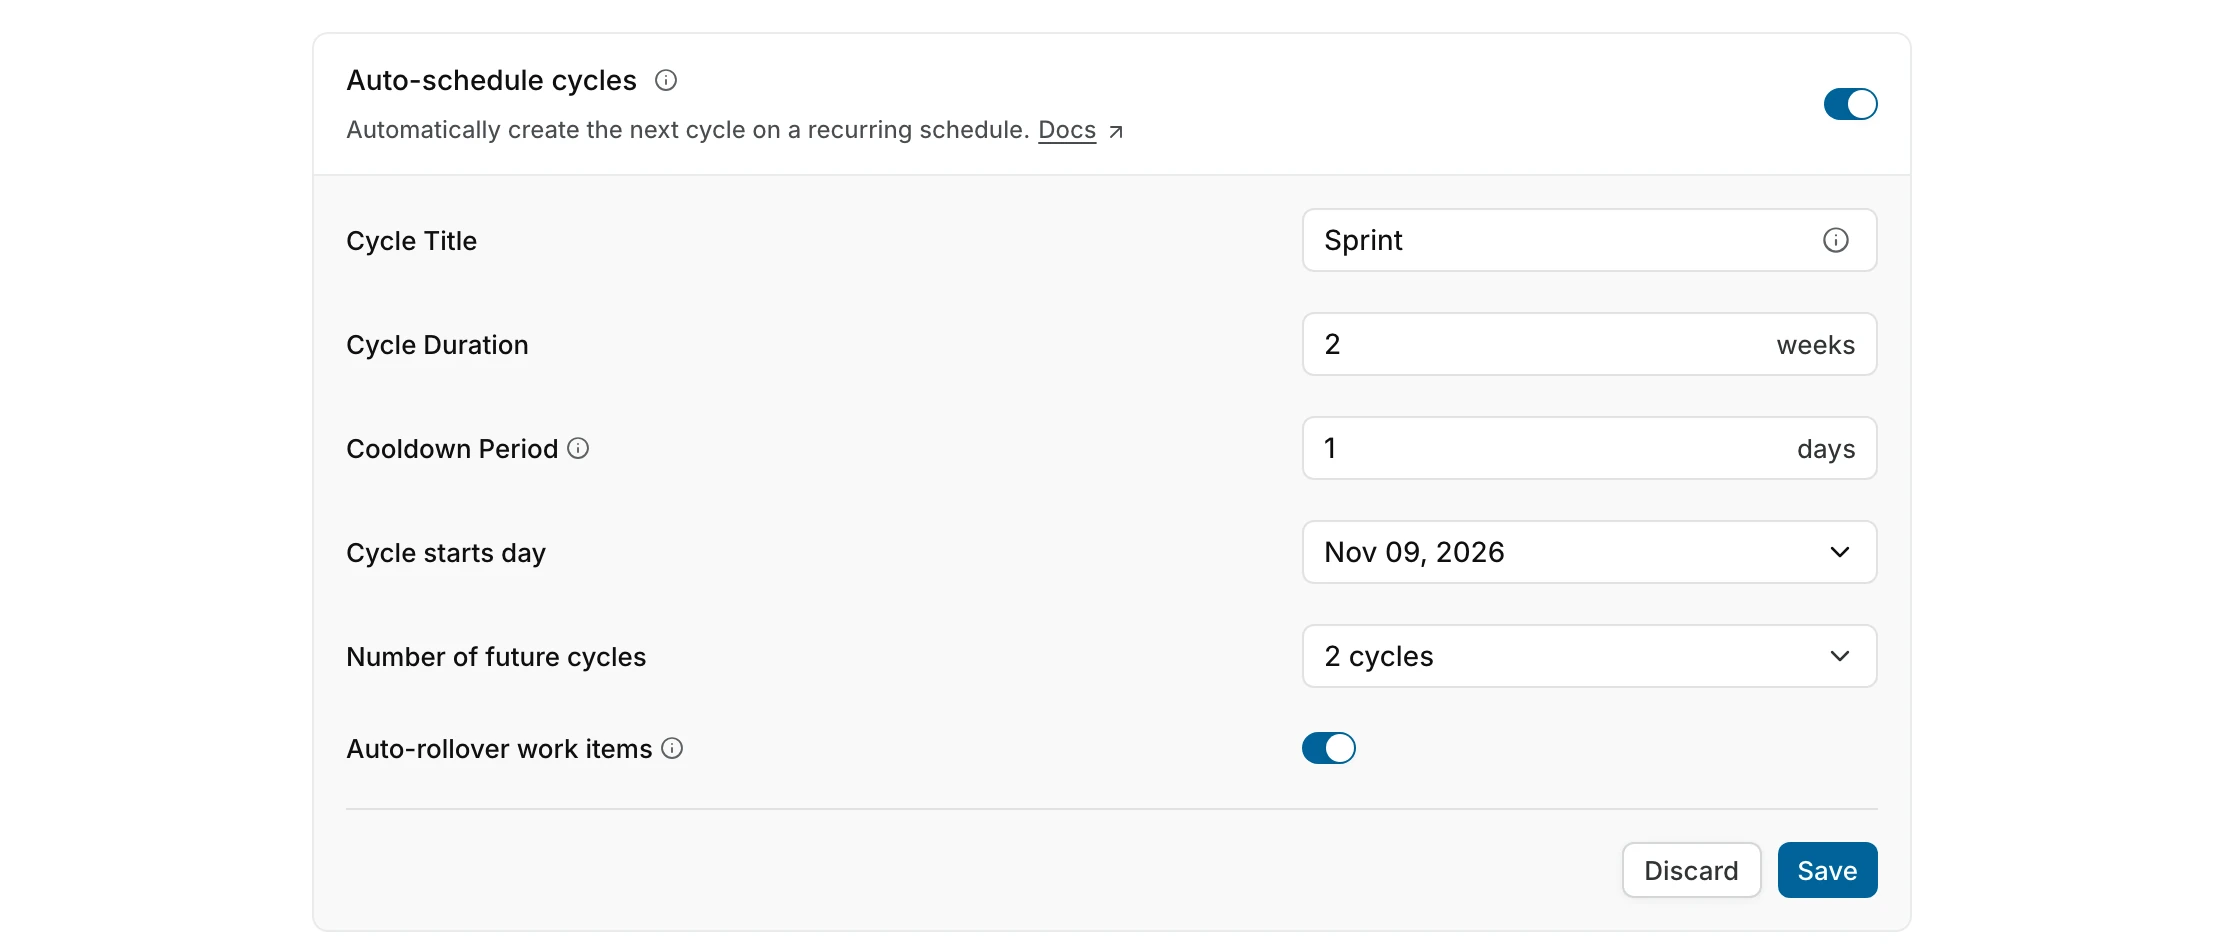
After you save, the fields are read-only. To change the schedule, click Edit next to the toggle, update the fields, and click Save. Only project admins can change the schedule.
Once the schedule is on, Plane:
- Creates upcoming cycles when you save, until the project has the number of future cycles you set. Upcoming cycles that people created by hand count toward that number.
- Creates another cycle each time a cycle starts, to keep the same number of upcoming cycles.
- Starts each new cycle after the last upcoming cycle, plus the cooldown period.
- Numbers each new cycle after the last one it created. If you change the title, numbering starts again at 1.
- With Auto-rollover work items on, moves backlog, unstarted, and started work items into the next cycle when a cycle ends, including when someone completes it early. Completed and cancelled work items stay behind.
Saving a new configuration only adds missing cycles. It doesn't rename, reschedule, or delete upcoming cycles that already exist, even if you lower the number of future cycles.
Add work items
Open a cycle, click + on the work item list's header, and choose Create work item or Add an existing work item. A cycle with no work items shows Create work item and Add existing work item buttons instead.

You can also select the Cycle property in a work item's details. A work item can belong to one cycle at a time. Selecting another cycle moves the work item out of its previous cycle. Completed cycles don't appear in the list, and you can't add work items to them.
Cycle states
Plane determines a cycle's state from its dates.
| State | Meaning |
|---|---|
| Draft | The cycle has no dates yet. |
| Upcoming | The start date is in the future. |
| Active | The current date falls within the cycle's date range. |
| Completed | The due date has passed or someone has completed the cycle early. |
On the cycle list, an active cycle's badge reads In progress or shows the days left.
A completed cycle can still contain unfinished work items. Completing a cycle does not change those work items' states.
To edit a draft, upcoming, or active cycle, open its menu and select Edit. In the Update cycle dialog, you can change its title, description, and dates. You can also change the dates from the cycle's details panel. Date changes must still respect the project's overlap setting. Completed and archived cycles are not editable.
Start or complete a cycle early Pro
The actions appear in the cycle's menu, or as buttons beside its name when Manual cycle advancement is on. To use them, you need permission to edit the cycle. Project admins can edit any cycle, and contributors can edit cycles they created.
To start ahead of schedule, select Start cycle for an upcoming cycle. Click Start cycle in the confirmation dialog. The cycle's start date changes to today. Without parallel cycles, you can start only the next upcoming cycle, and you must complete any active cycle first.
WARNING
You cannot restart a cycle after you complete it.
To finish early, select Complete cycle for the active cycle. The cycle's due date changes to today. If no work remains, confirm with Complete cycle. You can't edit the cycle afterward, and its data is frozen for analytics.
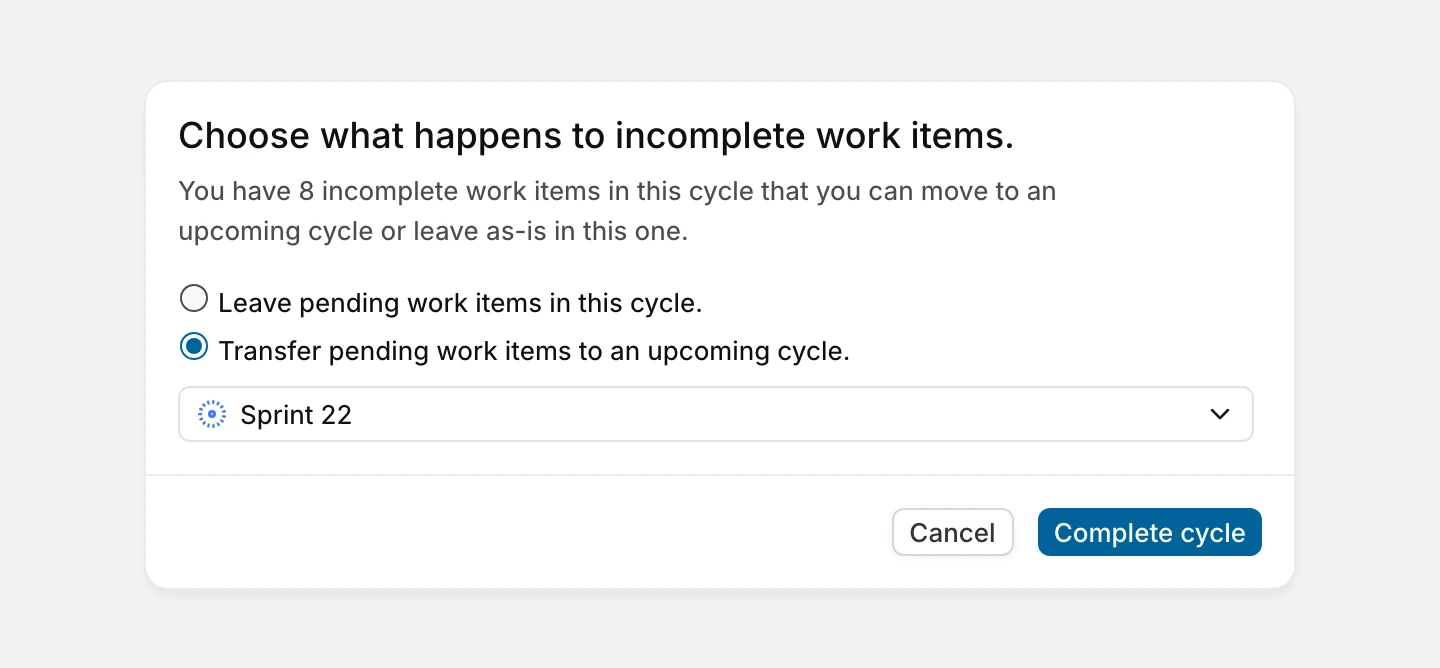
If work remains, the dialog asks what happens to the incomplete work items. Choose Leave pending work items in this cycle, which is the default, or choose Transfer pending work items to an upcoming cycle and select an upcoming or draft cycle. Click Complete cycle to confirm.
Manual cycle advancement Enterprise Grid
Turn on Manual cycle advancement under Features > Cycles in project settings to show Start cycle and Complete cycle as buttons. They appear beside the cycle's name in the cycle list, in the cycle's header, and on the active cycle's progress view, instead of in the cycle's menu. Project admins and workspace admins can change this setting.
A cycle's state still comes from its dates. An upcoming cycle becomes active on its start date, and an active cycle completes on its due date, whether or not this setting is on.
Transfer unfinished work
If a completed cycle has unfinished work that you have not transferred yet, you can move it to another cycle. You need permission to edit the cycle.
- Open the completed cycle. A banner reads Completed cycles are not editable.
- Click Transfer work items. You can also click Transfer {count} work items on the cycle's row in the cycle list.
- Select an active, upcoming, or draft cycle in the same project.
- Click Submit.
Plane moves the work items in backlog, unstarted, and started states. Completed and cancelled work items stay in the original cycle. The transfer option disappears after you use it once for a cycle.
Track progress
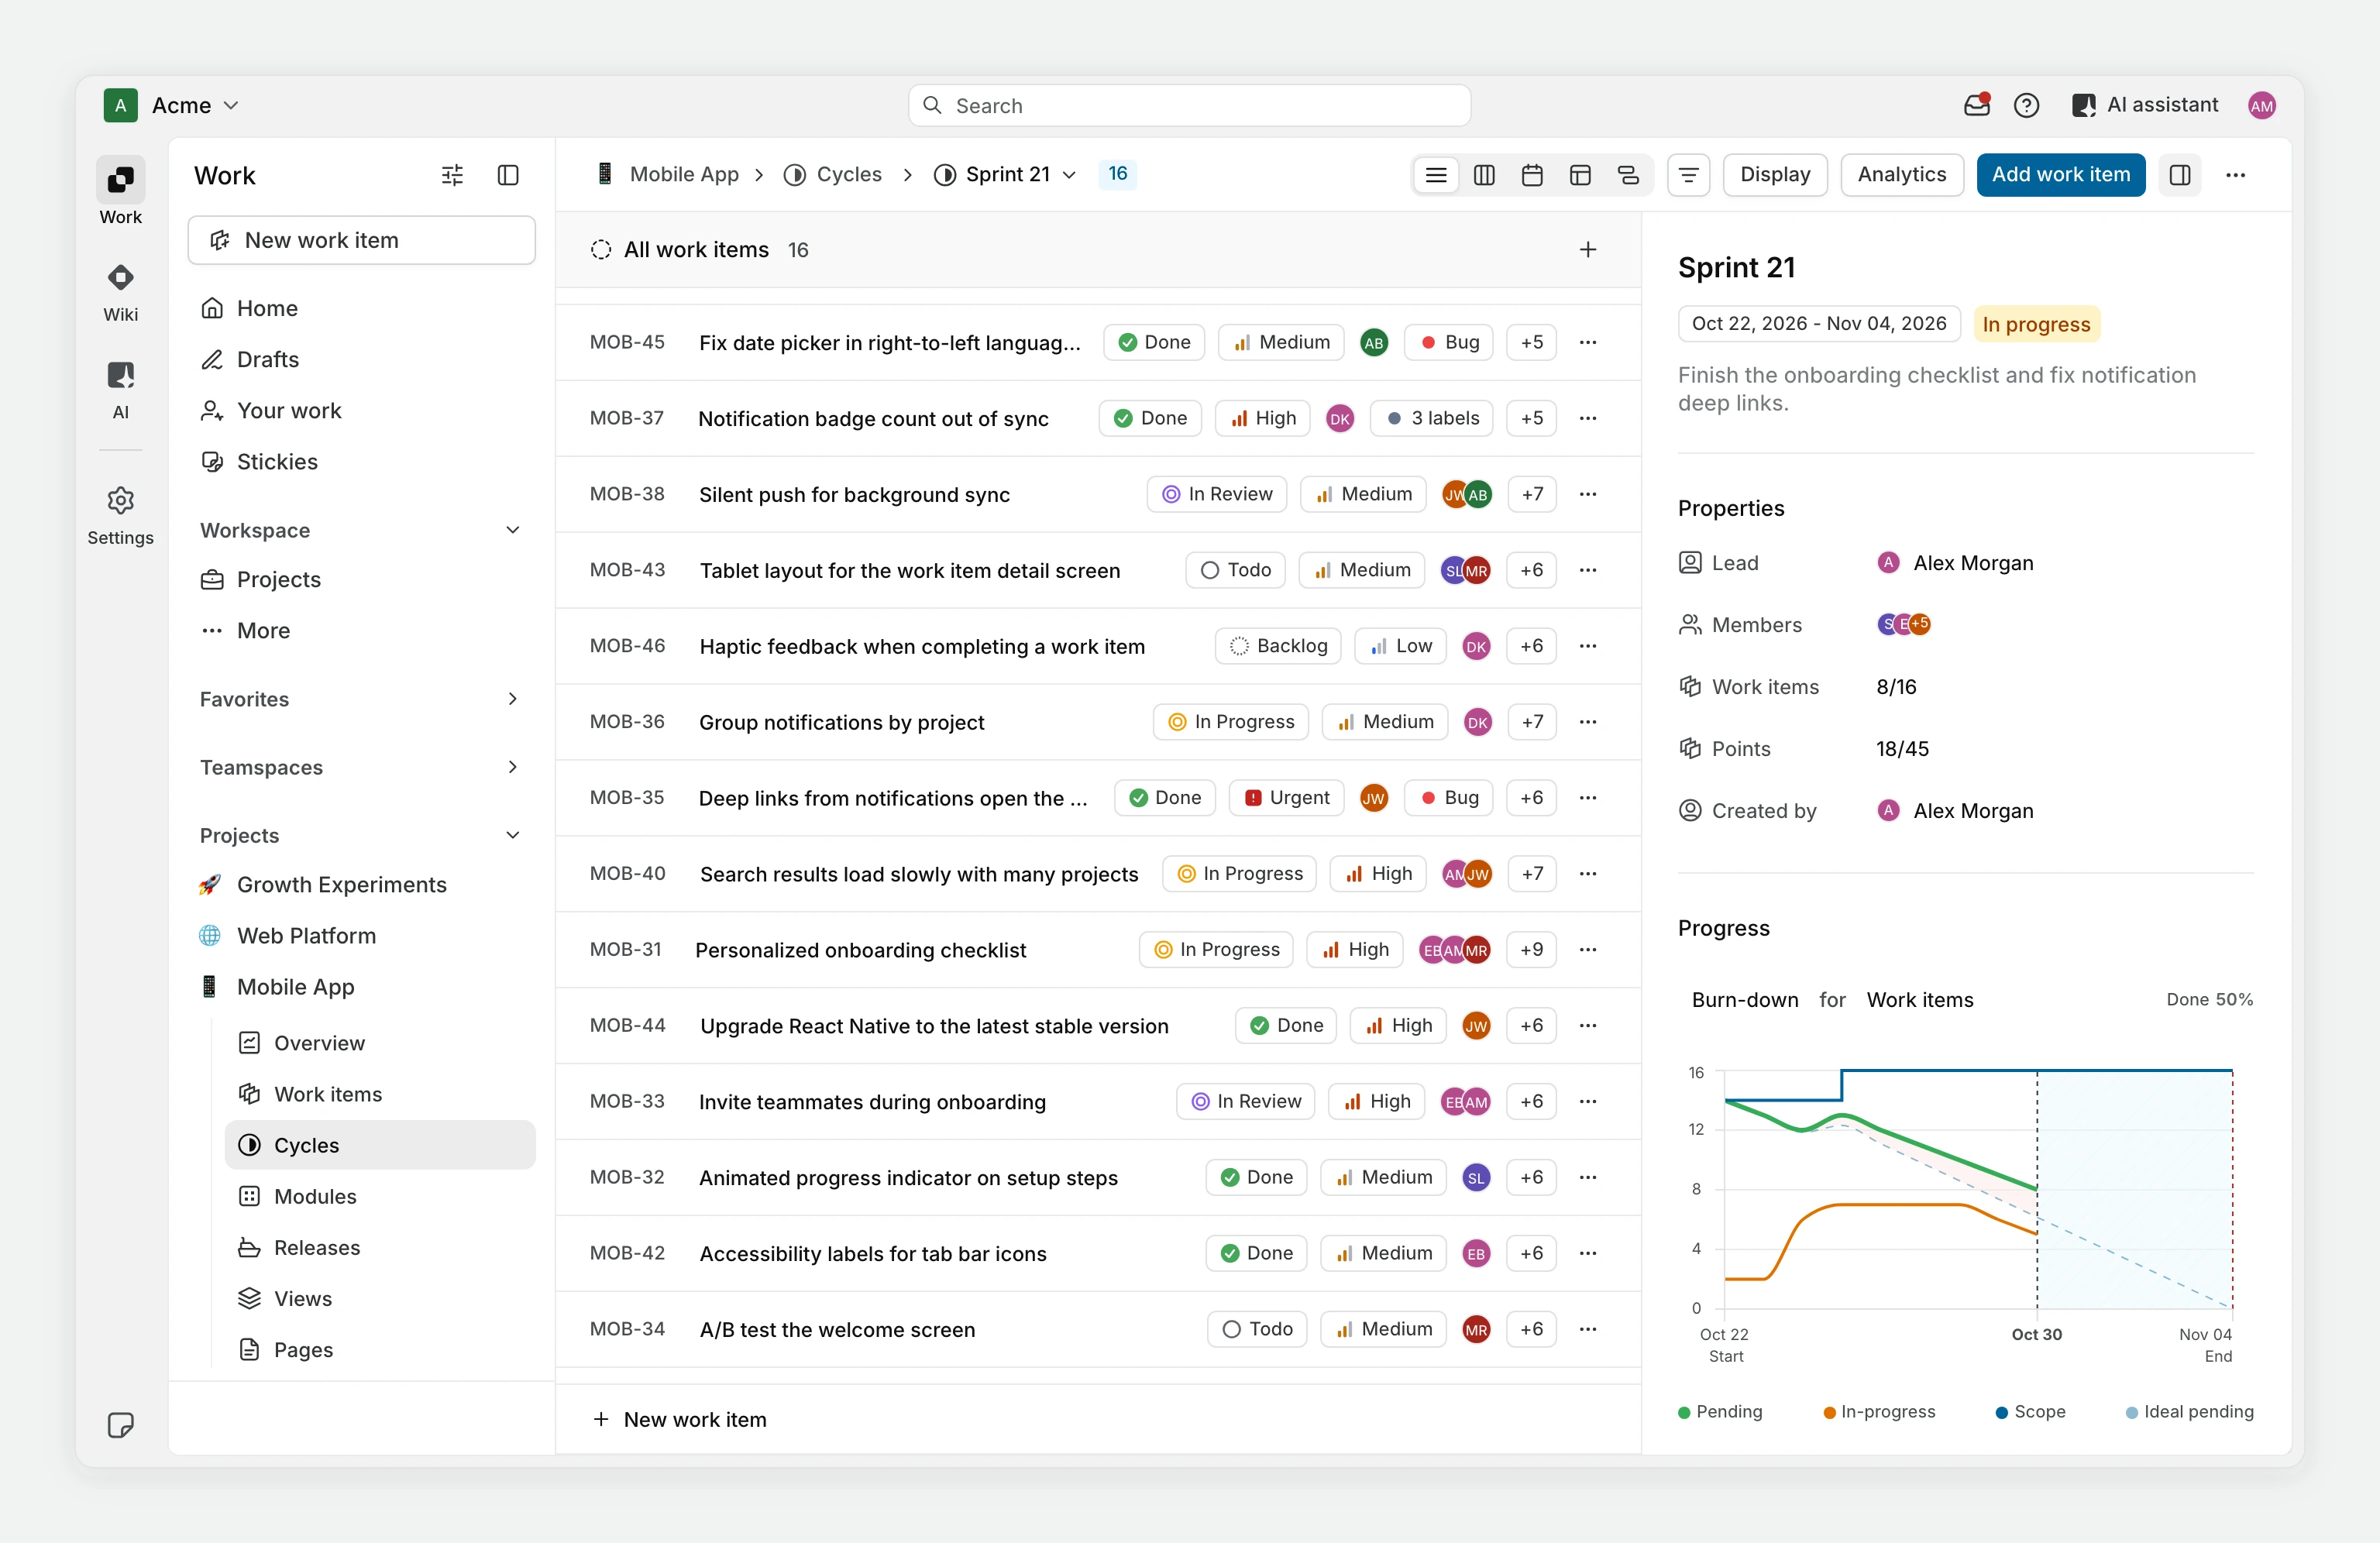
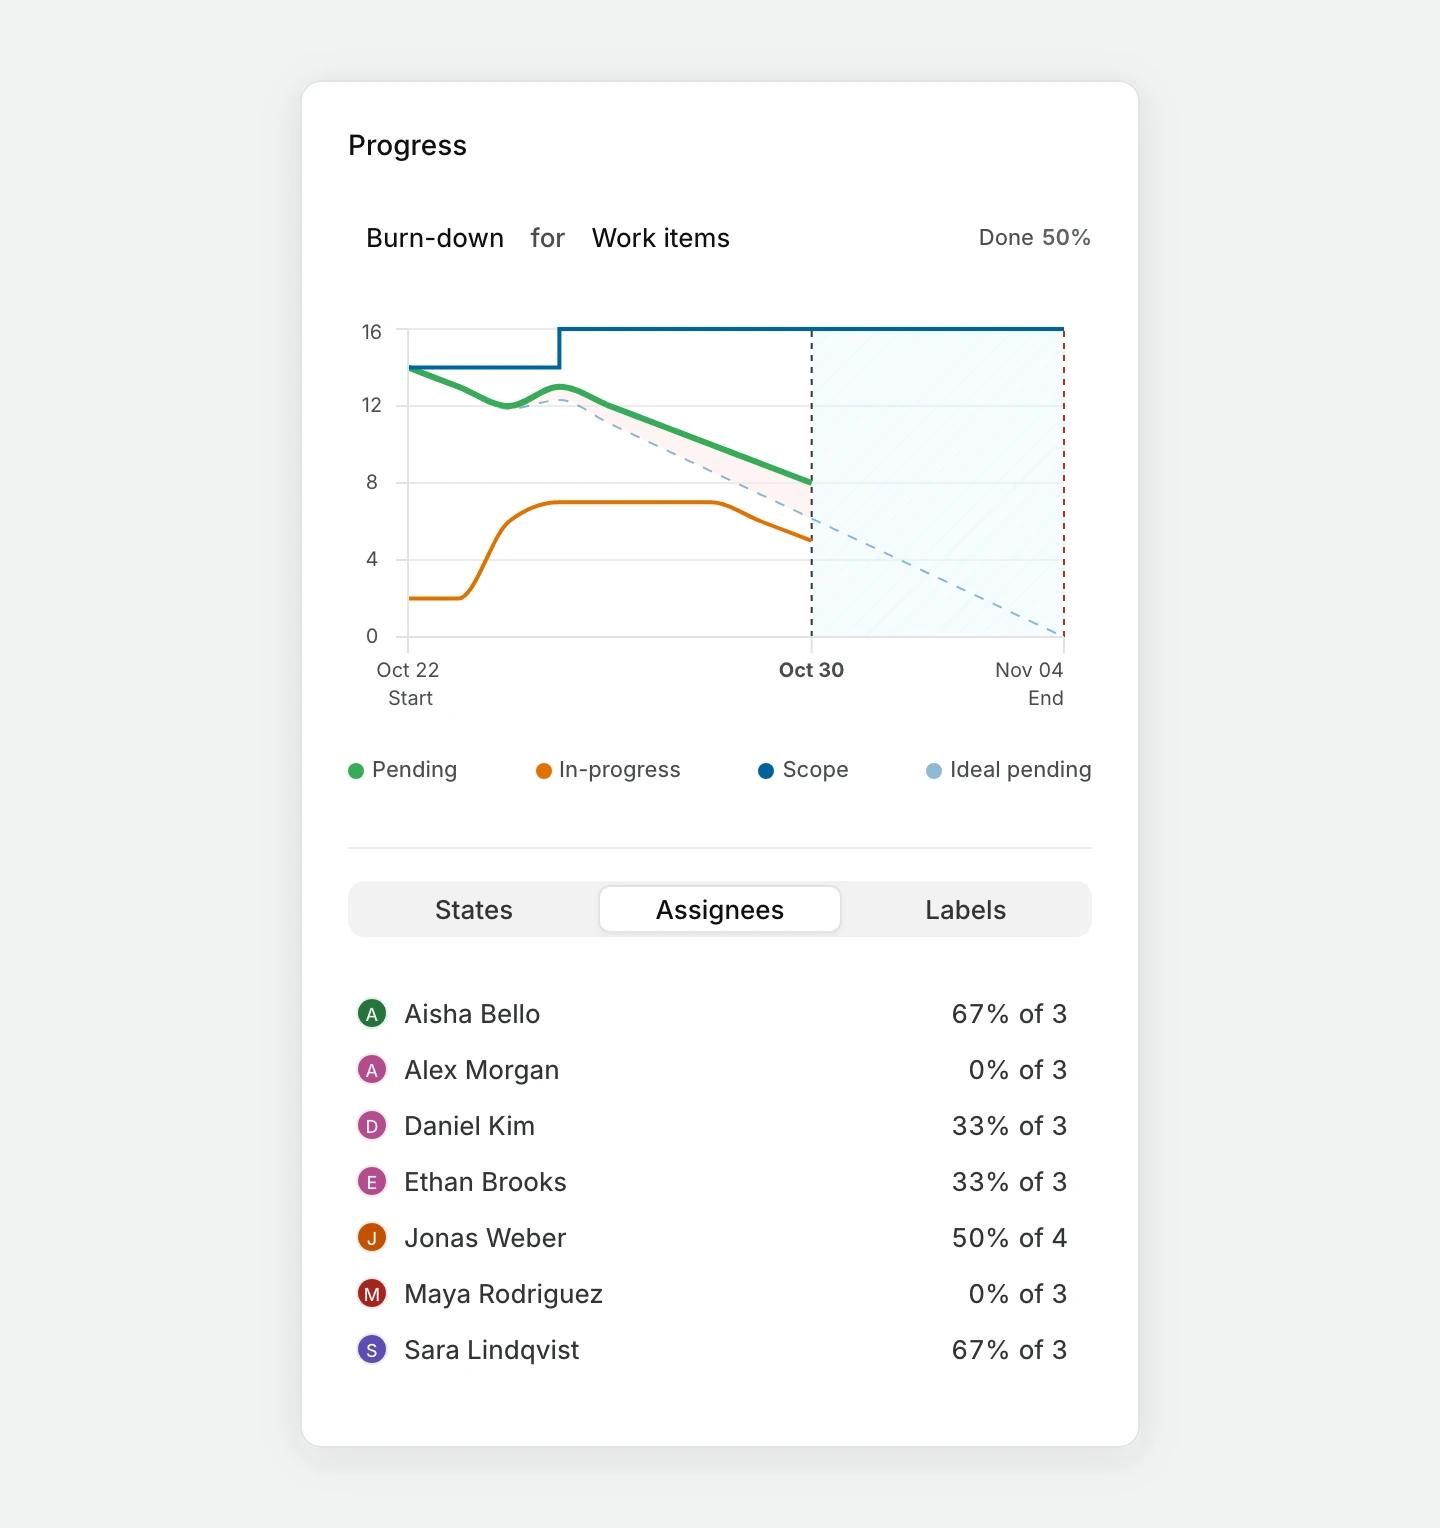
Open a cycle to review its work items. The details panel beside the list shows the cycle's progress: a burn-down chart and breakdowns by state, assignee, and label, so you can find unfinished work before the due date. The breakdown opens on the Assignees tab, and you can switch to States or Labels. The panel also shows how many work items are complete out of the cycle's scope, and the points when the project uses point estimates.
The chart appears once the cycle has started. A cycle without dates shows No Data yet. You can hide the panel to give the list more room.
Progress charts Pro
The Active tab on the project's Cycles page shows each active cycle's chart with a summary beside it. When several cycles are active, the first one is expanded and the others appear as compact rows. Click a row to expand it. Each row shows the cycle's completion percentage, its completed and total work items, and whether it's leading or trailing.
The selector above the chart reads as one sentence, such as Burn-down for Work items. Choose Burn-down to compare remaining work with the ideal pace, or Build-up to compare completed work with that pace. Use Work items to measure progress by item count. If the project uses point or time estimates, choose Estimates to measure the remaining or completed effort. Time estimates show in hours. Category estimates don't have this option.
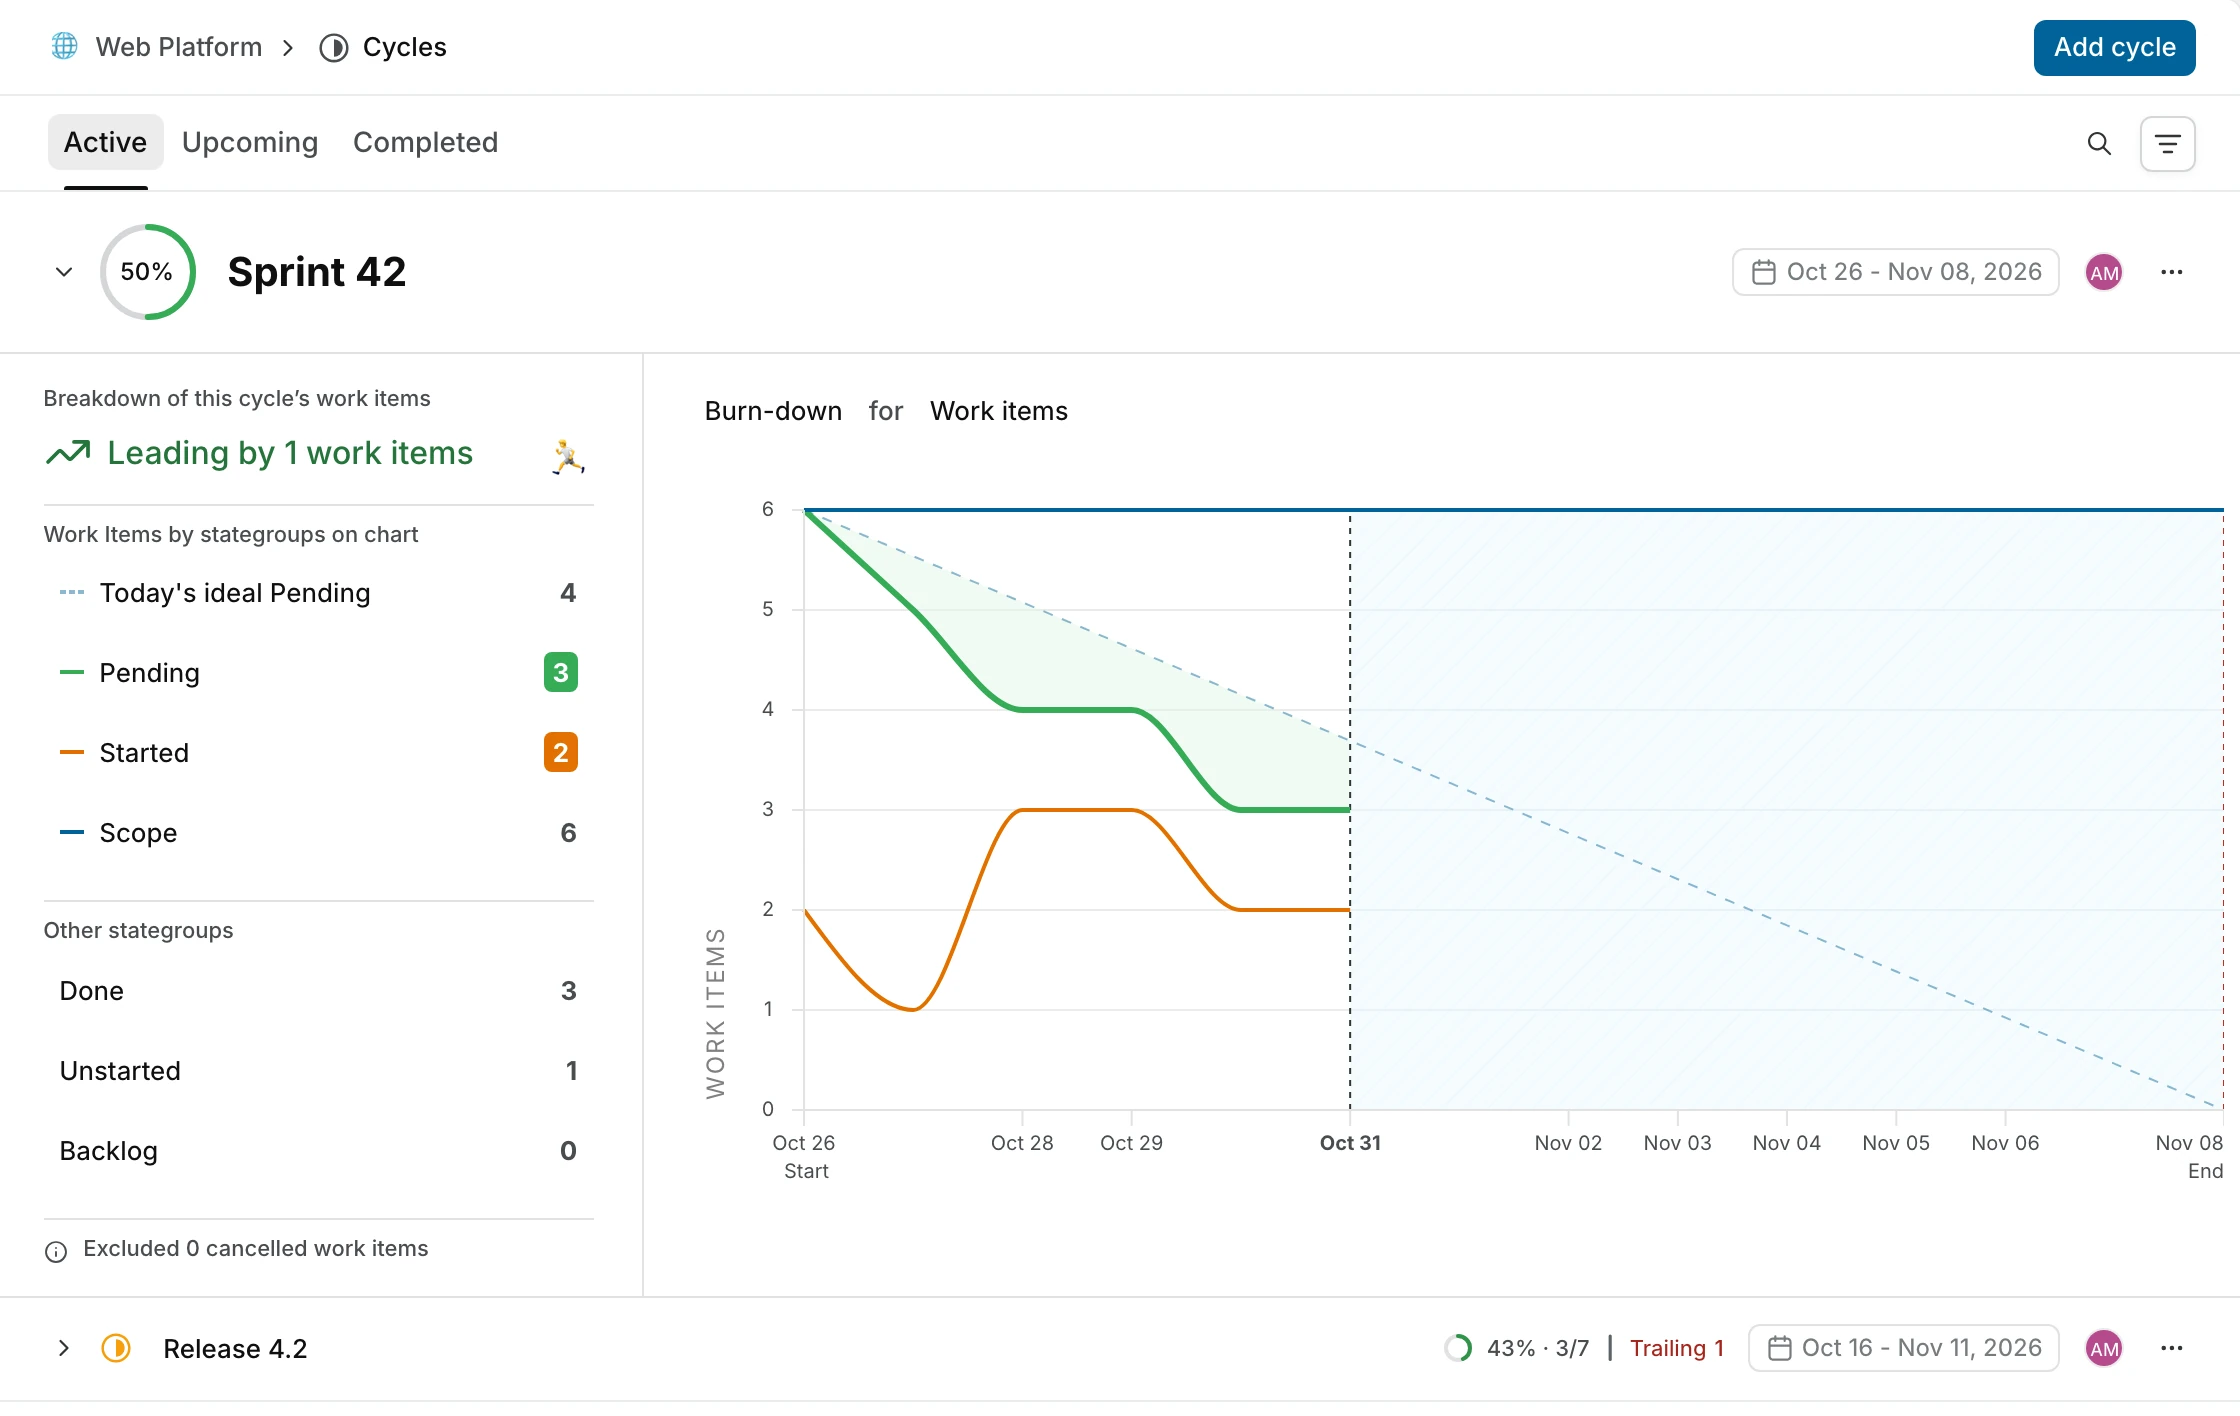
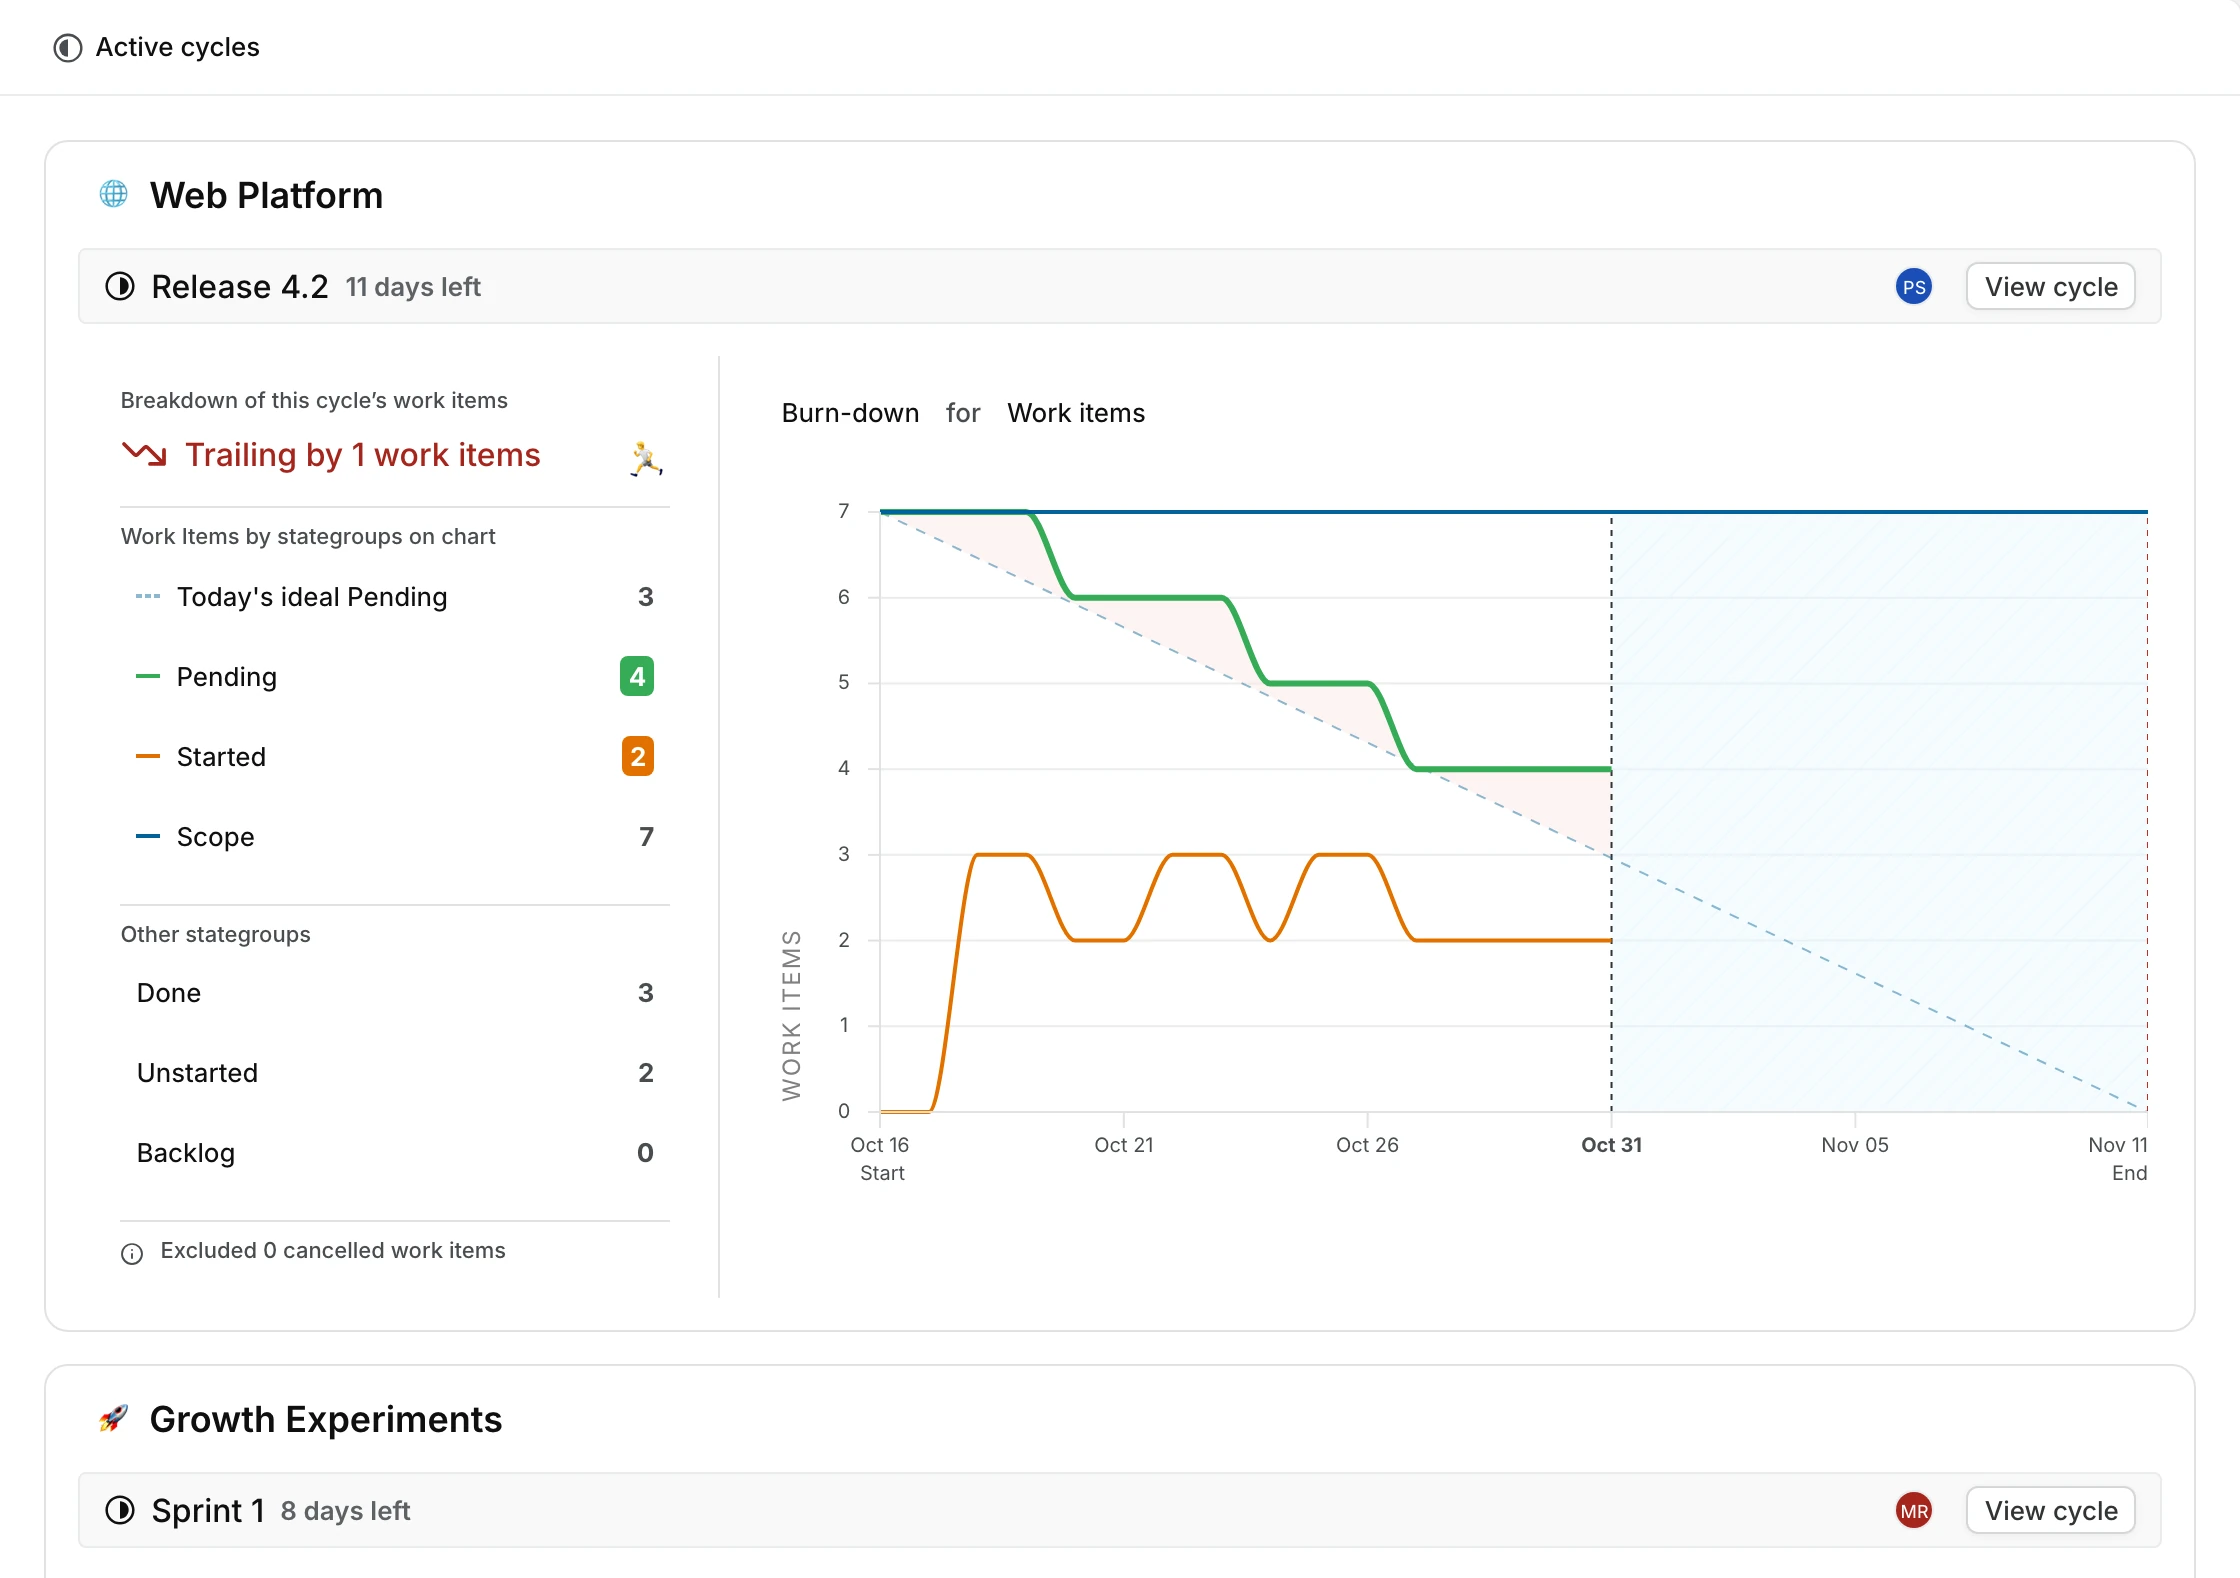
The ideal pace is a straight line across the cycle's days, scaled to its scope. When the team is ahead, the area between the ideal line and the actual line is green. When the team is behind, it's red. A progress ring shows the share of the scope that's done.
The summary's headline says whether the cycle is leading or trailing the ideal pace, and by how much, such as Trailing by 3 work items. Leading shows in green and trailing in red. The rest of the summary uses these terms:
| Metric | Meaning |
|---|---|
| Today's ideal Pending | How much work should still be pending today at the ideal pace. Shown for burn-down. |
| Today's ideal Done | How much work should be done by today at the ideal pace. Shown for build-up. |
| Pending | Work that is neither completed nor cancelled. |
| Started | Work items in a started state. |
| Scope | All work in the cycle except cancelled work. Scope changes when work is added or removed. |
| Done | Completed work. |
| Unstarted | Work items in an unstarted state, separate from backlog. |
| Backlog | Work items in a backlog state. |
The chart's legend and tooltips call started work In-progress. Below the summary, Plane notes how many cancelled work items it excluded and how many times the scope has changed. Hover over a row to highlight its line on the chart, or click it to filter the work items by that state group.
View and find cycles
Use the Active, Upcoming, and Completed tabs on the project's Cycles page. Draft cycles appear with upcoming cycles. Search by name or filter by Start date and Due date to narrow the list.
Open a cycle's menu and select Copy link to share it, or Add to favorites to save it for later.
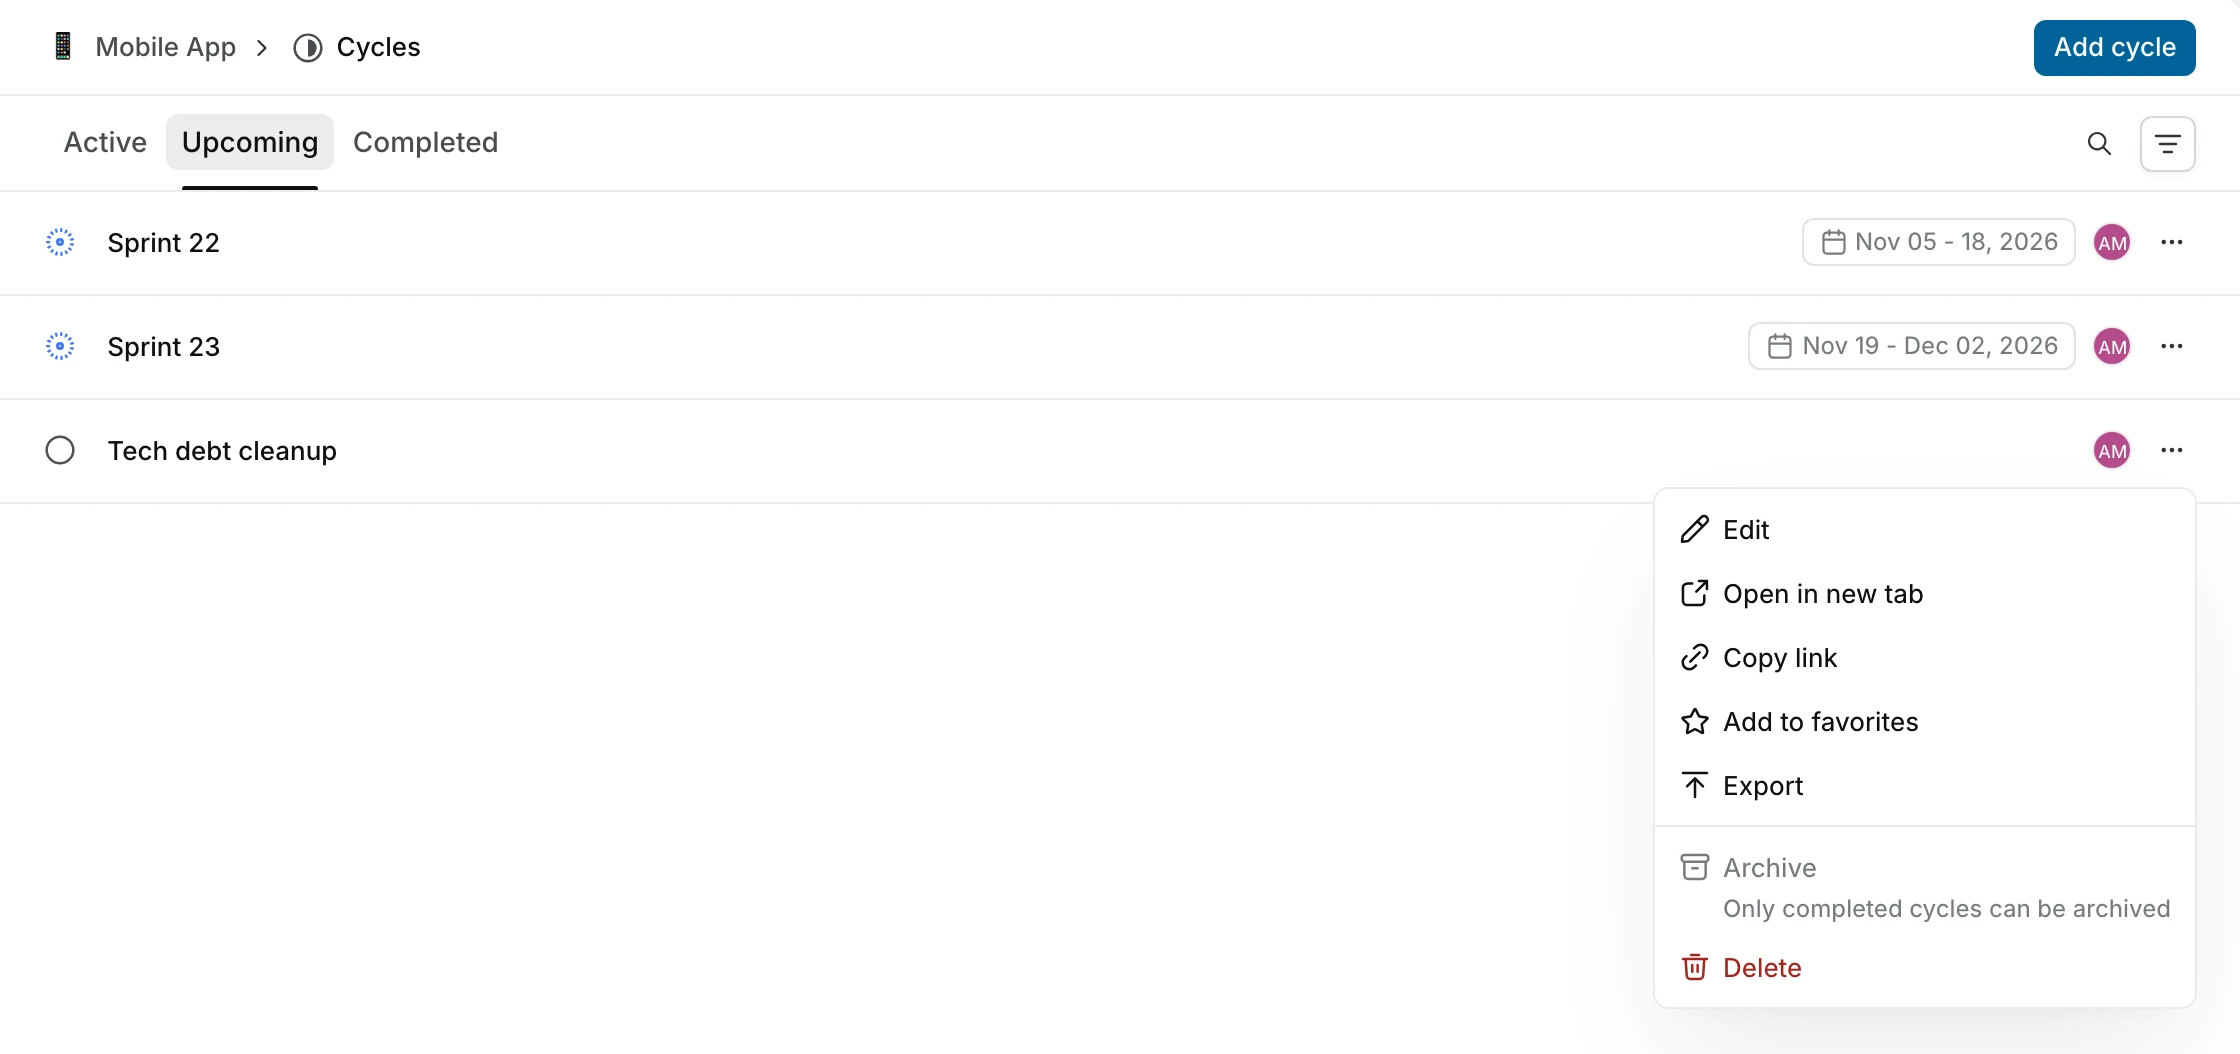
Depending on the cycle's state and your permissions, the menu can also show Edit, Open in new tab, Start cycle, Complete cycle, Export, Archive, Restore, and Delete.
Active cycles across projects Pro
Open Cycles in the workspace sidebar to see the Active cycles page, with the active cycles of every project you can view. Each active cycle gets its own card, labeled with its project, so a project that uses parallel cycles gets one card for each active cycle. A card shows the days left, the cycle's lead and assignees, a View cycle button, and the cycle's progress chart with whether it's leading or trailing the ideal pace.
A teamspace's Cycles view shows Current, Upcoming, and Completed cycles from its linked projects.
Archive a cycle
Only completed cycles can be archived. For any other cycle, Archive appears in the menu but is turned off. To archive a completed cycle, open its menu and select Archive. Click Archive in the confirmation dialog.
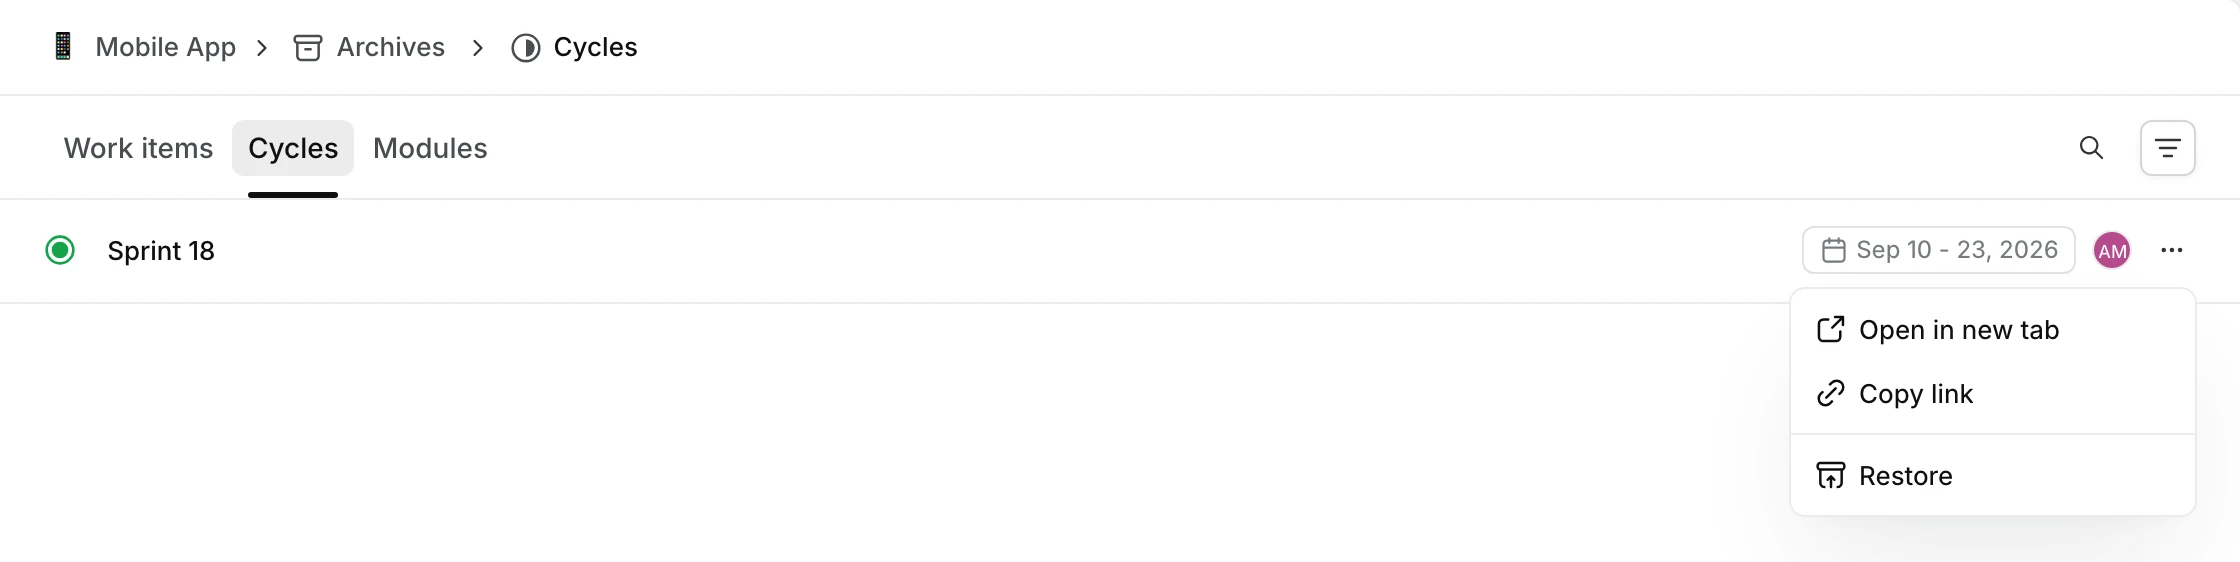
To find archived cycles, open the project's menu, select Open archives, and open the Cycles tab. To return a cycle to the completed list, select Restore from its menu. The cycle is restored right away, without a confirmation.
Delete a cycle
You can delete a draft, upcoming, or active cycle from its menu. Use Archive to remove a completed cycle from the main list. Project admins can delete any cycle, and contributors can delete cycles they created.
WARNING
Deleting a cycle cannot be undone. The cycle and its progress view are no longer available. Its work items remain in the project, without a link to the deleted cycle.
- Open the cycle's menu and select Delete.
- Click Delete to confirm.
Export work items Pro
The export contains the cycle's work items and their properties, with the current work item filters applied. You need permission to export, which commenters and guests don't have.
- Open an unarchived cycle.
- Apply the filters you want to use.
- Open the menu and select Export.
- Choose CSV, Excel, or JSON.
- Click Continue.
- Click View Exports in the Export started message to open workspace Exports in a new tab.
- Under Previous exports, click Download when the export is complete.
Export is also in each cycle's menu on the Cycles page. See custom exports for more export options.