Single sign-on (SSO) Business
Single sign-on (SSO) lets your team sign in to Plane using your organization's identity provider instead of managing separate passwords. This centralizes authentication, improves security, and simplifies user management.
Verify your domain
Before configuring SSO, you must verify ownership of your organization's email domain. This ensures only authorized administrators can configure authentication for that domain.
WARNING
Each domain can only be verified in one workspace at a time. If you've already verified a domain in another workspace, you'll need to remove it there first.
Add your domain
Navigate to Workspace Settings → Identity.
Under Domain management, click Add domain.
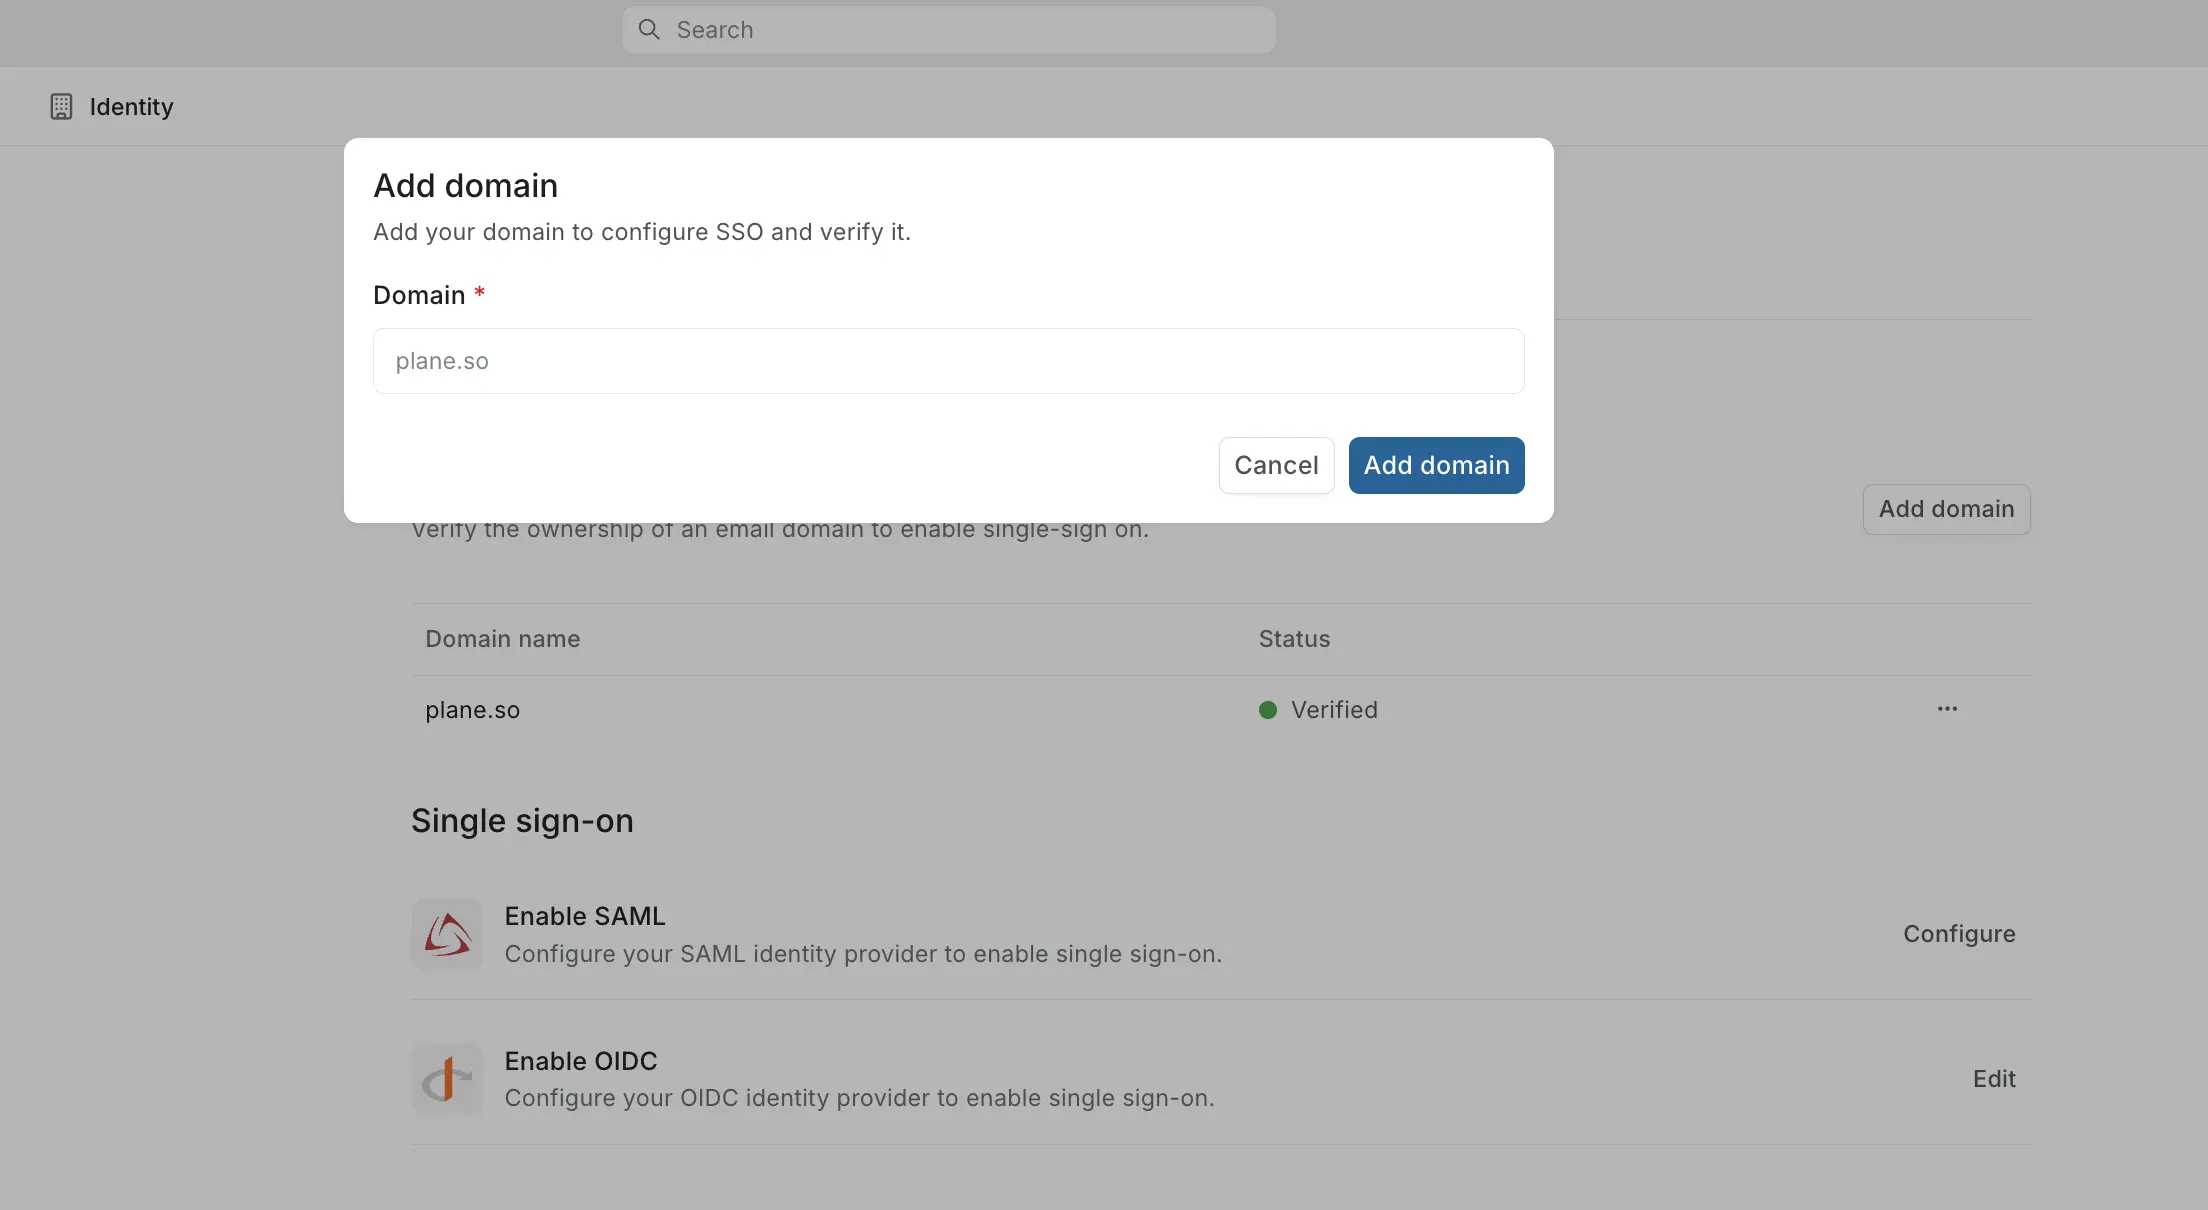
Enter your domain (for example,
acme.com) and click Add domain.In the Verify your domain modal that appears, copy the TXT record value.
TIP
Click I'll do it later if you need time to access your DNS. Your domain will appear with a Pending status. To resume verification later, click the ⋯ menu next to your domain and select Verify.
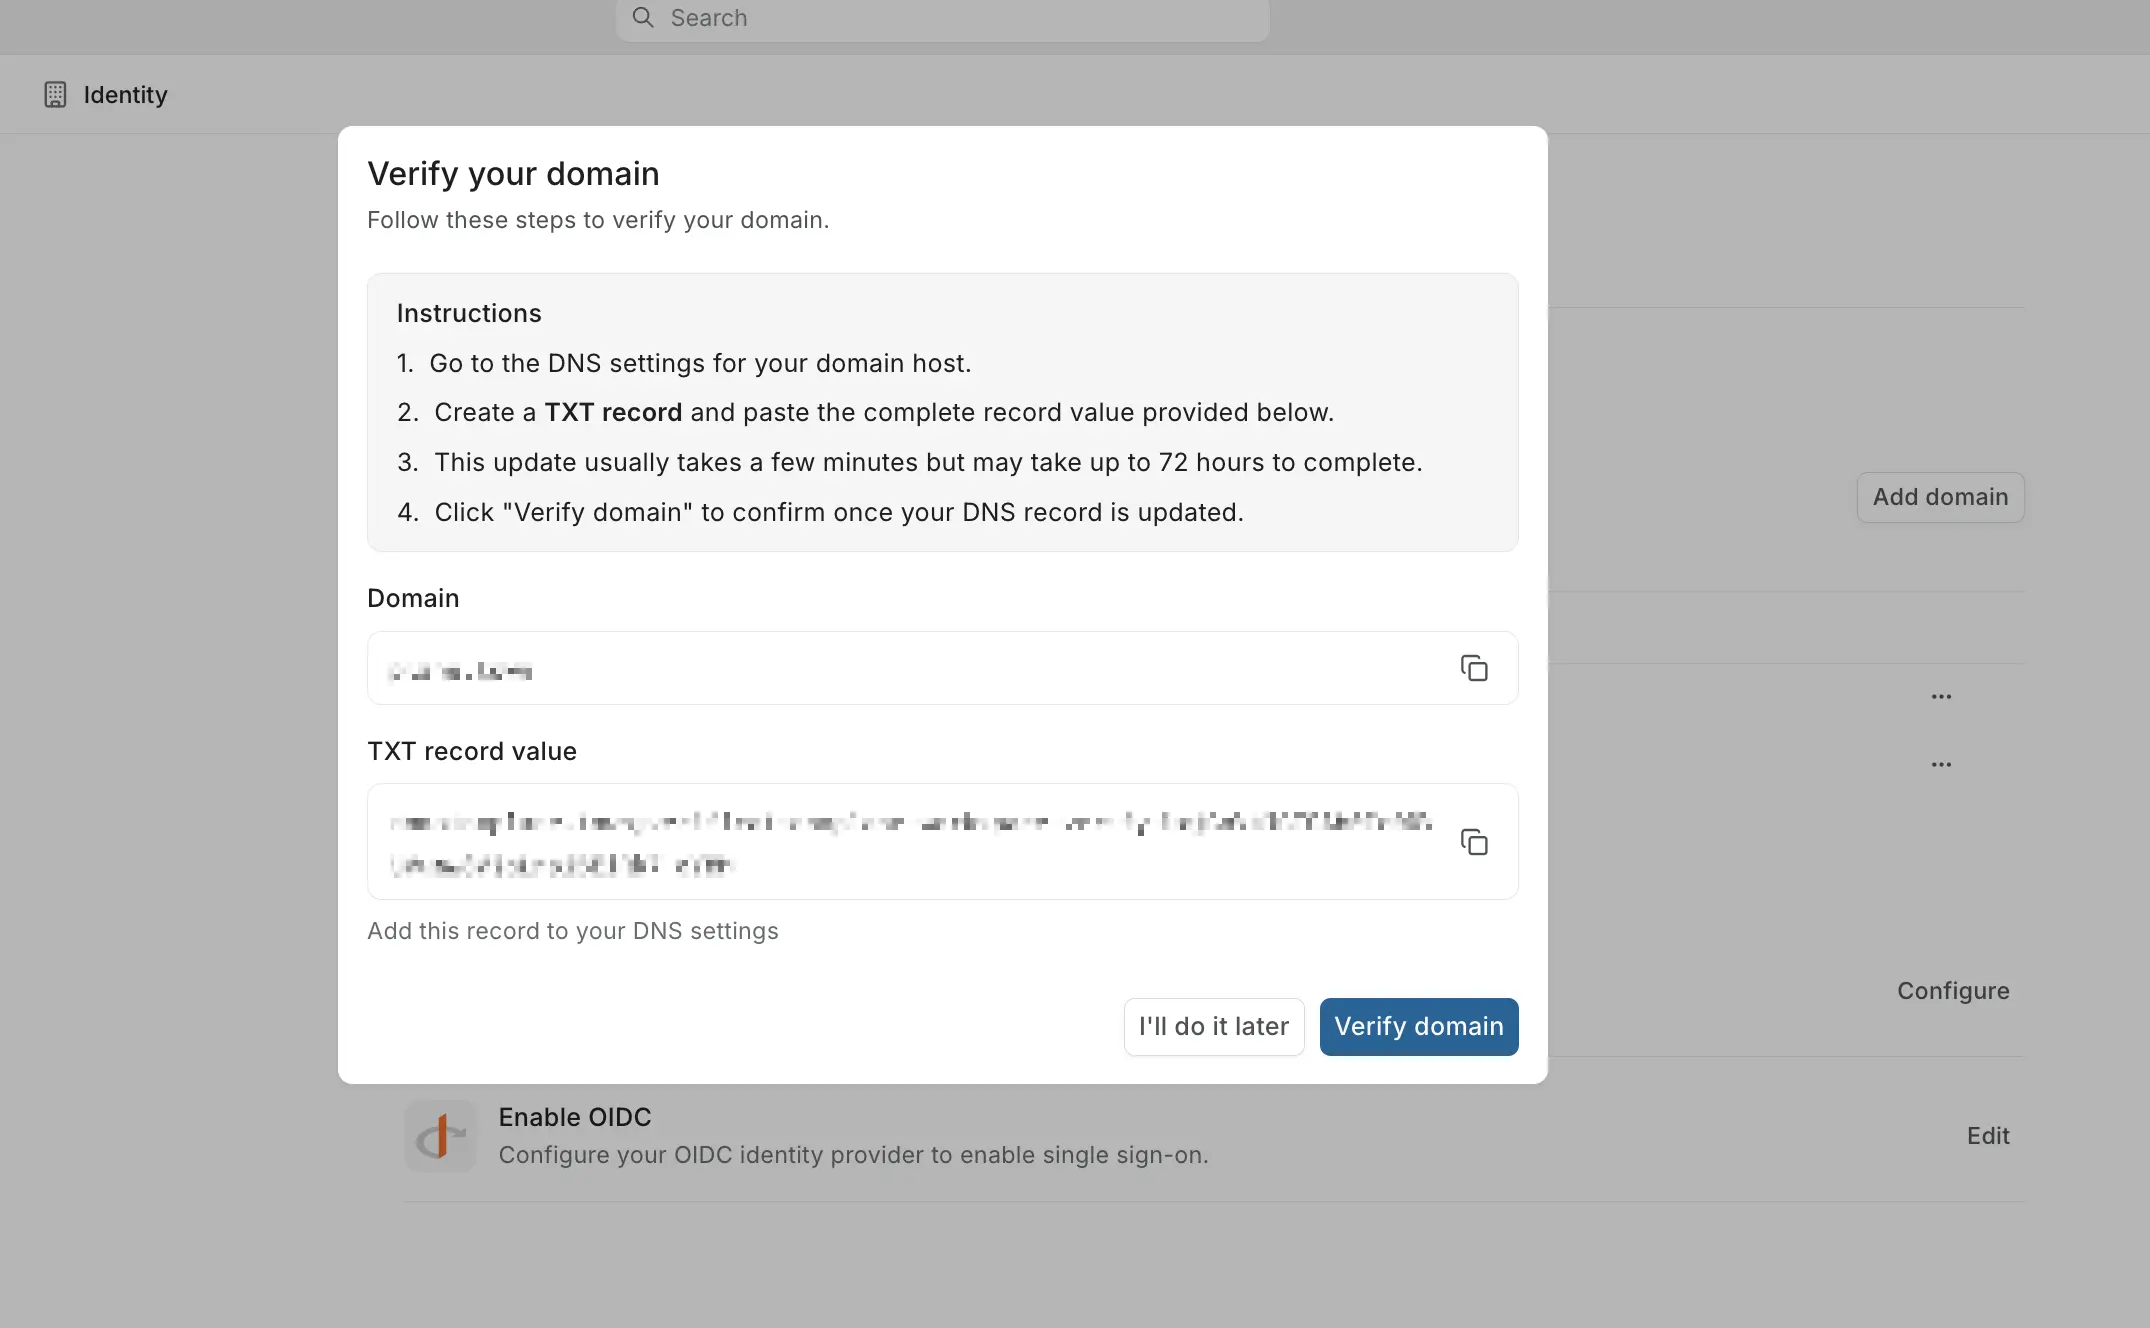
Add the DNS record
- Sign in to your DNS provider.
- Create a new TXT record:
- Host/Name:
@(or leave blank for root domain). - Value: Paste the TXT record value from Plane.
- TTL: Use default or 3600.
- Host/Name:
- Wait a few minutes for DNS propagation.
- Return to Plane and click Verify domain.
Once verified, the status changes to Verified and you can configure SSO.
TIP
DNS propagation times vary by provider. If verification fails immediately, wait a few more minutes and try again. You can check if the TXT record is live using dig TXT yourdomain.com or online DNS lookup tools.
Configure SSO
Plane supports two authentication protocols. Choose the one that matches your identity provider.
OIDC (OpenID Connect)
OIDC works best with modern cloud identity providers like Google Workspace, Auth0, Okta, and Keycloak.
Get Plane connection details
Navigate to Workspace Settings → Identity.
Click Configure next to Enable OIDC.
Click Get setup details and copy these values:
- Origin URL
- Redirect URL
- Logout URL
You'll use these when configuring your IdP.
Register Plane in your identity provider
The exact steps vary by provider, but generally:
- Sign in to your identity provider.
- Create a new Web Application or OIDC Client.
- Paste the Redirect URL from Plane into the redirect URI field.
- Configure the application:
- Application type: Web Application.
- Enable authorization code flow.
- Request scopes:
openid,email,profile.
- Save and note the Client ID and Client Secret your IdP generates.
Configure OIDC in Plane
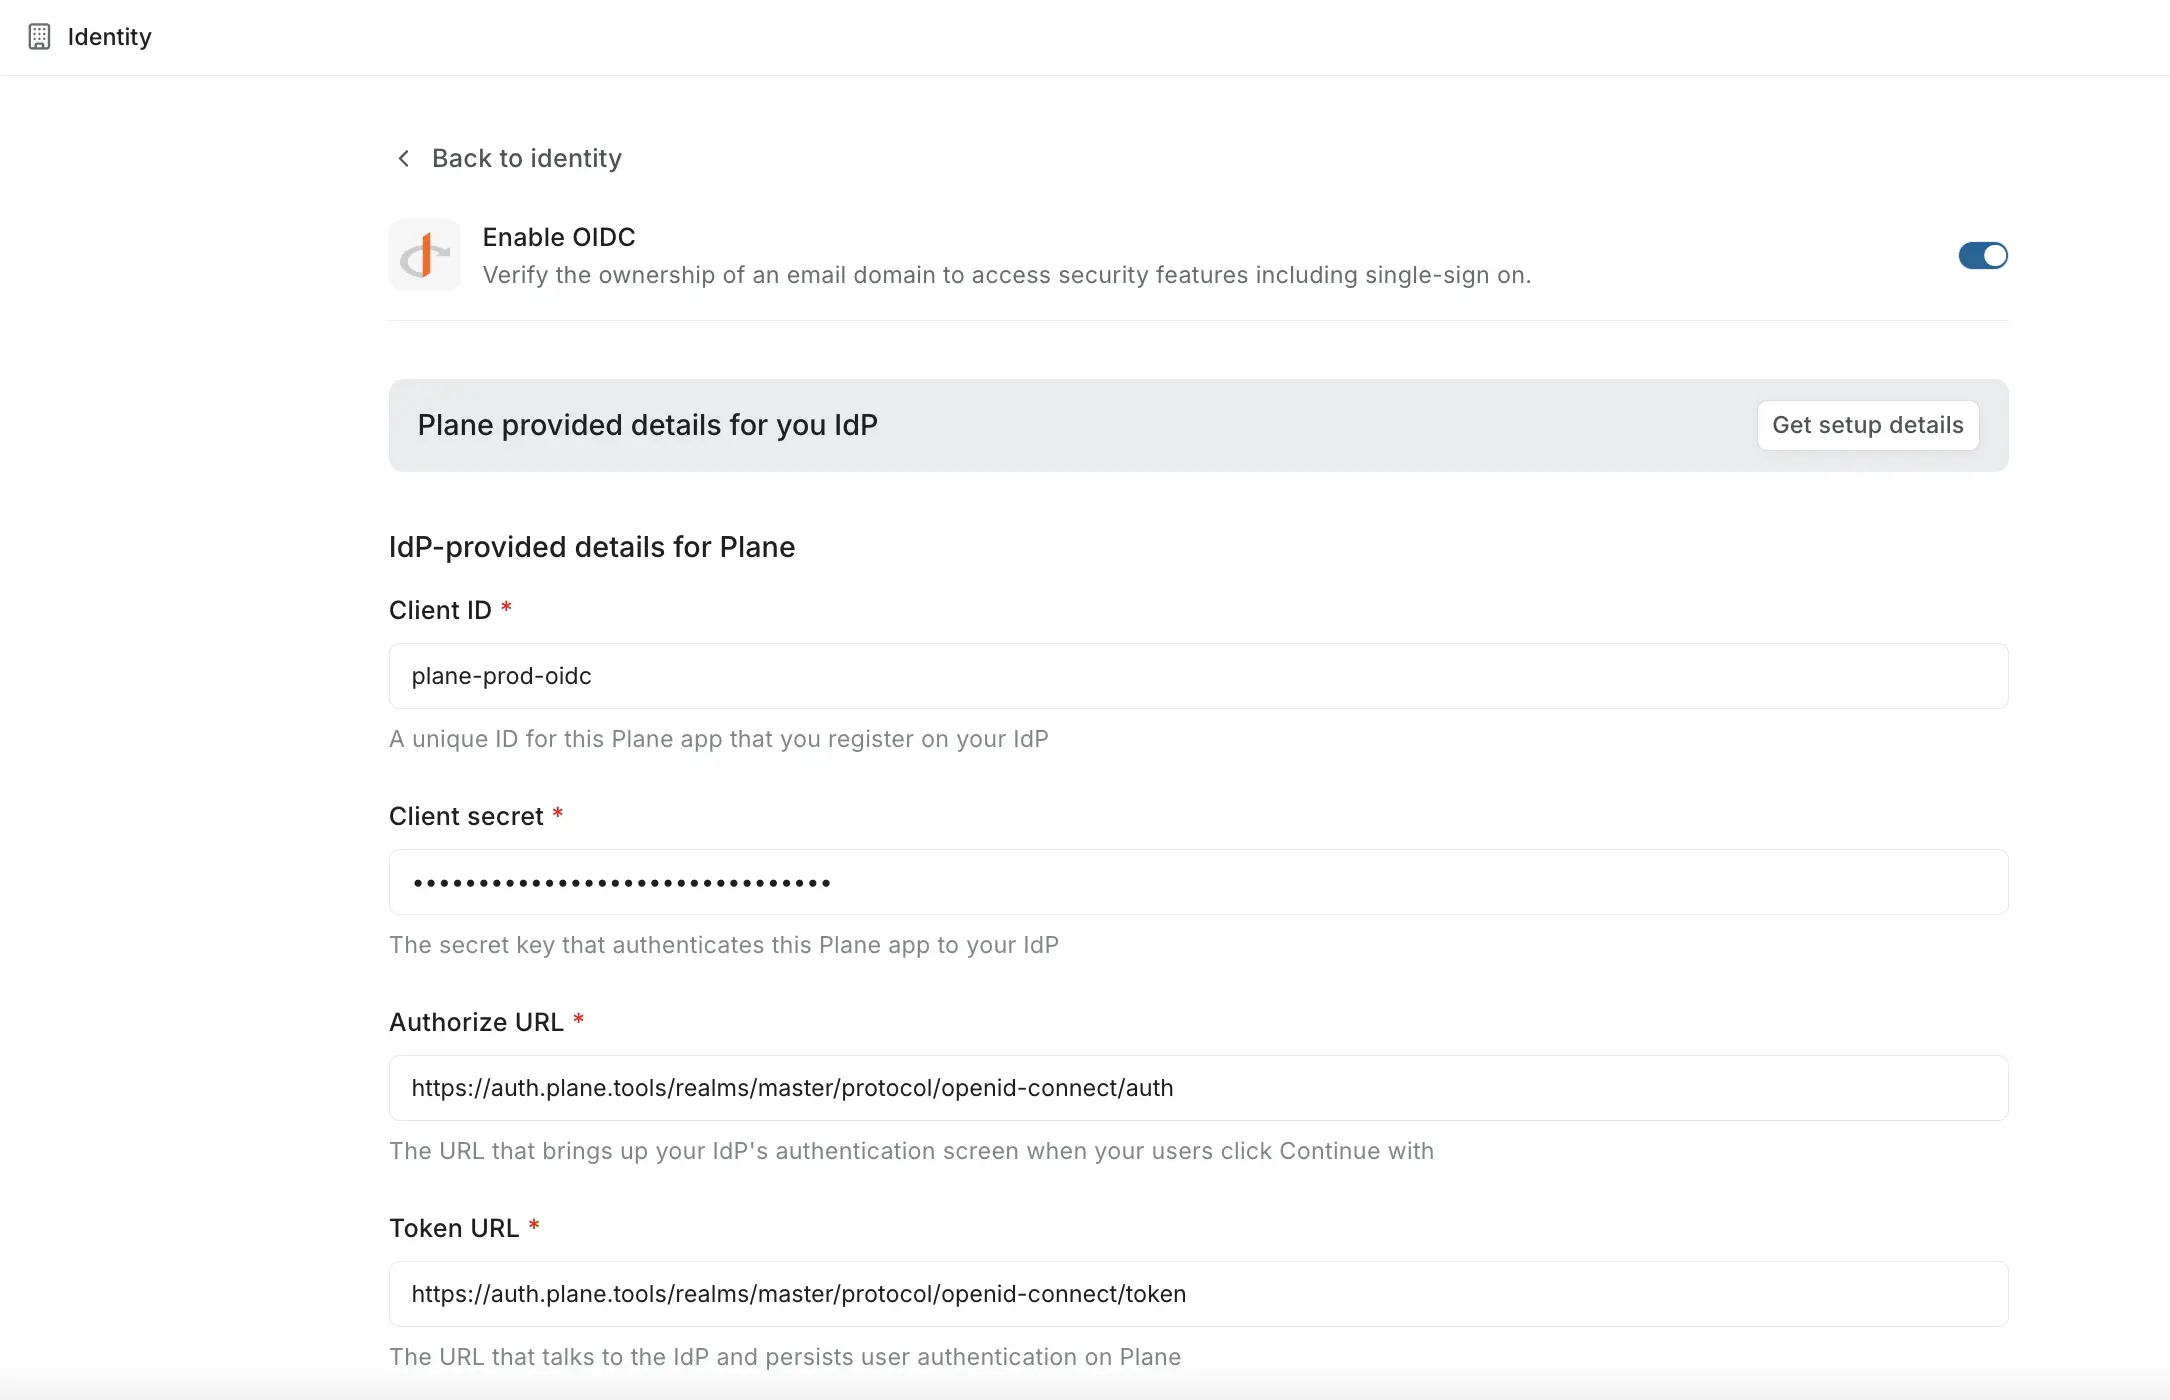
Return to Plane and enter the following details from your identity provider:
Field Description Client ID The application ID from your IdP Client secret The secret key for authentication Authorize URL The endpoint where users see the login screen Token URL The endpoint Plane uses to exchange authorization codes for tokens Users' info URL The endpoint that returns user profile information Logout URL (Optional) Where users go after signing out Click Save changes to activate OIDC authentication.
SAML 2.0
SAML works well with traditional enterprise identity providers like Okta, Azure AD, and on-premise Active Directory.
Get Plane connection details
- Navigate to Workspace Settings → Identity.
- Click Configure next to Enable SAML.
- Click Get setup details and copy these values:
- Entity ID / Audience / Metadata information
- SSO URL
- SLO URL
Create a SAML application in your IdP
- Sign in to your identity provider.
- Create a new SAML 2.0 Application.
- Configure the service provider settings:
- Entity ID / Audience: Paste the Entity ID from Plane.
- ACS URL / SSO URL: Paste the SSO URL from Plane.
- SLO URL: Paste the SLO URL from Plane.
- Configure attribute mapping to send the
emailattribute in the SAML assertion. Optionally mapfirstNameandlastName. - Save and copy your IdP's SAML configuration:
- SSO URL (sign-in endpoint)
- Entity ID
- X.509 Certificate
Configure SAML in Plane
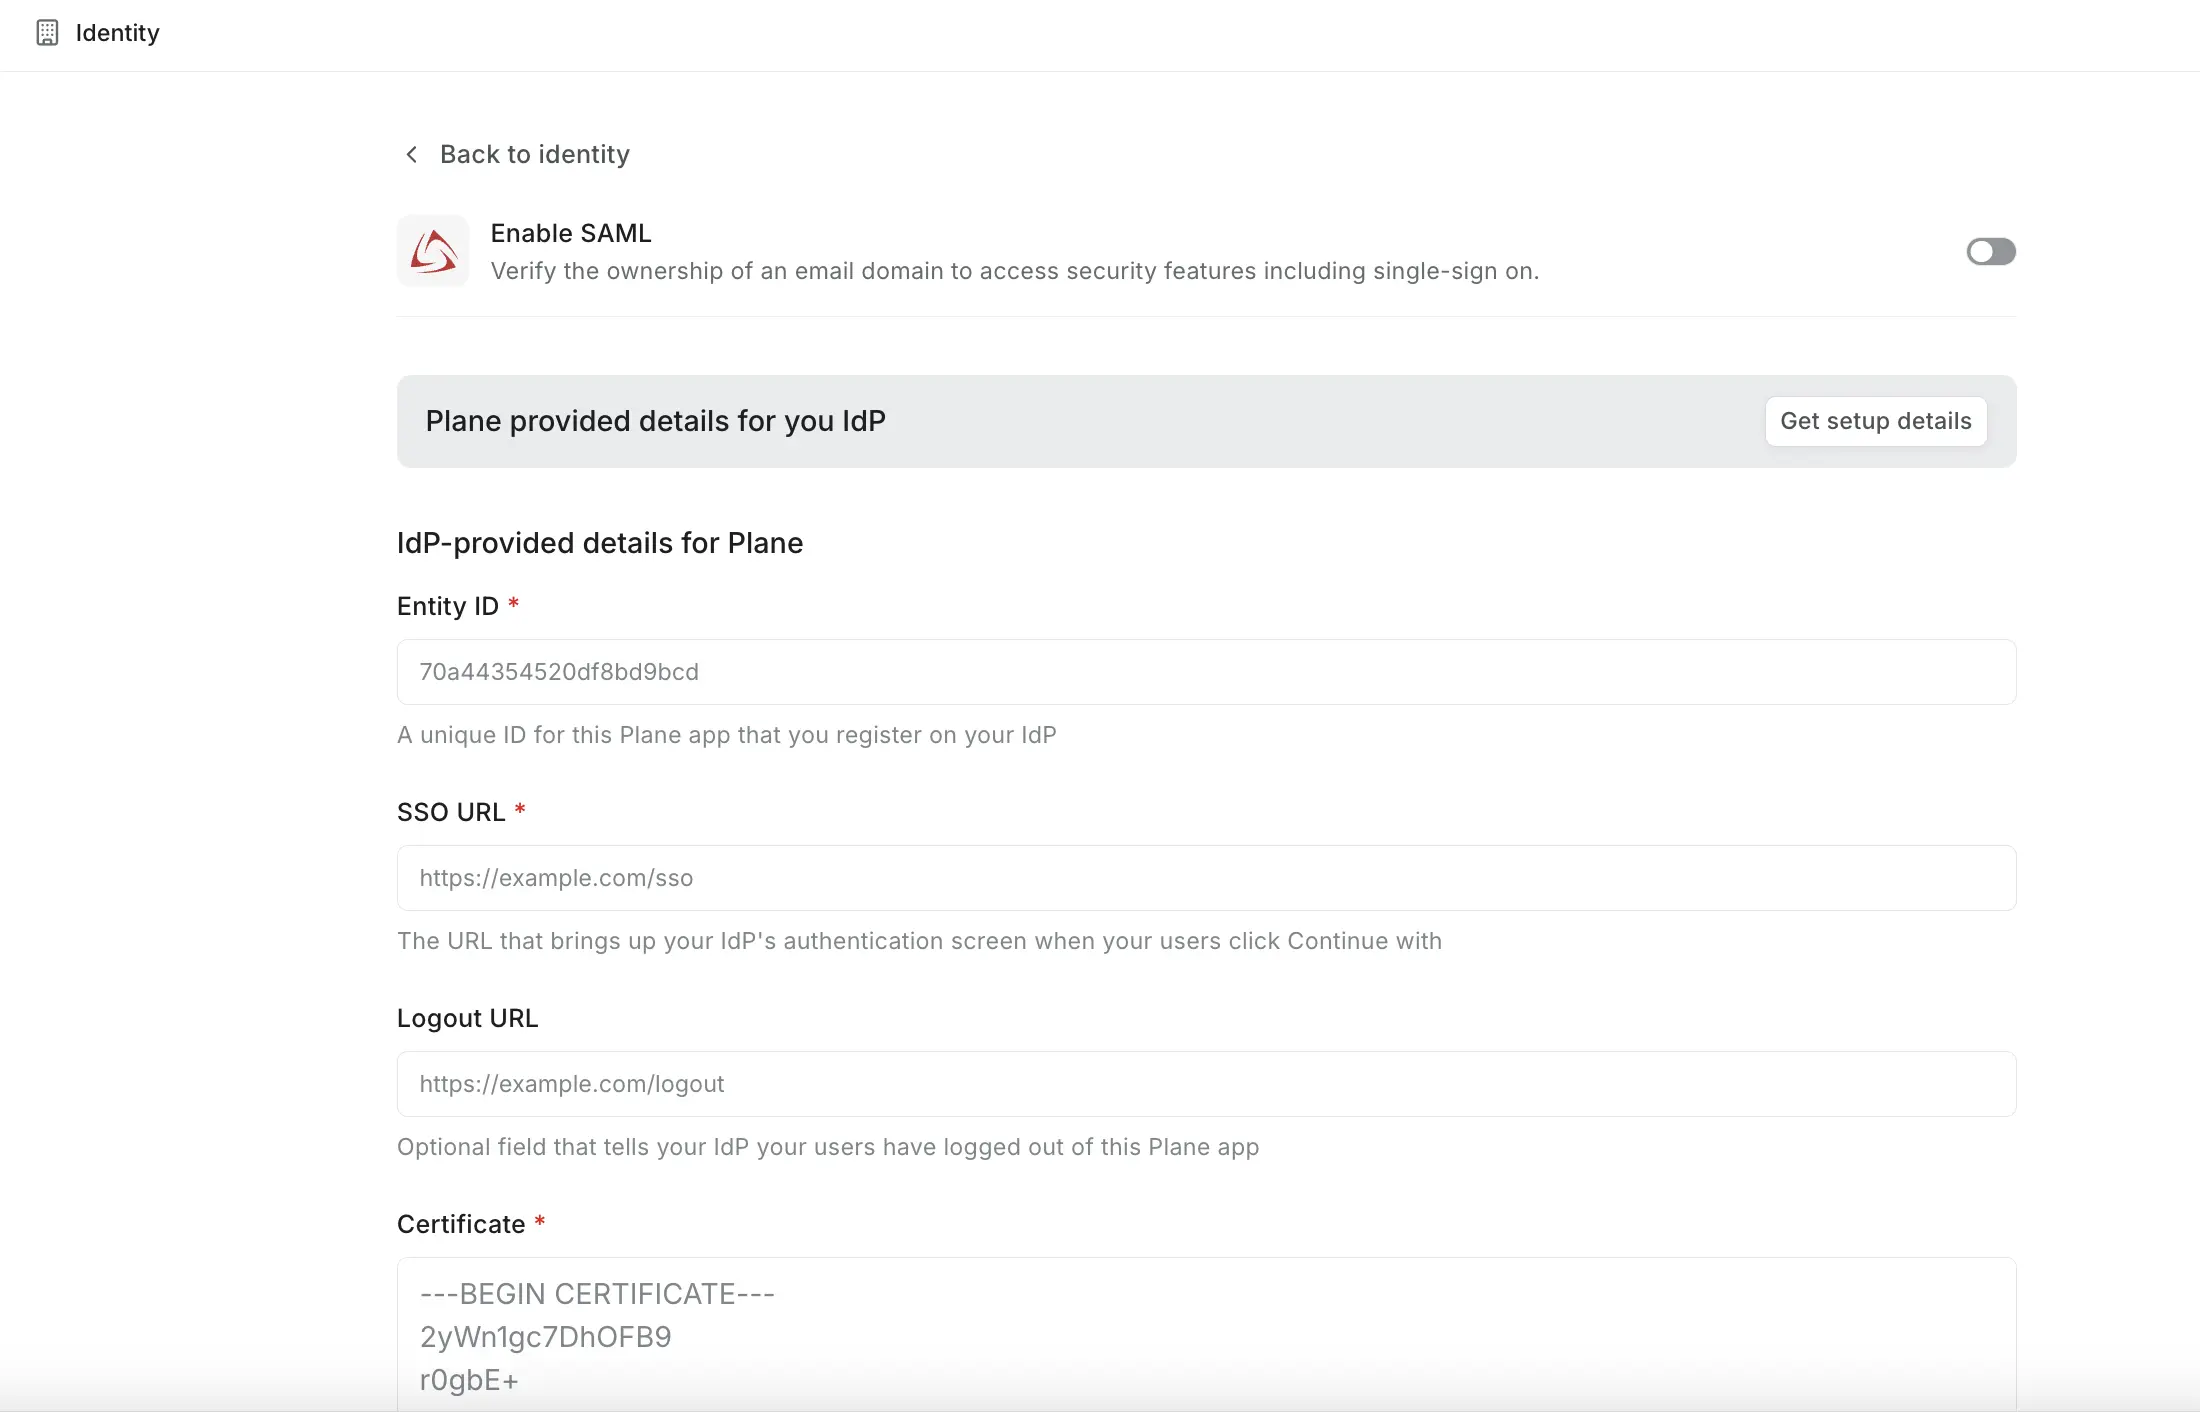
Return to Plane and enter the following details from your identity provider:
Field Description Entity ID Your IdP's unique identifier SSO URL The endpoint where Plane redirects users for authentication Logout URL (Optional) Where users go after signing out Certificate The X.509 certificate from your IdP Click Configure and enable to activate SAML authentication.
How SSO works in Plane
Once SSO is enabled:
When users visit your Plane workspace, they see the Sign in with Single Sign-On button.

Clicking it redirects them to your identity provider.
After authentication, they're signed in to Plane automatically.
Their Plane account is created automatically on first sign-in if it doesn't exist.